13 August 2015 Admin Home page » Middle delta
A complete description of the exercise for raising dumbbells to the sides, starting position, other exercises for the middle delta, execution technique, important rules of execution and visual video lessons.
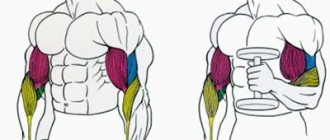
This isolated exercise has the second name of raising dumbbells to the sides (a specific muscle area is involved in the work) for targeted pumping of the middle fascicle of the deltoid muscle. This is not a basic compound exercise, so excessively heavy weights are not needed, otherwise injury will not be far off.
Technique for performing dumbbell swings to the sides
With a powerful movement, move the dumbbells upward to the sides until your elbows are at neck level, making sure that at the top point your forearm is parallel to the floor, and your wrists are at elbow level, neither higher nor lower.
If during the exercise you throw dumbbells through the amplitude of movement and arch your back at the top, reduce the weight, in this case do not think that you took more weight, it means you are progressing, you are breaking the technique, removing the load on your shoulders, and pulling the weight using the trapezius " By loading it, you overstrain the lumbar region and are close to injury.
Choose weights with which the exercise technique is not violated; remember, the main thing is quality, not weight and quantity.
After finishing the exercise, you should feel a slight burning sensation and muscle fatigue, a feeling that the delta has slightly increased in volume, “pumped up”, this means that you are on the right path.
Technique: main rules
To perform swings correctly, proceed as follows:
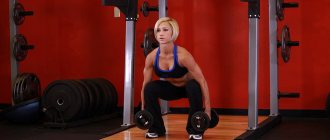
- Stand on a flat surface. Place your feet so that they are slightly wider than your shoulders, with your toes pointing out. Watch your back - it should be straight, slightly bend your torso forward. Bend your arms slightly at the elbow joint and lock them in this position. The average angle is 120 degrees. Do not raise your shoulders - they should be lowered throughout the entire exercise. Squeeze the dumbbells tightly (palms facing your hips). Make sure that they lightly touch your feet (no need to rest on them). Bend your knees slightly to maintain balance as you approach.
- As soon as the starting position is taken, begin moving the dumbbells to the sides. Make sure that your elbows do not move out of position. In the process of lifting a load, the little finger should be turned upward. As soon as the elbow joint has reached the level of the shoulder, you should lock in this position and, together with exhalation, lower your arms down to touch the thigh.
- Pay attention to your breathing. As you lower, smoothly release the air from your lungs, and after touching the dumbbells to your thigh, immediately begin a new cycle. Please note that the return movement of the hands is carried out slowly, with control of the load at each point. At this stage, many people try to bend their elbow joints - you should not do this.
- Try to keep your lower back tense and your torso straight.
The execution technique is correct if during the approach there is a feeling of the middle deltoid, and its stretching at the lowest point is physically felt. The effect is also visible visually - the muscle bundle becomes engorged with blood and begins to stand out from the rest of the groups. To improve the result and work the muscle of a particular arm, alternate execution is allowed. This option is also suitable for beginners who have not mastered the technique.
Rules for performing dumbbell swings to the sides
1) At the beginning of the exercise, be sure to slightly bend your elbows, this will relieve the stress on your elbow joints. However, do not bend too much, otherwise you will take the payload from the side delta.
2) When at the top point, the dumbbells are spread to the side, the elbows should look back, but in no case down. The elbow should be at the same level as the raised dumbbell, not below it.
3) Don’t slouch, no matter when you lift or lower dumbbells, keep your back straight and your chest slightly protruding forward.
4) You can perform cheating and help yourself by lightly swinging your torso and throwing up the weight with your legs, but this should only be done in the last 2-3 repetitions and in the last 1-2 sets of raising dumbbells to the sides.
5) Lower the dumbbells in front near the groin, and not on the sides of the body, this will stretch the side deltoids more strongly. When the dumbbells have dropped down, do not let them hit each other, this removes the load and sets the initial movement due to the dumbbells bouncing off each other, and you need not how easier, but how best to load the middle bundle of the deltoid muscle.
6) When raising the dumbbells, they should be strictly to the sides, do not push your arms forward, it’s easier to do this, but the load also goes from the middle section of the shoulder to the front deltoid.
7) It is necessary to lift the dumbbells slightly above the shoulders, if below the load the shoulders will not receive the full load, if above the trapezius will take part of the load.
Why Shoulders Are Often Injured?
In fact, dumbbell flyes are rarely a cause of injury unless the technique is truly horrendous. Some athletes may throw weights toward their heads, raise their arms too high, swing aggressively, and rotate their arms backward at the shoulders during the movement. They run a serious risk, but not of muscle tears, as is commonly believed, but of sprained ligaments and subsequent inflammatory processes.
The problem with shoulders is that they are loaded not only in sports, but also in everyday life. We sit a lot, raising our shoulders and overstraining our trapezius, we carry bags on one shoulder for a long time, stretching one half of our body and involuntarily shortening the other, and we often do sharp lifts of our arms without warming up. This leads to overload of the joints.
Let's say a person has never trained. He comes to the gym and starts doing bench presses, bench presses, sitting, standing, and a couple more presses, but this time with dumbbells. All of them work the deltoids and involve the joint. It is enough to overwork and make an awkward movement and you can get a tear or sprain. Ironically, injury occurs on the last exercise most often, and it's not just any heavy bench press, but a standing isolation dumbbell swing or a cable raise. The reason here is not the movement itself, but the overload of the joint.
For beginners, it is not recommended to do more than 2-3 bench press exercises in one workout. If there are too many exercises, it is better to leave abductions or swings for a light session, and not do them when the body has already received sufficient load. Ideally, the workout should include 1 heavy press, 1 assisted press, and 1 bench or standing abduction. Only then will the volume be adequate.
Anatomical features are also of great importance. If the trapezius is overdeveloped, the athlete will not be able to perform the movement using the shoulders alone. This must be taken into account when choosing weights and start literally with 2-3 kg.
Injuries are often accompanied by inflammation, which is not localized, but spreads throughout the muscle bundle. They often affect the nerves, which increases the pain. Shoulder injuries should be diagnosed by a doctor. Home treatment based on guesswork will not lead to anything good.
Exercises for the middle delta
1) Barbell overhead press
2) Seated dumbbell press
3) Raising arms to the sides in the simulator
4) Retraction of the arm to the side on the lower block
5) Swing dumbbells to the side while lying down
Useful tips
When performing swings, it is worth considering a number of tips:
- Choose your working weight wisely. If you increase the load, then the upper back (trapezius) gets involved in the work. We have already mentioned that in such a situation the back takes the main load, and the deltoids are left out of work. Also, excessive weight forces you to bend your elbow more than the required 120 degrees, which automatically reduces the training result (leverage effect in action).
- The upper position of the arms is parallel to the floor. If you lift it higher, the trapezius comes into play and the shoulders are unloaded. That is why the span of the “wings” should be controlled.
- Don't limit yourself to just swings. Beginners believe that raising dumbbells to the sides is enough to work the muscle. This is mistake. To speed up the “rounding” of the deltas, the training program should be supplemented with two presses - sitting and standing, as well as an exercise for the back of the shoulders. With this approach, the deltoid muscle is worked faster and deeper.
- Include block work in the program. To “sharpen” your technique or eliminate unnecessary movements, it is worth working on such a projectile. The technique is simple. In your right hand, take the handle of the lower block located on the left side, and in your left hand take the handle located on the right. At the first moment, the hands are crossed with each other, but later the technique does not differ from the “dumbbell”. Alternate execution is allowed for each of the hands separately.
- Remember the importance of proper breathing. There are two advantages here - obtaining additional energy for lifting, better fixation of the back in a straightened form. The chest, which is filled with air, is a reliable support for the spinal column.
- If, when performing an exercise, the body spontaneously pulls forward, then the weight is heavy and you should take lighter dumbbells. The second likely problem is excessive bending of the elbow joint. Make sure that your arms are spread to the sides and that the original bend angle does not change.
- From time to time, “shock” muscle groups with excessive weight. To do this, take dumbbells 15-20% more than usual. Limit the lifting of the load to 40-45 degrees. For such a “shock” it is allowed to allocate one training session per month.
We pump up our shoulders with dumbbell flyes: the correct technique and the main mistakes
In this article, we will look at the 7 main mistakes when performing dumbbell lateral swings while standing and how to correct them in order to improve the growth of the middle deltoid muscle.
- Core muscles: middle deltoid
- Additional - rear delta and trapezius
- Difficulty: medium
You may ask, what can go wrong when performing standing dumbbell swings on the middle part of the deltoids? The answer is, unfortunately, there is a lot you can do with the exercise, which is also called the standing dumbbell lateral raise. Next, you will see 7 common mistakes in the dumbbell swing exercise and tips on the correct technique.
The main goal of this article is to teach you how to properly swing dumbbells to the sides while standing, so that you can develop your shoulders and make them as wide as possible.
Developed deltoids (shoulders) are an important element for every athlete due to the fact that they just show you wider from the side, clearly emphasize the upper part of the arm and also let others know how serious you are in your business. And the best exercise for creating shoulder width is the standing dumbbell swing.
note
For many gym-goers, the overhead press is the primary foundation exercise for training the shoulders. Yes, it works, but the dumbbell lateral raise exercise is one of the best for isolated work on the middle deltoids.
Well, probably enough theory and let’s start practicing the exercise of swinging dumbbells to the sides. Let's look at these 7 mistakes one by one.
Treatment of hypertension, benefits for the heart and liver
✅ This exercise, with regular and sufficiently intense practice (from 20 to 30 minutes per workout), can work wonders, as it completely restores blood circulation and energy throughout the arms - from fingertips to shoulders.
Anatomically, the arms are very closely interconnected with the chest, and therefore with all the internal organs that are located in it. The palms and fingers are the endings through which energy exchange occurs between the chest and the external environment. For example: the colon canal passes through the index finger; through the thumb - the lung channel; through the middle finger - the pericardial canal, which regulates vascular tone; through the ring finger - the channel of three “heaters”, regulating the process of heat regulation of the whole body; The channels of the heart and small intestine pass through the little finger.
Healing exercise “Arm swings”
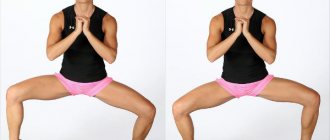
1. Stand straight with your feet shoulder-width apart, parallel to each other.
2. Lower your arms freely along your body, bending your fingers slightly.
3. Close your eyes and, letting your attention fly freely, wait for relaxation.
4. Distribute your weight evenly between your feet.
Subscribe to our INSTAGRAM account!
5. Ensure that each foot rests evenly on the support with your heels, balls of your feet and toes.
6. Feel how your feet are comfortably pulled towards the ground, down.
7. Relax your knees, avoiding rigid fixation.
8. Bring your sacrum forward and slightly tuck your lower abdomen just above your pubis.
9. Feel the tailbone being pulled down.
10. Lightly press the anus, perineum and genital area.
11. Lower your shoulders and straighten them, rounding the armpit area.
12. Gently tuck the center of the sternum and shoulder blade, flattening the rib cage.
13. Without lowering your head, tuck your chin slightly towards your neck. You can feel how the point at the base of the skull is comfortably pulled back, straightening the cervical arch of the spine.
14. Place the tip of your tongue comfortably against the roof of your mouth just behind your front teeth.
15. Feel the top of your head being comfortably pulled up.
16. Simultaneously feel two opposing forces, one of which is pulling the top of the head up, and the other is pulling the perineum (the area between the anus and the genitals) down. The crown and crotch should be on the same line.
17. Open your eyes and slightly defocus your vision.
18. Maintaining a comfortable feeling of tension on the top of the head and perineum, begin to swing your relaxed straight arms forward to a horizontal position, palms down, and back as far as possible, palms up.
Although you swing your arms straight, do not allow them to be rigidly fixed in the elbow joint, keeping your elbows slightly bent.
19. During the swing, the whole body should be relaxed and the shoulders should be lowered.
20. Continue swinging your arms comfortably for at least 10 minutes, gradually increasing them through regular practice to 30 minutes per workout.
Subscribe to our Yandex Zen channel!
21. While swinging, keep your main attention on your hands.
22. When you feel that you have had enough of waving your arms, stop and raise your straight arms up parallel to each other, so that your palms are facing each other and your comfortably straight fingers are facing up. Stay in this position for 3 - 5 minutes.
23. Lower your arms freely along your body and, closing your eyes, unobtrusively focus on your bodily sensations until they merge into a single, homogeneous bodily background.
24. Open your eyes. Stretch. Shake yourself up.
The described exercise, with regular and sufficiently intense practice (from 20 to 30 minutes per workout), can work wonders, as it completely restores blood circulation and energy throughout the arms - from the fingertips to the shoulders.
Regular long-term practice of this exercise cures high blood pressure, heals diseases of the nervous system, heart and liver. And with due diligence, it can make lymph cancer, lung cancer and esophageal cancer recede (of course, this is individual).
Understanding that something as simple as waving your arms can be so effective is something that you can only overcome your skepticism through long-term and regular practice.
Our hands keep many secrets, practically using which we can very effectively restore strength, normalize blood pressure and brain function, recover from various diseases, enter deeply altered states of consciousness, etc.
Subscribe to our VIBER channel!
In addition to the fact that the hands are closely connected with the chest area, they are no less closely connected with the brain and the processes occurring in it. And this makes it possible, through conscious manipulation of the hands, to control the functioning of the brain without any equipment or expensive pills. It is not for nothing that all the peoples of the world attributed miraculous, incredibly effective power to certain finger combinations and special positions of the palms. Published by econet.ru.
The materials are for informational purposes only. Remember, self-medication is life-threatening; be sure to consult a doctor for advice.
author Vadim Ufimtsev “The Art of Effective Self-Healing”
on the topic of the article here
PS And remember, just by changing your consciousness, we are changing the world together! © econet
econet.ru
Exercises for the shoulder girdle and arms
December 3, 2015
Stretching exercises
Hand circling
Rice. 1 Large circular movements with hands
Exercise 1 (Fig. 1). Starting position: basic stance - feet shoulder-width apart, arms down along the body. Large forward circles with your arms and then large backward circles with your arms. Perform for 20-30 s.
Rice. 2 Small circular movements with hands
Exercise 2 (Fig. 2). Starting position: standing, feet shoulder-width apart, arms to the sides. Small circular movements on the side of the body: first forward, then back.
Perform for 20-30 s.
Rice. 3 Circular movements with straight arms
Exercise 3 (Fig. 3). Starting position: main stance. Circular movements with straight arms in front of the body: first forward, then back. Perform for 10–15 seconds in each direction.
Swing your arms
Rice. 4 Swing your arms
Exercise 1 (Fig. 4). Starting position: main stance. Swing your right hand forward-up-back, with your left hand down-back. Swing your left hand forward-up-back, with your right hand down-back. Swings are performed with maximum amplitude, with straight arms for 15–20 s.
Rice. 5 Arm swing
Exercise 2 (Fig. 5). Starting position: main stance. Rocking relaxed arms with active assistance from the torso. The right hand is forward and upward, the left hand is upward and backward, to the starting position. Left hand forward and up, right hand up and back. To the starting position. The exercise is performed for 15–20 s.
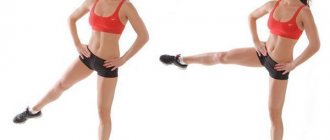
Rice. 6 Swing your arms up and to the side
Exercise 3 (Fig. 6). Starting position: main stance. Swing your right hand up and to the side (over your head), with your left hand down and to the side (behind your back) with the torso tilted to the right. To the starting position.
Swing your left hand up and to the side (over your head), with your right hand down and to the side (behind your back) with the torso tilted to the left. To the starting position. The exercise is performed 10–15 times.
Rice. 7 Arm swings with torso rotation
Exercise 4 (Fig. 7). Starting position: standing, leaning forward, arms to the sides. Swing your arms to the right with a twist of your torso. To the starting position. Swing your arms to the left with a twist of your torso. To the starting position. Repeat the exercise 10–12 times.
Abduction of arms
Rice. 8 Arm abduction
Exercise 1 (Fig. 8).
Starting position: standing, feet shoulder-width apart, arms brought to the chest. Move your arms to the side, take a deep breath. To the starting position - exhale. Repeat the exercise 10–12 times.
Rice. 9 Retraction of arms back and up
Exercise 2 (Fig. 9). Starting position: basic stance, partner holding the wrist from behind. Maximum abduction of the arms back and up. To the starting position. Repeat the exercise 8–10 times.
Rice. 10 Abduction of arms with deflection
Exercise 3 (Fig. 10). Starting position: main stance.
Move your arms up and back, bend over. To the starting position. Repeat the exercise 8–10 times.
Rice. 11 Arm abduction in the lock
Exercise 4 (Fig. 11). Starting position: standing, arms straight up, in the lock. The partner is behind, the right hand is on the hands of the person performing the exercise, the left rests on the back. Move your arms up and back as far as possible with the active help of your partner, bend over. To the starting position. Repeat the exercise 6-8 times at a slow pace.
Rice. 12 Retraction of arms back and up
Exercise 5 (Fig. 12).
Starting position: main stance. Move your arms straight back and up. Return to starting position. Perform at a slow pace with maximum abduction 6–10 times.
Rice. 13 Pulling the arms back and up with the help of a partner
Exercise 6 (Fig. 13). Starting position: standing, leaning forward, hands behind in the “lock”. The partner is on the side with his palm on his neck. Maximum abduction of the arms back and up with the active help of a partner. Return to starting position. Perform at a slow pace 6–10 times.
Strength exercises
Rice. 14 Pull-ups by bending your arms
Exercise 1 (Fig. 14). Starting position: hanging on the bar, medium grip. Pull up by bending your arms. Return to starting position. Perform 8–10 times.
Rice. 15 Push-ups
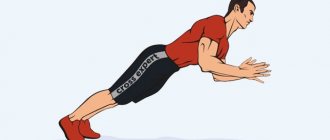
Exercise 2 (Fig. 15). Starting position: lying down, face down. Do push-ups with your arms straight. Return to starting position. Perform 10–12 times.
Rice. 16 Push-ups
Exercise 3 (Fig. 16). Starting position: lying on your back, support. Straighten your arms, do push-ups.
Return to starting position. Perform 6–8 times.
Rice. 17 Handstand
Exercise 4 (Fig. 17). Starting position: handstand, partner holding straight legs. Bend your arms and lower yourself down. Return to starting position. Perform 6–8 times.
Rice. 18 Bending and extending the arms, overcoming the partner’s resistance
Exercise 5 (Fig. 18). Starting position: standing, one leg bent at the knee, forward, the other straight - back, arms extended forward to meet the partner’s arms. Flexion and extension of the arms. Overcome your partner's resistance for 20–30 seconds.
Rice. 19 Raising hands, overcoming resistance from a partner
Exercise 6 (Fig. 19). Starting position: standing, feet shoulder-width apart, arms to the sides. Your partner is behind you, holding your wrists. Raise your hands up, overcoming your partner's resistance. Return to starting position. Repeat the exercise 6–10 times.
Source: Tennis for everyone, authors V. L. Gorokhovsky, V. E. Romanovsky
tennis74.ru