Share:
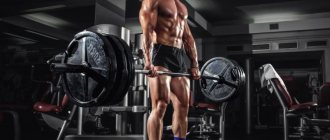
What you need
- barbell
There are exercises that are used within one sport, and there are universal exercises. For example, such as rowing a barbell to the belt. Despite its original origins in weightlifting, it firmly established itself first in bodybuilding, and then moved into other areas of athleticism.
Interesting fact: initially, bent over rows were used exclusively in a snatch style, which increased the risk of injury. Its task was not to build back muscles, but to help overcome the lower phase of the movement.
Purpose of the exercise
Bent-over barbell rows are the second most popular exercise for training the back muscles after classic pull-ups. This was facilitated by:
- multi-joint;
- possibility of slight differentiation of loads;
- excellent workout of most back muscles;
- and, most importantly, indispensability.
If you can get by with improvised means when training your arms, legs and shoulder girdle, then for the development of truly impressive latissimus dorsi muscles there is nothing that can compare with bent-over rows in terms of effectiveness.
Bent-over barbell row exercise options
The exercise is performed in the following variations:
- straight grip;
- reverse grip;
- different grip.
When performing the exercise with a direct grip, a good load on the latissimus muscles is provided, but for many, especially beginners, it is very difficult to maintain the correct trajectory of movement.
With a reverse grip, it is easier to maintain the trajectory, this is a more comfortable position, however, with it the biceps is included in the work and the ligaments are heavily loaded.
When performing the exercise with a different grip, better retention of the bar is ensured when choosing a very heavy weight.
Tips for beginners
We hasten to disappoint everyone who wants to add this exercise to their basic program. Despite its high efficiency and the type of sport (crossfit or bodybuilding), you will have to put the barbell aside for at least 2-3 months from the start of classes.
Why? There are several main reasons why it is not recommended to use deadlifts and bent-over rows in the first months.
Reason 1
Unfortunately, without preliminary training, the muscles of the human back are unevenly developed relative to the central axis. For some, the right side prevails, for others, the left. This means that when trying to lift even a light weight, the strong side of the back will eat up most of the load, which, in turn, leads to spinal deformation.
Solution: For the first months, while in the gym, work out with your own weight and on machines, paying attention to small weights with maximum muscle development. This will allow you to develop a more stable and evenly developed muscle corset.
Reason 2
Insufficient development of the muscular corset. Deadlifts and rows require the use of a huge range of muscles, including the psoas. With insufficient development of this department, there is a high probability of injury (including protrusions and hernias).
Solution: Hyperextension and abdominal exercises. At the same time, it is important to understand that if you work hard on your abs, then you need to pay the same attention to the lumbar region, because these muscles compensate for each other, being the main core of the spine.
Reason 3
Specific technique. For those who have never picked up a heavy barbell before, they cannot understand how difficult it is to keep track of all the little details on which the effectiveness of the exercise depends. Starting from the position of the knees, hips and ending with the ability to pull with the elbows, not the biceps, while keeping the back in a deflection. And this is not a complete list of nuances that reduce the risk of injury and increase efficiency.
Solution: in the first months, practice exclusively with an empty bar to develop technique, leaving this exercise after the main ones in the program.
After completing basic training (which is usually 2 months of training), you can grab the barbell and use your back 200%.
Note: Regardless of your past successes, in the first days it is better to perform the exercise without a safety belt and under the supervision of a trainer.
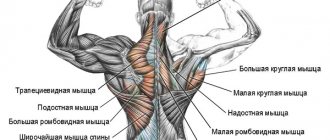
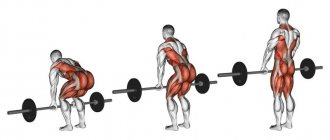
Muscles involved
Bent-over barbell rows involve almost all muscles, from the back muscles to the back of the thigh (see table).
So, what muscle groups are worked by the waist row?
| Group | Phase | Accent |
| Latissimus, teres major, posterior deltoid | Active phase of lifting and holding with a belt | Main muscle group |
| Rhomboid back muscles | When bringing the shoulder blades back at the top point | Accessory muscles, relatively light load |
| Carpal muscles | Holding the bar | Static load |
| Arm flexor muscles (biceps) | During the active phase | With the correct technique or use of straps, the accent is practically leveled |
| Trapezoidal | Responsible for the correct position of the shoulders during the approach | Light load, requires additional work |
| Lumbar | Throughout the entire exercise. Allows you to maintain balance | Stabilizer muscles. High dynamic load |
| Abdominal muscles | Throughout the entire exercise. Allows you to maintain balance | Stabilizer muscles. Static load |
| Posterior thigh | In the lower phase of the movement, they actively participate in small vibrations of the body | Relatively light load |
| Calf | Due to the tilt of the body, the gastrocnemius and soleus muscles are responsible for holding the increased weight. | Static load |
| Obliques | Throughout the entire exercise. Allows you to maintain balance | Stabilizer muscles. Static load |
| Core | Throughout the entire exercise. Allows you to maintain balance | Stabilizer muscles. Static load |
As you can see, this is a basic multi-joint exercise that uses almost all muscle groups. Moreover, during the approach you need to control almost each of them. This determines the complexity of bent-over rows with a barbell and its effectiveness. Even classic pull-ups place less load on the back muscles, since the load on the stabilizer muscles and lower back muscles is almost completely absent.
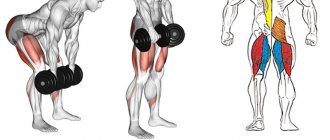
What exercises replace barbell rows?
The classic barbell row can replace a whole range of different exercises, namely:
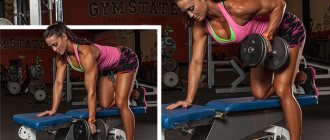
- dumbbell row to the belt;
- horizontal thrust of the lower block;
- various horizontal rows in simulators.
The bent-over barbell row is the most important exercise for working on the thickness of the back. It is by practicing this movement with decent weight and proper technique that will develop the depth of your muscles.
Pull-ups and vertical rows on blocks, in turn, work on the width of the back. Therefore, exercises from both groups should be included in the training complex so that the back develops harmoniously. And don’t forget about deadlifts and hyperextensions.
© Nicholas Piccillo — stock.adobe.com
What's next?
Well, ok, you grabbed the bar (with a grip shoulder-width apart or a little wider, for convenience, so that you feel comfortable doing the exercise), leaned forward (leaned your torso, making the necessary comfortable bend, as shown in the picture above), if you did all this , you are in this position (see photo below):
Bent-over barbell row (lowest point)
Please note (the bar is located just below your knees).
So, from this position (it is constant, i.e. the torso remains motionless during the exercise), you need to pull the barbell towards you (pull it to the lower abdomen).
At the same time (when you pull), keep your elbows close to the body (and not to the side, as some people mistakenly do), when you have pulled the barbell to the lower abdomen (well, you are already in the upper position), squeeze your back muscles (bring your shoulder blades together) , it is very important!!!
Bent-over barbell row (top point)
That’s actually all... this is how we perform the exercise (here here there here), i.e. pulled to the lower abdomen, lowered down (just below the knees) and again pulled to the lower abdomen and lowered again, etc. until you complete the planned number of repetitions.
This whole movement clearly looks like this: (gif. Picture)
For men:
Bent-over barbell row (full motion)
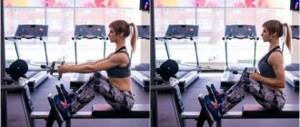
Among women:
Bent-over barbell row (full movement) for girls
What to combine with?
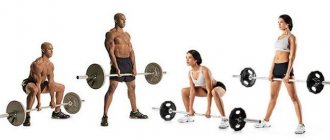
This basic exercise can be used exclusively for warming up, and by professionals of average and high levels of training. Let's look at CrossFit training complexes with which you can use deadlifts:
| Program | Exercises |
“Circular” program |
|
| Diana (pro) |
|
| Fran (pro) |
|
As you can see, most of the training complexes are aimed exclusively at athletes with a high level of training. Classes are aimed at improving strength performance and strength endurance. Fran's program is aimed at developing explosive strength. Therefore, for safety it is better to use a safety belt.
Execution technique
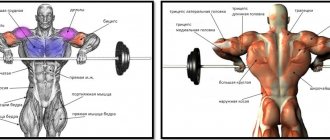
How to properly pull a barbell to your belt? Most visitors to fitness clubs do it incorrectly, bending low enough, which leads to a small range of motion and working only the trapezius (as with shrugs). The correct technique is as follows:
- Place the projectile on the fixing posts. Only after this can it be loaded.
- Approach the bar, grab the bar with an overhand grip, and remove it from the rack. Your arms should be parallel to each other and shoulder-width apart. Not narrower, not wider, since in this case the load on the back muscles is significantly weakened.
- Bend your legs slightly at the knees and fix them.
- Bend your lower back and hold it throughout the entire exercise.
- The head should look strictly at the mirror (i.e. in front of you). This will allow you to control the exercise technique; in addition, the presence of load on the trapezius depends on it.
- Bend over so that your torso is slightly above parallel to the floor, no more than 30 degrees from it.
- Slowly raise the barbell. The main movement should be done with your elbows. This is the only way to turn off “weak” arms as much as possible and turn on a “strong” back. The use of straps is allowed.
- Lift up to your waist, squeezing your shoulder blades back. Your elbows should be higher than your back, try to move them as far as possible.
- Hold for 1 second.
- Slowly lower the barbell towards your outstretched arms. Stretch your lats as much as possible and do a new rep. Do not forget that your knees and lower back must be fixed throughout the entire exercise. Body movements are also not allowed.
You can clearly see how you can correctly pull a barbell to your belt in the video:
Straight grip
The overhand grip technique allows for the use of straps or working with small weights with the lock open (the thumb is not opposed to the rest).
The main goal is to disable the flexor muscles (biceps) as much as possible. This is not easy for beginners; many still perform most of the movement with their hands. A reverse grip can help here.
Reverse grip
In this version, the bar is taken with a grip away from you. Can be done with a narrower grip than with a straight one. In which option you will feel your biceps less is a purely individual thing, you need to try both and choose for yourself the one that puts the maximum load on the back muscles.
T-Grif
This is a type of barbell row that uses a T-shaped bar with one side attached to the floor. There is a variation in which the athlete stands in a machine with a T-bar with chest support. The main advantage here is the ability to isolate many muscle masses, in particular, the legs and abs are turned off, since it is not necessary to maintain the body in one state.
The main feature of the technique is the need to use a neutral grip when the hands are facing each other, and the use of a T-bar allows you to shock the muscles with a new amplitude.
Key technical points that you should pay special attention to:
1. Throughout the entire movement, keep your back straight (arched in the lower back), almost parallel to the floor (as Ronnie Coleman did, I showed the photo) or if you are already working with weights (then slightly above parallel, so as not to ruin your lower back).
2. Don’t forget that your knees are slightly bent (they are not straight; with straight legs, your back will round, and this is unacceptable).
3. While performing the exercise (bent over row), look straight ahead (in front of you), if you look down, your back will immediately round and you can get injured (in the worst case), in the best case (you’ll be lucky, you won’t get injured, but the back muscles will not receive the proper load, as they could with a proper back).
4. At the top point (when you pulled the weight to your stomach), squeeze your shoulder blades (required) so that your back muscles engage.
5. When you pull the barbell (to the top point) i.e. to the lower abdomen, try, firstly, to pull the bar (barbell) along your legs to the lower abdomen and at the same time (secondly), try to keep your elbows closer to the body, i.e. do not move them to the side, closer to the body.
6. When you already use decent weights, I recommend using straps (in order to hold this same weight), the trick is that our cysts are much weaker than the back or biceps, therefore, why not help them? Use it! See below (how to wrap the straps around the bar):
Instructions on how to wrap straps around a barbell
7. Breathing as always (i.e. exhale with effort).
8. Work without stopping (some recommend pausing at the top and bottom points in order to stretch and contract the muscles, in principle you can try, feel how it will be more comfortable for you, how the muscles contract, etc.), but for me it’s more convenient work without pause.
9. At the lowest point of the range of motion (when you are leaning closer to the horizontal, or standing somewhere at 30 degrees, in general, you are in the starting position and preparing to pull the bar to your lower abdomen) make sure that your arms do not straighten at the lowest point to end!!
This is very important, i.e. The arms are slightly bent at the elbows, your arms should not be stupidly straight (otherwise the weight will hang on your arms), therefore, the elbows are slightly bent so that the load remains in the muscles.
10. There is an opinion that the classic bent-over barbell row is a little worse (or even much worse) than the reverse-grip bent-over barbell row. I think this opinion is not entirely correct... now I will explain everything.
The fact is that a direct grip forces the athlete to spread his elbows wide and pull the barbell to the chest, and not to the lower abdomen (as needed). Yes, yes, yes <= I see this error very often among most people (even more advanced ones).
Actually, because of this, the latissimus muscles practically do not work (or do not receive the additional load that they could receive), but with a reverse grip = it is more convenient for you to do the exercise, you simply aim there (as in a Smith machine) pull towards lower abdomen.. (ps I don’t know how to explain).
But, friends, in my opinion, this opinion is partially correct... because those people (athletes) who perform the exercise correctly (with the correct technique, i.e. pull to the lower abdomen, and not to the chest + bring their shoulder blades together) have very The latissimus dorsi muscles work well, but those people (who do it with the wrong technique, i.e. they pull closer to the chest and load the deltoids) their back does not work.. Well, who is their doctor? .. It's their fault, not the exercises. Learn to perform the exercise correctly before drawing any conclusions.
11. In connection with the paragraph just above (about the classic and reverse grip), you can try to combine both grips (in order to understand what is more comfortable for you and better in terms of the feeling of contraction), for example, do 2 approaches with a classic grip (regular , i.e. direct), and the next 2 approaches in reverse. This is just an example.
12. Until you master the correct technique for performing this exercise and develop the overall muscular framework of your back (strengthen your back extensors), don’t even touch heavy weights.
A small digression: I strongly recommend that you familiarize yourself with my books:
Precautions
No matter what training and athletic form an athlete has, a certain number of precautions must be followed:
- Always use a safety harness when lifting more than your own weight. If the goal is to pump up the muscles of the lumbar region, it is better to use hyperextension with additional weights.
- Never perform an exercise in a snatch style, despite the fact that it seems easier to lift the barbell in the lower phase.
- Even if you are in the waist, still arch your lower back and maintain the correct angle.
Common Mistakes
Most beginning athletes make the following mistakes when performing deadlifts:
- move their legs and head when this is not allowed;
- are unsteady on their feet - in order for the position to be stable, it is necessary to place the feet in the area of the shoulders;
- choose the wrong grip width when the distance between the hands should be slightly wider than the shoulders;
- they bend the lower back excessively, which leads to negative consequences, in order to avoid such a typical mistake you need to perform this technique - during deadlifts, try to lift your chest and keep your torso in place;
- choose excessive working weight, which a priori violates the execution technique and reduces the effectiveness of the exercise.