Of all the exercises for training the back, these two should perhaps be especially highlighted:
- Deadlift.
- Bent-over barbell row.
In fact, we can say that they are guaranteed to lead you to your goal - a wide, tight and sculpted back. There are, of course, several other excellent “pull” exercises (pull-ups, wide-grip lat pull-downs, or lat pull-downs), but without a lot of the first two, it will be more difficult to achieve good results. Bent-over barbell rows have several advantages:
- You recover faster after it. This means you'll be able to do more "heavy sets" over time without experiencing symptoms of overtraining.
- It's easier to progress the load, which is not the case with exercises like pull-ups (a lot of hassle with weighted belts).
- Works virtually every major muscle group in the back of the body, including the legs as the weight gets heavier.
But there is one condition: you must be able to perform this exercise correctly, otherwise it will become much less effective. Additionally, there are several variations of this movement that you need to be aware of and include in your workout for better results. That's what this article will be about. Let's start!
What is bent over row?
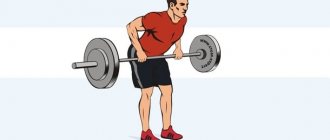
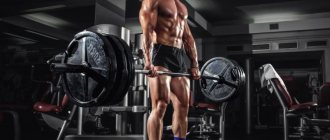
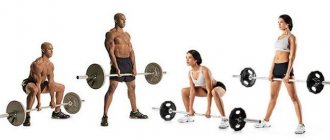
This is a category of exercises that involve bending your torso forward and lifting a barbell or dumbbells toward your chest or waist. However, when people say they do bent-over rows, they are usually referring to the classic barbell exercise that has been a mainstay of strength training and bodybuilding for decades. However, there are several different other variations of this exercise, including: Pendley row, bent-over dumbbell row, Yates row, and bent-over T-bar row. The main differences between the two are how you hold the bar, what exactly you train with (barbell or dumbbells, or machine) and how much footwork is involved to aid the movement. For a classic bent-over barbell row, you will need a standard 20-kilogram bar. If you're using heavy weights, you'll probably also want to do the exercise on a deadlift platform to avoid damaging the plates or the floor. Here's what a classic bent-over barbell row looks like: As you can see, to perform the exercise, you stand over the barbell with your feet about 15-30 cm apart. Then bend over, bending at the waist, and grab the bar with your hands about shoulder-width apart. , palms facing down. Straighten your back and start moving. Lift the bar off the floor by extending your hips. Continue pulling the bar until it touches your torso somewhere in the lower ribcage, and then reverse the direction of movement so that the bar falls back to the floor. There are some subtleties that we will talk about later, but these are the basic touches.
Purpose of the exercise
In bodybuilding they usually say that this movement gives a characteristic “shoulder turn” and helps give the body a V-shape. In reality, the purpose of the exercise depends on the body type and the purpose of the training. While for some people this exercise is a good way to “lift” the chest by engaging the lats more, for others it is purely a rehabilitative movement for the rotator cuff.
Movement is included in training in different ways. If a light, “pump” back workout is planned, this may be the first exercise in the cycle; if something heavier is planned, with a deadlift, this may be one of the final exercises.
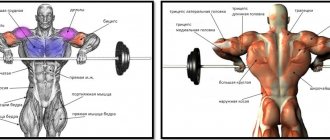
What muscles work
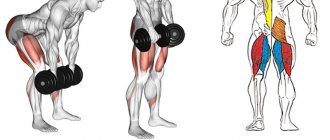
Most people believe that the bent-over row only trains the back muscles (which should be taken into account when creating a program), but when done correctly, it also loads the arms, shoulders and even, to a small extent, the legs. In particular, the following back muscles are worked:
- Latissimus dorsi muscles.
- Trapeze.
- Diamond-shaped.
- Teres major and minor muscles.
- Infraspinatus.
- The erector spinae muscle.
As well as muscles of the arms and shoulders, such as:
- Biceps brachii (biceps).
- Brachialis.
- Forearms.
- Rear delts.
And to a lesser extent they train:
- Posterior thigh muscles.
- Gluteal.
- Quadriceps.
As with most compound exercises, the stronger you get, the more you need to recruit other muscle groups to maintain stability throughout the movement, turning it more and more into a full-body exercise.
Correct technique
We're going to take a few minutes to discuss how to do this exercise with perfect form because it's the most effective and technically challenging bent-over row. Additionally, the skill developed in this exercise will serve you well in all other types of incline rows. So, the whole process can be divided into three parts:
- Preparation. Get into position to lift the weight off the floor.
- Climb. Pull the barbell from the floor towards your torso.
- Lowering. Return the weight to the floor.
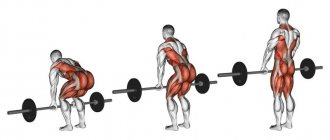
Preparation
The exercise begins with the barbell positioned on the floor, rather than on a rack or clamps. Step up to the barbell and position your feet so that they are slightly narrower than shoulder width (15-30 centimeters) and your toes point slightly outward. Then move the bar toward you until it is in line with your shoulders or slightly behind your shoulders. In this case, the bar will be located close to the shins, above the middle of the feet. For taller people, the bar will likely touch their shins.
Proper positioning is important because it allows the weight to be lifted more or less vertically (rather than first up and then toward the body, which is less efficient) and generate maximum power.
Stand up straight, straighten your chest, and take a deep breath of air through your stomach (not your chest), while tightening your abs as if you were going to get hit in the stomach.
Then drive your torso forward and down toward the bar, moving your hips back and bending your knees slightly, similar to how you would get into a deadlift position. Unlike a deadlift, your legs should be fairly straight and your hips should be high so that your back is more or less parallel to the floor. Then grab the bar with a double overhand grip (both palms facing down) a few centimeters (7-15 cm) wider than your shins and squeeze it as hard as possible.
Make sure your shoulders are back and down, your back is straight, and your head is in a neutral position - your gaze fixed on a point on the floor 3-4 meters in front of you.
Don't look up at the ceiling or down at your feet.
Climb
To lift the weight off the floor, begin the movement by straightening your legs (hip extension) and then pulling your elbows toward the ceiling to keep the bar moving vertically. Make sure your shoulders rise with your hips and your back remains in a straight, neutral position. Once you have started lifting the weight, simply continue to pull it until the bar touches your lower chest. The bar should move up along the shins, and when it reaches the height of the knee joint, the legs should be straight enough so that the bar does not touch the knees. Throughout the movement, it is important to hold your breath and keep your head in a neutral position in line with your spine, maintain a natural curve in your lower back, and keep all the muscles of your torso (core) tense. Also, try to keep the weight moving as vertically as possible, as any deviation will make it difficult to maintain proper technique.
Lowering
The final part of the exercise is the correct (controlled) lowering of the weight back to the floor. This is basically a mirror image of what they did during the climb. Quickly lower the barbell down until your elbows are fully extended, then bend your hips enough to bring the weight to the floor. The back should always be fixed in a neutral position and the muscles of the torso (core) tense. There is no need to lower the weight slowly. The entire lowering should take no more than 1 second. Now you are ready for the next repetition. Many people don't stop to take a break between reps, but instead simply lower the bar partially to a few centimeters above the floor, as in the Romanian deadlift. This is good when using light weights, but it is preferable to pause between each repetition - what some people call a "Pendley row" (named after Olympic weightlifting coach Glenn Pendlay). In this case, you will lowering the weight completely to the floor and returning to the starting position before starting the next repetition makes it easier to maintain proper form (and therefore can reduce the risk of injury.) This is especially important when you start using really heavy weights - to ensure that proper technique is strictly adhered to If you want to get some practice right away, grab a broom, pool cue, or something similar and work on the move.
Standing vertical block row
Wide grip
In these exercises we use a barbell and we ourselves are in a standing “soldier” position. We place our palms slightly wider than shoulder level and, while inhaling, pull the bar towards the chin. At the top point - a slight delay in breathing and movement, and a smooth descent.
Advice: the rhythm should not be too frequent and the load should not be too large. Arching of the back and the position of the elbows “forward” are unacceptable.
Narrow grip
The bar must have a specially curved bar. The palms are in the “narrower than the shoulders” position. We do rows up to the chin and with light weight. The exercise is performed to emphasize the relief of the back.
Tip: Do not use a too narrow grip or push your elbows forward - this reduces the load on your back and can lead to shoulder injuries.
Simple and effective back workout
Deadlifts in this workout always come before bent-over rows.
This is because the deadlift involves using more muscles. It is technically more challenging and allows for heavier weights to be lifted, making it more taxing than any bent over row variation. Therefore, in any case, it is advisable to do the deadlift first, when you are still physically and mentally fresh. Then, as a rule, perform the second most difficult exercise (often another basic one), and then any other less difficult ones. Workout : Deadlift .
After warm-up sets:
- For experienced athletes (men): 3 sets of 4-6 reps at 80-85% of one-repetition maximum (1RM).
- For women and beginners: 3 sets of 8-10 reps at 70-75% of 1RM.
Bent-over barbell row: 3 approaches:
- 4-6 repetitions (experienced athletes - men).
- 8-10 reps for women and beginners.
Wide grip lat pulldown: 3 sets:
- 4-6 reps for experienced male athletes.
- 8-10 reps for women and beginners.
Optional (optional): Bent-over T-bar row:
- 3 sets of 8-10 reps.
Now a little about how to carry out this training.
- Don't aim for muscle failure on every set . Muscle failure is the point at which you can no longer hold the weight in motion and are forced to finish the set (from fatigue). It is necessary to complete the exercise shortly before failure (1-2 repetitions). And it is very rare to do “refusal” approaches. Most competent athletes do not train to muscle failure for more than 2-3 sets per workout. And they try not to reach this state when performing basic exercises, as this can be dangerous. Instead, “failure” approaches are reserved for isolation exercises, such as: lying leg curls, seated leg extensions, calf raises, and the like. This is how load progression is achieved.
- Rest 3-4 minutes between sets . This will give the muscles enough time to fully regain strength so that you can fully perform each set.
- As you reach your maximum reps, increase the weight on the bar . For example, if you did 6 reps with 75 kg on the first set, add 5 kg to the barbell for the next set. If at the same time you managed to do 4 repetitions, then this will be your new weight for training until you reach 6 repetitions again. And when you reach 6, increase the weight again. If you get 3 or fewer repetitions, then try removing not all 5 kg, but 2 or 3 kg. Alternatively, train with the same weight you trained with until you can do 6 reps for all sets, and then increase the weight again. If you have difficulties again, try, if possible, to add as little weight as possible to the bar.
That's all!
Have fun training! Good luck!
Safety
The pull-down from the upper block is aimed at working the back, so part of the load will always go to the spine. To reduce its amount, you need to perform the exercise correctly.
First of all, you need to monitor the position of the body . It should not swing when pulling weights, as this disrupts the stability of the spine. There is also no need to hunch your back or push your stomach forward too much. Thus, the lower back will get tired of this exercise much faster, and you will get unpleasant pain.
It is important to avoid any sudden movements . The entire exercise should be performed strictly on the muscles, without inertia. If you have to “tear” the handle, this means that you started working with a weight that is too heavy for you. It is better to reduce it, protecting yourself from injury.