Author: Timko Ilya - the ruler of the entire site and fitness trainer | more details >> Rod. 1984 Trained since 1999 Trained since 2007. Author and creator of the site tvoytrener.com. CCM in powerlifting. Champion of Russia and South Russia according to AWPC. Champion of the Krasnodar region according to IPF. 1st category in weightlifting. 2-time winner of the Krasnodar Territory championship in t/a. Author of more than 700 articles on fitness and amateur athletics. Author and co-author of 5 books.
Place in the author rating:
out of competition
(become an author) Date: 2020-11-24 Views: 2,992 Rating: 5.0
| All articles by the author >> | Medals articles >> |
Articles are loading...
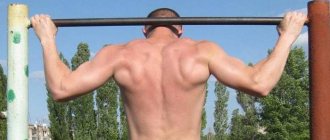
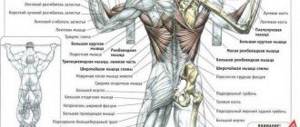
Main muscles - latissimus Additional - chest, biceps, rear delta teres major and rhomboids Difficulty - high
Benefits and contraindications
Beginners use this exercise as an aid to more complex strength exercises for the back. Most experts recommend starting to learn pull-ups with this one. It is enough to simply learn to feel the back muscles, completely stretching them at the bottom point and contracting them at the top point.
By performing simple exercises such as horizontal pull-ups, push-ups and bodyweight squats, you will build a certain muscle base, which will become the basis for further productive sports activities.
Experienced athletes can use this exercise as a warm-up or as a finishing exercise to maximize blood flow to the back muscles. With the warm-up, everything is clear: with the help of pull-ups you can safely stretch all large muscle groups, all joints and ligaments. This way the body will be ready for more serious work.
As a final exercise, it is used to give the joint-ligamentous system a little rest after working with heavy weights. For example, doing 3-4 sets of horizontal pull-ups after heavy bent-over barbell and dumbbell rows will have a great impact on your progress, as you continue to dynamically load the target muscle group and do not overdo the load on the spine.
By the way, there is no axial load on the spine in this exercise, so it is perfect for those who have a hernia in the lumbar region and various curvatures of the spine. This is one of the few exercises for which there are no serious contraindications, and it can be performed by anyone.
Content
- 1 Technique: horizontal pull-ups
- 2 Recommendations for implementation
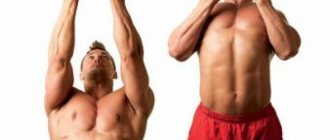
Types of horizontal pull-ups
Horizontal pull-ups
The CrossFit pull-up is a very popular exercise because it can be done anywhere there is a bar. It has an excellent effect on many muscle groups. In CrossFit, the functionality of the whole body is important, so this type of exercise has gained popularity among athletes.
Horizontal pull-ups are an exercise performed on rings, on parallel bars, on a bar, or with the help of any stable object that can support the weight of the body in a horizontal position.
When performing pull-ups, the latissimus, major, teres, rhomboid, biceps, and trapezius muscles are involved. Proper execution of horizontal pull-ups will help to evenly load all areas of the back.
What muscles work?
Before moving on to describing the technique of performing the exercise, let's look at which muscles work during horizontal pull-ups:
- The main part of the load falls on the latissimus dorsi, biceps and forearms.
- Depending on the range of motion, you can also focus the load on the rear deltoids or trapezius.
- The stabilizer muscles are the spinal extensors, gluteal muscles, quadriceps and hamstrings - they are responsible for our stable position during the exercise.
Variations of horizontal pull-ups
There are many ways to perform this exercise: on low-hanging rings, on a horizontal bar, on TRX loops, on parallel bars... Let's take a quick look at the benefits of each option.
One point needs to be clarified right away. Not only the position of our hands is important, but also the position of our legs. If your feet are on the floor, the exercise becomes much easier to do, since the amplitude of the movement is short. But by doing horizontal exercises with support from your legs, you can increase the range of motion by 10-15 cm and stretch the latissimus dorsi muscles more strongly at the lowest point. You can use anything as a support: a step platform, a bench, a stack of discs, etc.
Horizontal ring pull-ups
The great thing about horizontal ring pull-ups is that you can constantly vary the biomechanics of the movement. The rings can be rotated in any direction, brought together and apart. This gives us the opportunity to pronate and supinate the hand at any time. Plus, you can do something like combined approaches: first use a shoulder-width grip and swing your back, then spread your arms wider and shift the emphasis of the load to the rear deltoids. It's exactly the same story with TRX loops.
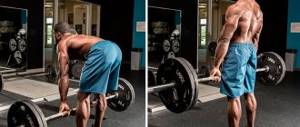
Horizontal pull-ups
Horizontal pull-ups with a barbell placed on racks are perfect for finishing back exercises in the gym. You need to adjust the racks so that the bar is approximately at the level of your lower abdomen. You can use both narrow and wide, both forward and reverse grip. The static position of the projectile allows us to better focus on the work of the back muscles.
You can also perform horizontal push-ups with a reverse grip, focusing on the biceps. To do this, you need to move your legs a little more forward and try to move so that at the top point you can reach the bar with your chin. A very unusual but effective exercise. For convenience, you can replace the barbell and racks with a Smith machine, this does not matter.
Horizontal pull-ups on parallel bars
Horizontal pull-ups on parallel bars are the most amplitude variety of this exercise. However, not everyone will find it convenient, since the diameter of the pipes used for street bars is quite wide. There may simply not be enough grip strength. There is also a more complicated variation of the exercise - pull yourself up on parallel bars with your feet on top of them. This is much more difficult to do, since the center of gravity changes, and it seems that you are working with more weight. The main thing in this exercise is not to arch your back or lower your buttocks.
Hanging pull-up while lying on a low bar
⇐ PreviousPage 5 of 6Next ⇒
The low bar pull-up is used as a test to determine the level of development of strength and strength endurance in the arm and shoulder muscles. The height of the crossbar bar for participants of the 1st-3rd stages of the GTO complex is 90 cm. The height of the crossbar bar for participants of the 4th - 5th stages is 110 cm.
Execution technique. Pull-ups on a low bar are performed from and. p. hang lying face up with an overhand grip, hands shoulder-width apart, head, torso and legs form a straight line, heels can rest against a support up to 4 cm high. In order to take the starting position, the participant approaches the bar and grabs the bar with a grip from above, squats under the bar and, keeping his head straight, places his chin on the bar of the bar. After which, without straightening your arms and without lifting your chin from the bar, stepping forward, straightens so that your head, torso and legs form a straight line. The assistant referee places a support under the competitor’s feet. After this, the participant straightens his arms and takes the starting position. From the starting position, the participant pulls himself up until his chin crosses the bar of the bar, then lowers himself into a hanging position and, having fixed the starting position for 0.5 seconds, continues performing the exercise (Fig. 28).
Fig.28
The number of correctly performed pull-ups is counted.
The main mistakes in the hanging pull-up technique while lying on a low bar:
• pull-ups with jerks or bending of the body;
• the chin has not risen above the bar;
• lack of fixation at 0.5 s from the starting position when performing the exercise;
• bending the arms at different times.
When doing pull-ups on a low bar, the most active muscles are the wrist flexors, triceps brachii, biceps brachii, brachioradialis, pectoralis major, latissimus dorsi, and rectus abdominis.
Exercises that develop strength in the muscles of the arms and shoulder girdle
1. Bending and extension of the arms while lying on a gymnastic bench.
31
2. Bending and extension of the arms while sitting and lying behind (arms on a gymnastic bench).
3. Flexion and extension of the arms with dumbbells at the elbow joints.
4.Hang while lying on a low bar (5 seconds or more) with bent arms.
5. Pull-ups on a low bar from a hanging position.
6. Pull-up from hanging while lying on a low bar with an underhand grip. …………………………………………….
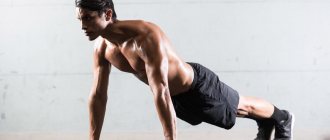
Flexion and extension of the arms while lying down
The test is designed to determine the level of development of strength and power endurance of the arm muscles.
Execution technique. I. p. - emphasis lying on the floor. Hands shoulder-width apart, fingers forward, elbows apart no more than 45 degrees.
Legs together, feet resting on the floor without support. Shoulders, torso, legs form a straight line.
Rice. 29
Bending the arms is performed until the chest lightly touches the floor, without breaking the straight line of the body, extension - until the arms are fully straightened I; elbow joints while maintaining the same straight line (Fig. 29).
After extending your arms, you need to fix the starting position
for 0.5 s, then continue the exercise. The number of correctly performed flexions and extensions of the arms is counted and recorded by the judge.
The main mistakes in the technique of bending and extending the arms while lying down:
• touching the floor with knees, hips, pelvis;
• violation of the straight line “shoulders - torso - legs” (when performing the exercise, the subject bends or bends the torso);
• multi-simultaneous extension of arms;
• lack of fixation for 0.5 s from the starting position when performing the exercise.
To perform flexion and extension of the arms in a prone position, it is necessary to develop the strength of the same muscle groups as when performing pull-ups on the bar, but it is not the flexors, but the extensors of the shoulder that are decisive.
When moving downward, extension occurs in the shoulder joints, flexion in the elbow and wrist joints. This movement is carried out under the influence of gravity. In the lifting phase (arm extension), the greatest load falls on
triceps brachii muscle. She does the overcoming work. The shoulder flexors work in a yielding mode. The activity of the pectoralis major muscle is especially great.
Exercises that develop strength in the muscles of the arms and shoulder girdle
1. Bending and extension of the arms in a lying position, arms on an elevated bench (bench).
2. Bending and extension of the arms in a prone position, legs on an elevated support (bench, chair, gymnastic wall rail, etc.), arms on the floor (Fig. 30.1)
To complicate the exercise, you should gradually increase the distance between the hands (arms wider than shoulders); height of the footrest.
3. Bending and extension of the arms in a prone position, legs on an elevated support - push off with the hands, clap the palms and return to the I.P.
4. Bending and extending the arms while lying down, the partner presses on the shoulder blades, making it difficult to straighten the arms.
5. Flexion and extension of the arms while lying down with weights on the shoulders and back (Fig. 30, 2).
6. Bending and extension of the arms while lying on two parallel benches, spaced slightly wider than shoulder-width apart (Fig. 30, 3). Perform the exercise with full amplitude (until full flexion and extension of the arms). When straightening your arms, do not bend your torso.
33
7. Sit on the floor with your back to the bench with your hands supporting you on the near edge. Extension (lying in the back) and flexion of the arms (Fig. 30, 4).
8. Bending and extension of the arms in support from behind, arms and legs on an elevated support
(Fig. 30, 5). Perform the exercise with large amplitude.
9. In pairs: the first partner is in a support position with his legs apart; the second one supports the partner by the shins. Bending and extension of the arms with pushing away from the support (floor) and moving forward (Fig. 30, 6). Perform without delay, at pace.
10. Bending and extension of the arms in support on parallel bars: for the maximum number of repetitions; with additional weights (weight belt, etc.).
11. Bench press on a bench.
12. Outdoor game “Fishing Rod” (i.p. - lying position).
13. Outdoor game “Forward on your hands.”
Raising the body from a supine position
The test is designed to determine the level of development of strength endurance of the trunk flexor muscles. To perform testing, pairs are created, one of the partners performs the exercise, the other holds his legs by the feet and shins. Then the participants change places.
Execution technique. The exercise is performed from and. p. lying on your back on a gymnastic mat, hands behind your head “locked”, shoulder blades touching the mat, legs bent at the knees at a right angle, feet pressed by a partner to the floor (Fig. 31).
The participant performs the maximum number of body lifts in 1 minute, touching the hips (knees) with the elbows, followed by returning to the starting position.
The number of correctly performed body lifts is counted.
The main mistakes in the technique of lifting the body from a supine position:
• no elbows touching the hips (knees);
• lack of contact with the shoulder blades of the gymnastic mat;
• fingers are open “from the lock”.
Compliance with the standard for lifting the body forward from a supine position is determined by the level of development of the strength of the abdominal and back muscles, as well as strength endurance. The tension of these muscles reaches its greatest value when the angle between the torso and the horizontal surface is close to 45°.
Exercises that develop strength and endurance of the trunk flexor muscles
1. Raising the body from a supine position, legs bent at the knee joints and secured, hands clasping the shoulders (Fig. 32, 1).
2. Lying on your back, legs bent on a raised surface (chair, bench, etc.). Raising the body with the chest touching the knees (Fig. 32, 2).
3. Raising the body from a lying position with your back on an inclined bench, legs secured (Fig. 32, 3). The exercise can be performed with additional weights: a barbell plate (1 - 5 kg), dumbbells, or a medicine ball. Hold the weight in front of your chest or behind your head.
4. Tilt and lift the torso from a sitting position on a gymnastics pommel horse, legs are secured, arms up (Fig. 32, 4). The exercise can be performed with additional weights (medicine ball, dumbbells).
5. Raising and lowering straight legs from a supine position on an inclined bench (head to the wall), grabbing the bar with your hands (Fig. 32, 5).
6. Simultaneously raising straight legs and torso (sitting bent, hands to toes) from a supine position (Fig. 32, c).
7. Lying on your back, legs bent at the knees, feet pressed to the floor. Medicine ball in outstretched arms behind the head. Raise your torso, the ball forward and upward (Fig. 32, 7).
8. Lying on your back, hands with dumbbells on your chest, legs bent at the knees. Without lifting your feet from the floor, raise your upper body and bend forward until the dumbbells touch your knees (Fig. 32, 8).
Exercises should be performed with the setting for the maximum number of repetitions - “to the limit”.
2
1
3
6
7 8
Fig.32
| Bend forward from a standing position The test is designed to determine the level of development of mobility in the joints and is performed from and. And. standing on the floor or gymnastic bench, legs straightened at the knees, feet parallel, 10-15 cm wide. When performing a test on the floor, the participant, on command, makes two preliminary bends. At the third tilt, he touches the floor with the fingers or palms of both hands and records the result for 2 s. When performing a test on a gymnastic bench, upon command, the participant makes two preliminary inclinations, sliding his fingers along the measurement ruler. During the third bend, the participant bends as much as possible and records the result for 2 s (Fig. 33). The amount of flexibility is measured by the distance in centimeters from the zero mark to the tip of the third finger of the hand. If the fingers do not reach the zero mark, then the measured distance is indicated by a minus sign (-), and if it falls below the zero mark (+). The main mistakes in the technique of bending forward from a standing position: • bending the legs at the knees; • fixing the result with the fingers of one hand; • failure to record the result within 2 s. When bending forward, flexion occurs in the hip joints and in the joints of the lumbar and lower thoracic spine. — — Exercises to increase mobility in the hip joints 1. From a squat position, straighten your legs without lifting your hands from the floor (Fig. 34, 1). 2. Bend forward, pulling the torso towards the legs with the help of the hands (Fig. 34, 2). 3. In pairs, facing each other. One partner performs springy forward bends, the second strengthens the movement by gently pressing his hands on the shoulder blades (Fig. 34, 3). 4. In pairs: the first partner sits, legs together; the second, standing behind (hands on the shoulders of the first), produces springy tilts of the person sitting forward (Fig. 34, 4). 5. In pairs: the first partner stands on one leg with his back to the wall, the second takes the first’s free leg by the ankle and lifts it as high as possible with gentle rocking (Fig. 34, 5). 6. Sitting on a bench, bend forward until your forehead touches your knees (Fig. 34, 6). 37 7. Sitting crosswise on the bench, grab the edges of the bench slightly in front of your feet, straightening your legs while standing, pull back (Fig. 34, 7). Hold for 2 - 3 s. 8. Standing facing the wall, place your straight leg on the bar at shoulder level. Squat on the supporting leg, keeping your leg straight on the bar (Fig. 34, 8). 9. Swing the leg forward and backward, standing sideways to the gymnastic wall and leaning on the bar with your hand (Fig. 34, 9). 10. Standing facing an elevated support (gymnastic wall), place one foot on the support (rail) at waist level. Bend towards a straight leg, touch your chest to your thigh (Fig. 34, 10). 11. Stand on your left leg, with your right side to the gymnastics wall, raise your right leg on the bar as high as possible, hands behind your head. Springy inclinations towards the supporting leg (Fig. 34, 11). After several repetitions, do the same, standing on the other leg. Legs straight, chest or forehead touching the knee. 12. Sitting with your feet apart, medicine ball above your head. Bend over while touching the ball alternately with the right and left foot (Fig. 34, 12). 13. Walking with bending forward and reaching the floor with your hands. 2 4 6 Fig.34 Kettlebell snatch 16 kg Compliance with the standards of the GTO complex in the kettlebell snatch is carried out on a platform or any flat area measuring 2X2 m. The participant performs in a sports uniform that allows the judges to determine the straightening of the working arm and the extension of the legs at the hips and knees. The participant, with a continuous movement, lifts the kettlebell up until the arm is fully straightened and fixes it . The control time for performing the exercise is 4 minutes. The total number of correctly performed lifts of the weight with the right and left hands is counted. During the exercise, the judge counts each correctly performed lift after fixing the weight for at least 0.5 s. The participant has the right to start the exercise with any hand, rest, holding the weight in the upper or lower position, for no more than 5 seconds. • It is prohibited: to use any devices that make it easier to lift weights, including gymnastic pads; • use rosin to prepare your palms; • help yourself by resting your free hand on your thigh or torso; • place the weight on the head, shoulder, chest, leg or platform; • go beyond the platform (or designated area). Basic mistakes in the kettlebell snatch technique: • pressing the weights; • touching the legs, torso, weights, working arm with the free hand. Execution technique. Stand - feet shoulder-width apart, knees slightly bent, straight arm from above grabs the handle of a weight standing on the floor. Having lifted the weight from the floor, swing it back between your legs, then swing it forward in an arc and lift it up above your head and fix it (Fig. 35). The working arm, legs and torso must be straightened. Then lower the weight down without touching the floor. At the end of the kettlebell jerk on the swing below, grab the kettlebell in the other hand and continue the jerk with the other hand. Before you start learning the snatch, you need to show the exercise as a whole, paying attention to the correct grip of the arch and fixation of the weight. To better master the technique of performing a snatch, it is advisable to divide the training into parts: first teach swings, change hands, and then teach the snatch as a whole. Lead-up exercises 1. Swing the kettlebell with different amplitudes with both hands. 2. Swing the kettlebell with one hand (with changing hands). The exercise is performed in series (2-3 swings with one hand, change, 2-3 swings with the other hand, lower the weight) for 2-3 approaches. Change hands when the weight is on the swing in front in a straightened arm at waist level. 3. Two-handed kettlebell snatch. 4. Half squats with a kettlebell at the top on a straight arm. Exercises that develop strength in the muscles of the arms, shoulder girdle and back 1. Squeezing a tennis ball or expander (rubber, spring) with your hand.
2. Standing, dumbbells in lowered hands. 4. Feet shoulder-width apart, arms with dumbbells up. Energetic bending of the torso forward, lowering the arms between the legs (Fig. 36, 2). 5. Standing in an inclined position, holding weights in your hands. Straightening the body. 6. Feet shoulder-width apart, knees slightly bent, straight arm from above grabs the handle of a weight standing on the floor. Raising the weight from the floor, swing it between your legs, then swing it in an arc to your shoulder (Fig. 36, 3). 7. Feet shoulder-width apart, barbell at hips with arms down. Raising straight arms forward and up to shoulder level (Fig. 36, 4). Hold for 2-3 s. 8. Feet shoulder-width apart, barbell at hips with arms down. Lifting the barbell up with straight arms (Fig. 36, 5). 9. Lying with your hips on a gymnastics horse (goat), face down, legs secured to the rail of the gymnastic wall, holding a medicine ball in your hands. Tilts of the body forward and backward (Fig. 36, 6). Perform with large amplitude, without pauses. Fig.36 10. Swings of a heavy weight (24, 32 kg) with different amplitudes. Exercises to develop leg muscle strength 1. Half-irised with two weights at the top on straight arms. 2. Squats with two weights (dumbbells, medicine ball) at the top with straight arms. 3. Half squats and front squats. Cross-country skiing Cross-country skiing is presented in the GTO complex (for age groups from 6 to 17 years) with distances of 1, 2, 3, 5 km. It is carried out in a free style mainly in areas with weak and moderately rugged terrain, in places sheltered from the wind in accordance with the sanitary and epidemiological requirements for the conditions and organization of training in general education organizations (Sanitary and epidemiological rules and regulations SanPiN 2.4.2.2821-10). For cross-country skiing, trails are prepared in the form of a closed circle or loop with the start and finish in one place. The ski track should be dense and well-rolled. Competitions are held in accordance with the rules of cross-country skiing. Separate start - after 10-15 seconds. Starting (bib) numbers should be issued in accordance with the preparedness of the participants - it is better to put strong ones at the beginning of the starting protocol. To fulfill the standards of the GTO complex in cross-country skiing, you need to have a good command of the technique of ski moves and transitions from one move to another, methods of ascents and descents from mountains, turns, and braking. Mastery of these motor actions is provided for in the educational process in the subject “Physical Education” when passing the “Ski Training” section. Compliance with the standards of the GTO complex in cross-country skiing is determined not only by technical readiness, but also by the level of development of endurance, speed and strength abilities. During ski training, much attention should be paid to the development of general, special and speed endurance. To develop general endurance, long-term movement on skis is used (heart rate 130-150 beats/min), special endurance - they complicate the terrain of the ski track and increase the speed of movement (heart rate 150-160 beats/min), speed endurance - use repeated passage of segments of 300 -500 m at competitive speed (heart rate 165-175 beats/min). Exercises that develop endurance 1. Skiing at a uniform speed for 25-35 minutes (heart rate 140-150 beats/min). When moving at a uniform speed, all systems of the body work most harmoniously and rhythmically, which helps slow down the development of fatigue. 2. Covering a distance of 1 -1.5 km at a uniform speed (heart rate 150-160 beats/min), in a repeated execution mode (for example, 3 times 1 km). The total number of repetitions of the exercise must be greater than the competitive distance of the GTO complex program. 3. Walking along the training track for distances of 500–800 m at competitive speed. The exercise should be repeated 3-5 times. The rest interval (skiing at a slow pace) between repetitions is determined taking into account the indicators of heart rate recovery among those involved (heart rate should not exceed 120-130 beats/min). The length of the segments depends on the age and level of preparedness of the students. 4. Repeated passage of segments of 300-500 m at high speed (approximately 90-95% of the competition speed), after each segment - 250 m of movement at low intensity (“game of speeds”). To perform accelerations, it is necessary to place certain landmarks on the track that are familiar to those practicing, or make two circles in a figure eight - 300-500 m and 250 m (or make another circle inside the main circle at a distance of 3 m from the first). The trainees walk a large circle at high speed, switch to a small circle, and at a low pace, while resting, move in a small circle. Then they again move to a large circle and go through it in submaximal intensity mode, again switch to a small circle, etc. There can be 5-6 or more such repetitions on a large circle. 5. Walking the distance: 3 times 1 km at a high pace (pulse 175-180 beats/min) after 4-6 minutes of rest. 6. Ski relay races with stages: • 500-700 m and moving in alternating two-step strokes; • 250-300 m and movement with simultaneous classical moves. Relay races are held on a training circle. Participants are divided into how many teams of 5-6 people each? 7. Skiing competition games: “Pursuit Race”, “Circle Race”, “Knockout Race”, “Fast Team”, etc. 8. Cross running 3-5 km: • With various combined speed modes; • with imitation of ski moves on ascents of varying steepness. Speed abilities are manifested in skiing in speed movement but distance (distance speed), in the speed of switching from one motor action to another, as well as in finishing time. Exercises that develop speed abilities 1. Covering sections of 50, 100, 200 m with various ski moves at maximum speed: with time recording; with determination of the winner. The number of repetitions depends on the preparedness of the students. There should be sufficient rest after completing each segment. If the results begin to decline even after a long rest, then work on developing speed should be stopped. 2. High-speed movement on skis uphill with a sliding step. 3. Alternating high-speed skiing in difficult, normal and easy conditions (variable method): • on a gentle slope and along a flat section of the ski track; • on a gentle rise and down a gentle slope; • along a flat section of the ski track and down a gentle slope. 4. Crossing the ski distance at variable speed (varying the speed of movement and the duration of the exercise). For example, high-speed skiing for 10-15 seconds is followed by the same rest intervals. The duration of the exercise is 10-15 minutes. 5. Covering a given section of the distance with acceleration in the last 50 -100 m. 6. Skiing competition games: “Best starter”, “Fast skier”, “Start with pursuit”, “Who is faster”, etc. 7. Ski relay races with stages of 100-200 m. 8. Flexion and extension of the arms while lying down at a fast pace for 10-15 seconds (high-speed push-ups). 9. Squats and half-squats at a fast pace. Strength abilities are manifested in skiing when power work is performed for a sufficiently long time when pushing off with arms and legs (strength endurance). At the same time, in order to effectively push off with your legs (especially when skating), you need to make efforts as quickly as possible, and this depends on the level of development of speed-strength abilities. Exercises that develop strength abilities 1. Pull-ups while hanging on the bar. 2. Bending and extension of the arms: in a lying position (legs on an elevated support); in support from behind (arms on an elevated support); in emphasis on the uneven bars. 3. Rope climbing without using your feet. 4. In a forward lunge, jump, change the position of the legs (with a partner on the back). 5. Squats with a partner on the shoulders, holding the rail of the gymnastic wall with your hands. 6. Squats on one leg. 7. Bend forward: • simultaneous and alternate extension (with abduction) and bending of the arms with dumbbells at the elbow joints; • abduction of straight arms with dumbbells back and up; • alternating movements (swings) with straight arms forward and backward with dumbbells. 8. Bend the torso forward while simultaneously moving the arms with dumbbells back - up. 9. Bend the torso forward while simultaneously moving the arms backwards and upwards with the tension of the rubber shock absorber, a tourniquet attached to the rail of the gymnastic wall (Fig. 37) 10. When tilting forward, stretching the rubber shock absorber due to alternate (alternating) movements of the arms downwards and backwards. 11. Jumping from foot to foot moving forward 50-100 m 12. Jumping in a deep squat with forward movement of 10 - 20 m. 13. Walking with a partner on your back for a distance of 30-50 m: with an extended step (wide lunges); in a half squat, in a half squat sideways. 14. Running uphill of varying steepness and length with an emphasis on pushing off. 15. Repeated execution of movements in the rise with a simultaneous stepless move. 16. Games - competitions: “Forward on your hands”, “Carry your friend”, etc. 17. Competitive - game exercise “Push harder.” On a ski track 50-60 m long, participants move at a single-track, stepless pace, trying to push harder with ski poles and make as few push-offs as possible to the designated finish line. The winner is determined by the fewest repulses. Strength exercises should be performed to the point of significant muscle fatigue (i.e., “to failure” or almost “to the limit”). Swimming Swimming is carried out in pools or specially equipped places on reservoirs. It is allowed to start from a bedside table, side or from the water. The swimming method is arbitrary. The swimmer must touch the wall of the pool with any part of his body at the completion of each segment of the distance and at the finish line. Prohibited: • walk along the bottom; • use lane dividers or improvised means to promote or maintain buoyancy. Compliance with the norms of the GTO complex in swimming (distances 10, 15, 25, 50 m) is carried out, as a rule, after preliminary training and training. All swimming methods are studied approximately in the following sequence: 1) studying the technique of leg movements; 2) studying the technique of hand movements; 3) coordination of leg movements with breathing; 4) coordination of hand movements with breathing; 5) coordination of movements of arms and legs; 6) general coordination of the movements of the arms, legs and breathing. It is advisable to first perform exercises in water with supporting equipment (swimming belts, boards, inflatable rings, etc.). The use of support means allows students to focus on performing the movements being studied and contributes to the correct development of their technique. Having mastered the technique of movements in easier conditions (on land, standing on the bottom, at the side, with supporting means, etc.), they begin to improve it over short and then long distances. At first, you should not get carried away with the speed of swimming; it is better to pay attention to the correct and relaxed execution of stroke movements. Mastering the technique of starts and turns begins after the person being filmed can swim 25 m, and also learns to glide underwater without rowing movements. Exercises for mastering swimming techniques using the breaststroke method 1. Sliding on the chest. Raise your arms straight up, bringing your hands together, with your head between your hands. Inhale, hold your breath, sit down, lean forward and, pushing off with your feet from the bottom of the pool, lie down on the water - slide as long as possible, then get up, exhale, inhale and continue the exercise. While sliding, stretch out into a string, stretch your arms in the direction of movement. 2. Sliding on the chest with different hand positions: one hand in front, the other at the hip; both arms along the body. 3. Lying on your chest, holding the side of the body with straight hands (chin on the surface of the water), perform movements with your legs, as when swimming breaststroke. Pulling the legs towards the body is performed slowly, and extension (push-off) is performed with a fast, powerful movement. After the push, maintain a short pause (time for sliding) 4. Swimming using breaststroke movements on the chest, arms forward, with a swimming board in hands After the push, maintain a pause and slide (try to slide as long as possible). 5. Swimming using arm movements using breaststroke with an inflatable ring between the thighs (swimming board at the feet). Exercises for mastering swimming techniques using the “crawl and breaststroke” method 1. Lying on your chest, holding the side (chin on the surface of the water) with straight hands, perform quick alternating crawl movements with your legs. 2. Slide on your chest, arms forward, palms down, head between your hands, perform quick alternating crawl movements with your legs. 3. Swimming on the chest using freestyle leg movements with a swimming board in outstretched arms. Monitor the elongated position of the body at the surface of the water. Pay attention to the fact that movements are performed with almost straight legs with a slight swing. 4. Front crawl swimming using arm movements with an inflatable ring between the thighs (swimming board at the feet). 5. Front crawl swimming with full coordination of movement. The success of fulfilling the standards of the GTO complex in swimming is determined not only by technical readiness, but also by the level of development of speed and strength abilities, and endurance. Exercises that develop speed and speed-strength capabilities 1. Repeated swimming of 10-15 m segments at maximum speed: • using only hand movements; • using only leg movements; • with full coordination of movements with legs and arms. 2. “Boat race” (speed swimming with a board in hand) 10-25 m. Repeat the exercise at least 4 - 5 times. 3. Outdoor game “Who is first”. On command, players swim a distance of 10, 15, 25 m at maximum speed - depending on age and preparedness. The one who finishes first wins. 4. Competition for the distance of sliding after pushing off the wall of the pool with your feet. Exercises performed at maximum speed should be short in duration, not exceeding 15-20 seconds in one attempt. Exercises that develop endurance 1. Swim at a steady pace with moderate intensity for a given time. 2. Repeated swimming of distances of 10, 15, 25, 50 m with moderate or high intensity and short, strictly regulated rest breaks (10-30 s). Exercises to develop strength in the mouse, arms and shoulder girdle 1. Flexion and extension of the arms while lying down at a fast pace (high-speed push-ups). 2. Hand movements with dumbbells, as when swimming front crawl; back crawl while standing or lying on a bench; breaststroke on the chest. 3. While bending forward, alternately swing your arms with dumbbells. 4. Swimming breaststroke and front crawl using one-arm movements. 5. Swimming a series of breaststroke segments on the front in the least number of strokes. Exercises to develop leg muscle strength 1. Sitting on a bench (on the floor) with your hands supporting you behind you. Fast, time-based movements of the legs, as when swimming crawl. 2. Lying on your chest, bending over. Leg movements, as when swimming crawl. 3. Swimming using movements with only legs. The main method of targeted strength training in swimming is the method of repeated efforts “to the limit” (until muscle fatigue occurs) at an average speed of movement. To increase the level of fitness and swimming readiness of those involved in the educational and training process, it is necessary to: 1) increase the series of segments and distances swam non-stop; 2) increase the total volume of swimming per lesson and for the week as a whole; 3) increase the pace and speed of swimming over segments and distances; 4) reduce rest intervals between tasks (segments) swam in one lesson; 5) selectively increase the load on the muscles of the arms or legs (for example, swimming with the legs or arms, swimming in the least number of strokes). ⇐ Previous5Next ⇒ Recommended pages: |
Exercise technique
The technique for performing horizontal pull-ups is as follows:
- Hang from a low bar (bar, rings, TRX loops, etc.). Take a couple of steps forward and straighten up completely. The horizontal bar should be approximately at chest level. An acute angle should form between the floor and the body.
- Place your hands slightly wider than your shoulders. The wider the grip, the more the rear deltoids and trapezius work. Accordingly, for the latissimus dorsi and biceps, a grip approximately shoulder width is more suitable. Use a middle ground. It is better to hold the horizontal bar with a closed grip and use magnesium, since the time under load will be quite long. You should not use straps here; learn to feel the work of your back in such simple exercises with your own weight.
- Begin to pull your body towards the horizontal bar, bringing your shoulder blades together. If you reach the horizontal bar with your chest before you have completely retracted your shoulder blades, it means that the amplitude of movement is too small. In this case, you need to take it one step further or use the foot support we talked about in the previous section. Lifting the body should be done while exhaling. At the same time, you should keep your elbows closer to the body, so the tension will not go away from the back muscles. if you move them apart, the load will transfer to the rear bundles of the deltoid muscles.
- If you did everything correctly, then at the top point there should be literally 3-5 cm between the horizontal bar and the solar plexus. At this moment, you should statically tense your back muscles as much as possible for greater effect. To do this, bring your shoulder blades together completely. Stay in this position for 2-3 seconds.
- Smoothly lower yourself down while inhaling. Fully straighten at the bottom. At this point, many people make the mistake of relaxing the spinal extensors. This causes the thoracic spine to “sag” downwards. It is not recommended to start repeated pull-ups from this position. This is not dangerous, but you are unlikely to be able to effectively work out your back muscles.