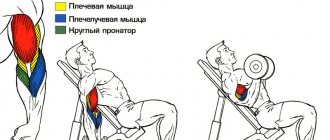
Options for mixing hands in a crossover
Reduction of hands in a crossover from the lower block while standing
This option is aimed at working the upper pectoral muscles. It will help shape and draw the chest in the collarbone area. The exercise is performed with blocks installed below, which we will pull up, with slightly bent arms. Since the exercise is isolated, it should be done with a small weight for a large number of repetitions from 12 to 20. The main thing is to feel a burning sensation in the upper chest, this will be the optimal number of times. When performing this option, you should feel the upper chest and shoulder joint working. If your arms get clogged, then reduce the weight. Try to lower the blocks as low as possible, this will stretch the muscles more and increase the result. The reduction from the lower block is best done at the end of the workout, for maximum pump (blood engorgement) of the chest. If you do it at the beginning, you will simply tire the working muscles and will not be able to work to the maximum in basic exercises.
Technique:
Initial position
- Set the crossover to its lowest position. Set the weight you need. For the exercise we will use single iron or nylon handles.
- Walk forward a little to tighten the crossover cables. Feet stand on the same line, shoulder width apart. If you find it difficult to maintain a stable position in this position, then put one of your legs forward and alternate them each new approach.
- Tilt your body slightly, keeping your back straight. There is a slight arch in the lower back. The arms are bent at the elbows.
Performance:
- Take a deep breath and press the cables forward to a height just above your chest, and bring your arms together. Exhale. Stay in this position for a short time to maximize tension in your pectoral muscles.
- As you exhale, smoothly return your arms to the starting position, stretching your chest muscles as much as possible.
As some say, imagine standing in waist-deep water and picking up water in your hands. The movement is quite simple, the main thing is to take your time and control the weight at the top and bottom points.
Bringing your arms together in a bent-over crossover
In this exercise, we shift the emphasis to the middle of the pectoral muscles. The blocks are installed on top. Before proceeding with this option, it is necessary to sort out some nuances.
Firstly, the position of the body.
There are several possible options.
- The body is almost straight with a slight tilt forward.
- Tilt at an angle of 30-45° degrees.
- And the body is parallel to the floor, that is, a full tilt to an angle of 90°
There will not be a very big difference in the effect of the exercise. There may be a shift in emphasis to the chest muscles, but they will not be so significant. Of course, it’s up to you to decide, since all people are individual and what may work for one may be just a waste of time for another. Start with the classic version with a slight forward bend, and only then experiment and find your formula for success.
Secondly, the area where we will bring our hands together.
Many people advise bringing your arms together in the abdominal area; this option will put more stress on the lower sections of the pectorals, but we are trying to pump up the middle. Therefore, our task is to bring the arms together in the chest area.
Technique:
Initial position
- Place the simulator blocks up. Choose the weight that suits you.
- We use the same handles as in the previous exercise (one-handed iron or nylon).
- Take a small step forward to stretch your pecs. We put our legs on the same line, if it’s hard, then we bring one forward. Don't forget to alternate them each approach.
- We tilt our torso a little forward. We keep our back straight, there is a slight arch in the lower back, and the chest is slightly pushed forward.
- We spread our arms to the sides until we feel a stretch in the pectoral muscles. The elbows are slightly bent.
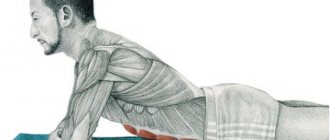
How to do a pullover correctly in a block simulator
Good day, our dear readers. Today we will learn how to do a specific exercise to develop the back muscles - a standing pullover or a pullover on a block simulator, a pullover in a crossover. The mechanics of movement is bringing the arms to the body.
During the exercise, various muscle groups are involved in the work. This includes the back, chest and arms. Therefore, depending on the specifics and variations of the technique, the load can be emphasized on individual groups. Our task today is to pump up the back - so we will learn how to do a pullover at the training block with an emphasis on the lats.
How a pullover in a crossover looks in motion
Let's dwell on the technique and find out why, when performing a pullover, the load is focused on the back muscles?
Hand position. The load falls on the back and does not leave it thanks to the positions of the arms throughout the entire range of motion, and especially at the top. Without raising our arms very high, we constantly strain our back. In a regular pullover, the hands go far behind the head at the top point. That is, we work our arms, biceps, then our chest, and then our back, it turns on at a certain point. Here we shorten the amplitude of the movement and leave only the phase that is responsible for the work of the lats.
Back position. When doing a crossover pullover, as in all back exercises, the lower back should be slightly arched and the back straight. As for the chest, it should be slightly inflated and, as it were, pushed up. When there is a natural deflection in the lower back, this allows the back muscles to contract correctly.
Knees. When performing lat pulldowns with straight arms, you need to squat down - bend your knees. With your knees bent, it is easier to work your back and contract your back muscles.
Hands. Hands must be fixed throughout the entire range of motion. They do not need to be raised high or bent at the elbows to imitate a French bench press. It is necessary to achieve a position of the hands where movement in the elbow joint is close to a minimum. This is the connecting link; all the work is transferred to the back muscles. So that it doesn’t turn out that by pumping up your lats, you pump up your arms.
Top and bottom point
. At the lowest point of the amplitude, you need to linger for a couple of seconds and strain your back with additional effort. This is the so-called peak contraction. At the top, on the contrary, you need to stretch your lats, but do not throw your arms, do not let them go up by inertia. Maintain an average position, approximately parallel to the floor, maybe a little higher.
Distance to projectile. In order for the back muscles to contract as efficiently as possible while pulling the upper block with straight arms, it will be necessary to conduct several experiments regarding the distance of the body from the projectile. The load on your back will change as you move closer or further away from the crossover block exercise machine.
Angles of inclination, handles. The same is with the angles of inclination, a little lower, a little higher. Try different handles. Some people will feel comfortable doing it with a straight handle, others with a bent handle. Third, they will use a rope handle, parallel or V-shaped, in the pullover. That is, there are a lot of options - you need to try.
Pullover in a crossover: how to do a back exercise in a simulator from the top block
The classic version of the pullover is performed with a dumbbell, lying on a horizontal bench. This technique develops to a greater extent the pectoral muscles, triceps, and also loads the lats. But there is another effective option - a pullover in a block, also known as a block row with straight arms, in which most of the load is focused on the latissimus dorsi muscles. So, let's look at the advantages and subtleties of the exercise technique.
What muscles are involved?
The obvious answer is breastfeeding. To be more precise - the upper chest. Some experts argue that the pectoral muscle is one single muscle mass and is not divided into upper, middle or lower parts. But numerous studies have shown that different exercises have different effects on some of its parts. For example, an incline bench press stimulates the upper chest more than a flat bench press. And the head-down press mainly works the lower chest. Therefore, of course, there is still a difference between the exercises. Let's return now to the crossover.
It works the upper chest to a much greater extent than the lower chest. However, there are ways to modify the execution technique in order to pump up the bottom. For example, when pulling the handle below the waist, the lower chest is activated. However, this exercise is not used in this way. Reverse push-ups and head-down incline presses are best for this. The main conclusion is simple - although the crossover (bringing the arms together in a block) can load the entire chest, it is still especially effective and advisable to use it for the upper chest.
Benefits of the crossover pullover exercise
Often, most lovers of strength training neglect the classic pullover due to the complexity of the technique and its specifics, because the effectiveness of the exercise lies in the maximum stretching of the pectoral muscles and triceps. A standing pullover, on the contrary, does not stretch the pectoral muscles and triceps, as when placing a dumbbell behind the head; the technique is clearer and more accessible due to the anatomy of the exercise, or rather, the option is simpler for most trainees.
In addition, a pullover in a crossover is safer and less traumatic. If the free weight of the dumbbell cannot be held and the muscles are severely stretched, then in the version with the upper block, when muscle “failure” occurs, the athlete only needs to return the plates to their place by lifting the arms higher than the top point of the amplitude. In this case, there is no way to drop the weight on yourself or stretch the ligaments, unless, of course, you make a jerk, which is extremely prohibited with any weight.
Crossover exercises for the lower body.
For a beginner in sports, getting lost among the iron jungle of sports equipment is a completely common situation. Today we will talk about a block simulator - a crossover. This is a multifunctional simulator with which you can work out the flexors and extensors of the arms, deltoid muscle bundles, pectoral muscles, torso and leg muscles. The crossover may look slightly different in appearance, since there are several different models. This can be a block single rack or a double, or even a triple version of the simulator, allowing several athletes to train at once. In any case, the simulator consists of an upper and lower block, the height of which is adjustable. As a rule, the crossover is no longer used by beginners, but rather by intermediate or professional athletes. If at the beginning of the sports journey everyone tries to generally get in shape, lose weight and dry out, then later, more targeted work begins on a specific muscle group. This is exactly what this simulator was created for. The simulator helps to perform isolated work on a specific muscle group. This means that the crossover is used more for working out the relief than for losing weight.
Exercise technique: straight-arm pull-down exercise
This option is made with a straight handle. If this grip causes pain, you can change to a curved handle that provides a neutral grip. Let's consider the option of performing it in a crossover, but the exercise can also be performed in a vertical block for the back muscles.
- Place your hands on the handles, shoulder-width apart, with an overhand grip, and place your feet hip-width apart.
- Move back a little from the block, tensioning the cable. Your arms should be straight throughout the entire approach. At the beginning of the movement, the hands should be at shoulder level or slightly above, but do not raise them too high, as you need to maintain constant tension in the back, and not switch to the chest and arms.
- The back should remain vertical, with the exception of the lower back, which should be slightly arched, pushing the pelvis back, but the thoracic region should remain flat. This position ensures constant tension in the latissimus dorsi muscles. It is a mistake to lean forward too much , since the emphasis from the back will shift to the pectoral muscles and triceps. The more vertical the position, the more the lats are loaded.
- The knees should be slightly bent, this will allow you to maintain the arch in the lower back without difficulty and concentrate the load on the back muscles.
- Inhale, and as you exhale, lower the handle with your straight arms down, touching your hips. Additionally, do not bend over, round your chest, or rock. Do not bend your elbows so as not to engage the shoulder muscles. The chest should be open and stretch upward.
- As you inhale, smoothly return your arms up to shoulder or chin level, but not higher.
Execution technique
It is performed on a block simulator: two vertical racks that are connected at the top by a frame. Adjustable weights moving on cables are placed on the racks. Handles are attached to the other ends of the cables, which the athletes pull on.
Stand between the posts with one foot slightly in front (staggered position).
Grasp the handles of the blocks. Elbows slightly bent, palms facing each other.
Bring your hands together until they touch, and it is advisable to cross your wrists slightly.
Concentrate on tightening your chest rather than focusing on your arm muscles.
Perform smoothly, without swaying; movements should occur only in the shoulder joint. Do not try to facilitate movement due to inertia.
Don't start with a jerk at the start - this reduces efficiency. And also do not throw the weight in the negative part of the amplitude.
Typically, the most common mistake that most guys and girls make is placing their elbows at the same level as their shoulders, and sometimes even raising them higher than their shoulders. This is exactly the same mistake that many people make when doing dumbbell flyes or butterfly curls.
This position of the elbows not only reduces the load on the chest, but also rotates the shoulders into a very undesirable position.
Shoulders are one of the most easily injured body parts in strength sports. And the high position of the elbows is very dangerous. The same applies to the standing overhead bench press.
For proper technique, three things need to be monitored:
Elbows below shoulders
. Slight tilt of the torso forward. As a result, you achieve two things: greater involvement of the pectoral muscles, and it also helps keep the elbows below shoulder level. From a pecs perspective, the principle is the same as reverse push-ups. Leaning forward recruits more muscle fibers from the pectoralis muscle.
Full extension of arms to the sides
. In this case, the muscle lengthens - a process that is the opposite of the contraction of muscle fibers, when we pull the blocks forward and down and feel tension in the chest. It is because of this tension that many consider this phase of the movement to be more important. However, research shows that the arms-out phase of the exercise is just as (if not more) important for muscle growth. Therefore, it is important to feel the full extension and even tension of the pectoral muscles when the elbows go completely behind the back (the elbows are always below shoulder level). The stretching phase is key in gaining muscle mass.
Blocks overhead.
Usually no one discusses this. The vast majority of block exercise machines have the ability to adjust the position of the block. Either way, try to make sure the blocks are above your shoulders (preferably above your head).
Then, when the upper half of the body tilts, the pectoral muscle is pulled forward and down.
Try to cross your arms
. Crossover, translated from English, means “crossing.” This name is not accidental. You need to actually cross your arms until your wrists cross. This is one of the few chest exercises that allows you to do this, while working a large number of muscle fibers deeper.
You need to perform a crossover at the end of a chest workout - 3 sets of 10-15 repetitions.
Features of performing a pullover with a rope
The rope is a soft handle with tips that protect the hands from slipping. The instability of the rope, unlike metal handles, adds inconvenience, in the good sense of the word. Thus, the instability of the handle allows you to better work all the muscles on each side. If, when working with a straight handle, the stronger side can compensate for the lack of strength of the other, then this will not happen with ropes, and each working muscle, each of its bundles will be worked out to the maximum.
Recommendations for performing pullovers in the simulator
The standing pullover is an isolating exercise, since only one joint is involved - the shoulder. Accordingly, the exercise should be performed after basic and most complex exercises on the target muscles. For example, a back workout should start with pull-ups, then include basic free weight exercises, block exercises like overhead or waist rows, and only then single-joint isolation exercises like standing pullovers. From complex to simple.
You should not select a large working weight for the exercise. It is impossible to perform this exercise correctly and concentratedly with a large weight. It will also be too much for the accessory muscles. Therefore, large weights are for the base, for isolating ones - moderate weight for 12-15 repetitions of 3-4 sets.
How to use
Next we will talk about the basic and most popular exercises on this simulator.
Exercises for the shoulder girdle
Do you agree that the importance of the shoulder girdle is quite difficult to overestimate? For the stronger half of humanity, pumped shoulders are needed to give a silhouette to the upper body.
For women, shoulders emphasize the femininity of the figure, helping to create the illusion of a thin waist.
- Raising hands
It is necessary to take the handles of the simulator in both hands and move away a short distance (where the crossover resistance begins). We raise our hands in front of us.
We hold them straight, parallel to the floor and perpendicular to the body. Feet should be placed shoulder-width apart and pressed firmly to the floor.
We take a breath, begin to spread our arms to the sides and back. While moving, keep your arms extended and parallel to the floor.
Then we continue moving in the opposite direction. Our hands do not touch each other at the end.
- Swing your hand to the side
We take the handle of the simulator in one hand and move away a short distance. The arm is slightly bent at the elbow joint. We press our feet tightly to the floor, placing them shoulder-width apart.
We take a breath and stretch our hand to the side. The elbow is directed slightly back and up. We try to keep our shoulder straight, and don’t move it or raise it anywhere.
This video shows how to do the exercise correctly.
- Swing your arms backwards while bending over
We stand in the middle of the simulator. We take the crossover handles in both hands. We place our feet shoulder-width apart. We bend the lower back - bend forward. We bend our elbows slightly.
Let's start working with our hands. We try not to jerk our shoulder blades. Keep your back in place. Elbows at the top should point to the ceiling.
You can view this exercise here:
Exercises for the pectoral muscles
- Crossover (or crossover)
This is the most popular exercise. It is named after the simulator. There are many options for performing exercises.
Can be done with both large and small weights; both with two hands and alternately; both standing and lying down.
- Classic option:
We take the handles of the simulator in our hands. Feet - shoulder width apart.
We begin to bring our arms down and then raise them up, while spreading them at shoulder level. Below we linger for a few seconds. Then we slowly rise up.
It is important to monitor your body position. The body should be straight, the elbows should not bend at right angles.
The technique and all the nuances can be seen in this video:
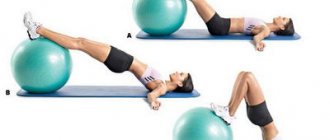
- Lying fly
It is necessary to move the bench with an adjustable tilt angle of 30-35 degrees. This will work the middle of the pectoral muscles. This exercise is similar to lying down with dumbbells.
More details here: