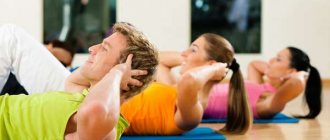
Vanilla ice cream, a simple cheeseburger, a little black dress—sometimes the sweetest things are the simplest. This also applies to the main core exercise you've probably done in almost every workout, the plank.
Of course, simply holding a straight line of the body is not as interesting as doing crunches, but the plank will make you more trained and will help both in the gym and at home. “Side planks are designed to strengthen the obliques and stabilize the spine,” says Pilates trainer Cara Bonney. “And this will give you the opportunity to lift more weight - be it a barbell or a child, for example.”
And if you think the side plank is boring, you clearly haven't tried the endless variations of it.
How to do a side plank
Execution technique
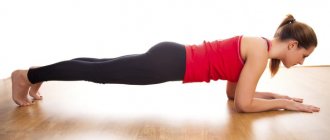
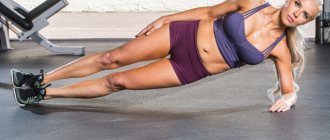
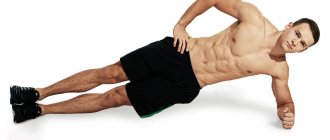
Lie on your side with your forearm on the floor, your lower elbow directly under your shoulder, and both legs extended.
They can be staggered for added stability or stacked on top of each other for added complexity. Tighten your abs and lift your hips off the floor, forming a straight line from your head to your feet. Stay in this position for 15-30 seconds. Your top hand may be on your hip (relief) or raised (difficulty). “The side plank works your postural muscles, which help you stay upright and prevent injury.”
To perform the exercises correctly, start by bending both knees and placing your feet 90 degrees behind you so that your body forms a straight line from your head to your knees. To make the side plank more challenging, keep your bottom leg bent but extend your top leg, actively engaging your inner thigh.
Useful tips
Let's share a few more tips on how to learn how to do a side plank.
- There is no need to be afraid. It is impossible to injure yourself if there are no contraindications to the plank.
- To perform the plank, you do not need to visit a gym or fitness center. It can be done at home, on the sports ground, even at work, if there is space.
- When performing the exercise, every 3-4 days you need to increase the time of balancing on your side by 5 seconds.
- There is no time of day restriction for the side plank. If you have time and desire, it can be done several times a day.
After doing the side plank every day for more than 21 days in a row, this exercise becomes a healthy habit that can help anyone quickly become lean and healthy.
Types of side plank
And here are a few more complicated variations of the exercise...
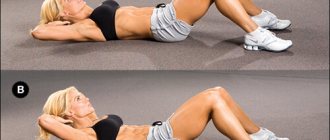
With the hips dropping
Technique: From the side plank position, lower your hips (body) a couple of centimeters, then return to the starting position. This is one rep plank with hip dip.
With knees touching
Technique: In a side plank position, bring your right elbow to your stomach and touch your left knee. Then return to the starting position. This is one repetition.
With a twist
Technique: In a side plank position, slowly rotate your chest until it is parallel to the ground. As you do this, extend your right arm out to the side through your bottom. Then return to the starting position. This is one repetition.
Technique tips: You should feel how the abdominal muscles seem to “stick” to the spine and are in constant tension. In the classic side plank, you should also keep your head in line with your spine and avoid looking down, as this can damage the cervical spine. The most important thing in all variations is to feel the push from the floor, and not from the shoulders.
Number of Reps/Sets: Stick to a maximum of 30 seconds or 10-15 reps for all variations. If you want more resistance, lower to the starting position, pause and repeat. But in general, it is better to perform planks at short intervals, but with good technique, than to stand in them for a long time to the detriment of your own muscles.
Muscle work and benefits of planks
The classic version of the plank is designed so that the main load falls on the abdominal and back muscles. But as you perform, the muscles of other parts of the body are also activated - shoulders, chest, buttocks and thighs. Thus, the load distribution occurs according to the following algorithm:
- the abdominal muscles keep the body suspended, helping the body resist gravity;
- the back muscles support the body in an upright position;
- the pectoral and deltoid muscles hold the shoulders and chest up, like the abdominal muscles, resisting gravity;
- quadriceps, calf and gluteus maximus muscles help keep both legs and pelvis in a level position.
That is, in the process of doing the plank, not only the abs are pumped, but the whole body is involved. And since this exercise has several variations, the load can be shifted to certain muscle groups.
The plank is designed for comprehensive muscle strengthening, increasing the strength and endurance of the body. More specifically, this exercise is useful in several ways:
- Losing weight, because as a result of daily planking, the muscles are tightened, the waist becomes narrower, the stomach becomes flat, and the looseness of the figure disappears.
- Improvement: Significant strengthening of the muscles that support the back leads to stabilization of the lower spine. However, if a person has had back injuries or diseases in the past, then before starting classes you should go to the doctor and consult - sometimes strengthening the back muscles may be a contraindication.
- Posture alignment. Both when doing the plank and as a result of strengthening the muscles, the skill to keep the body straight appears. Posture improves, and with further exercise it becomes easier to do isotonic exercises.
Again, the plank does not require sports equipment. This exercise can be performed with equal effectiveness both at home and in the gym. It is suitable for both men and women.
Since the plank is aimed at strengthening the muscles, it does not help increase their length. This means that it will not be possible to increase muscle volume or pump up muscles by performing this exercise.
And it’s worth mentioning separately about the effect of planks for weight loss. The fact is that it is not some kind of panacea, and the effect directly depends on how much energy was spent on implementation. And dynamic plank variations will, of course, burn more calories than static planks. And if you combine exercise with diet, the result will be more pronounced and faster.
You can even combine the plank with fitness or gymnastics: for effective weight loss, it is important to spend more energy than a person receives from food.
What are the benefits of doing the exercise?
Yes, everything looks cool in the photo, but what muscles are used in the side plank? According to Bonnie, this exercise works the entire core. “The core muscles are not just the abs, but the muscles of the torso, including the hips and back.”
This plank primarily works your obliques, but your glutes, lateral thighs, and hamstrings also work. Plus, shoulder stabilizers keep you balanced.
One of the benefits of this exercise is that it is safe even for people with back or spinal disc injuries. While many movements involve twisting your spine and putting pressure on your lower back or neck (such as crunches), the side plank does not bend or compress your spine.
Core muscle development
The plank, as we said, works all of your core muscles. Here you won’t be able to cheat and not use any of them, since they will all be needed to maintain balance.
Strengthening your hands and wrists
The side plank requires you to balance on one arm, so it's a great pose for strengthening the muscles in your shoulders, wrists, and arms. Don't lock your elbow or put all your weight on your shoulder.
Strengthening leg muscles
Firstly, in order to successfully perform the plank, you will need to train your legs separately, which is already a plus. In addition, they also maintain balance while doing the plank.
Improved sense of balance
I think many would agree that the side plank is, without a doubt, a difficult exercise in terms of balance. However, the fact that it is quite challenging and demanding makes it an excellent basic exercise.
Don't be afraid to cut yourself some slack if you're new. Don't chase time, pay attention to technology.
Improved concentration
Example: you feel your hands trembling, sweat running down your forehead... You are just waiting for the pose to end. And you concentrate so hard on staying upright and keeping yourself from sagging.
You may not notice that you are training concentration at the moment, but by doing the plank over and over again, you will become more and more successful in controlling yourself.
Newbie mistakes
Most often, those who do not perform the side plank correctly cannot stay in the pose. Let's look at the most common mistakes made by novice athletes, which also happen to professionals:
- Bent, hunched back. In this position, it is difficult to maintain balance, your back quickly begins to hurt and it is difficult to breathe.
- Incorrect hand position. If the hand is placed at a different angle than necessary, there will be a risk of injury to the joints of the hand, the inability to perform the exercise, and improper load on the body.
- Sagging of the pelvis during fixation. If the buttocks are not tense, the movement will not be possible, since these muscles are the main ones for performing the plank.
- Head down. A chin lowered toward the chest makes breathing difficult and creates unnecessary stress on the neck muscles.
- Relaxed or bent knees. Due to this position of the legs, proper execution of the exercise will be impossible.
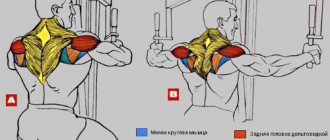
What muscles does it pump?
The plank strengthens the abdominal cavity, back and shoulders.
Target muscles involved in plank work:
- Primary muscles: extensor spinae, rectus abdominis and transverse abdominis.
- Secondary muscles: trapezius, rhomboids, rotator cuff, anterior, middle and posterior deltoids, pectoralis, serratus anterior, gluteus maximus, quadriceps and gastrocnemius.
Target muscles involved in the side plank:
- Primary: transverse abdominis, gluteus medius, hip adductors and abductors, and external and internal obliques.
- Secondary: gluteus maximus, quadriceps and hamstrings.
Exercise characteristics
The side plank is a more complex technique for performing a regular plank. Since when performing this variation of the plank, a woman needs to balance on two or three points of support. It is difficult for beginners to immediately start doing the side plank. Therefore, they need to first learn how to correctly perform the classic plank, and then move on to more complex variations. If you correctly learn how to do a complicated plank, then in just a couple of weeks you can achieve weight loss in problem areas, show relief and improve your health.
About doing the plank for weight loss >>
We supplement the training program
As we said earlier, the plank will be an excellent solution to diversify and complement your training program. Especially for you, we have compiled a plank schedule for 30 days, which outlines the number of approaches of various types of planks per month for men. Use this as a rough guide to achieve the best results. Remember that any trained muscle becomes stronger, but don't overwork yourself by trying to achieve big results in a short time.
| Day | Type of plank | Time in seconds | Pause in seconds | Number of approaches |
| 1 | Classical | 20 | 20 | 3 |
| 2 | Classic with outstretched arm | 20 | 20 | 3 |
| 3 | Classical | 30 | 30 | 3 |
| 4 | Classic with outstretched arm | 30 | 30 | 3 |
| 5 | Lateral (on each side) | 20 | 30 | 3 |
| 6 | Rest | |||
| 7 | Classical | 30 | 20 | 3 |
| 8 | Classic with outstretched arm | 30 | 20 | 3 |
| 9 | Classical | 30 | 20 | 4 |
| 10 | Classic with outstretched arm | 30 | 20 | 4 |
| 11 | Lateral (on each side) | 30 | 30 | 3 |
| 12 | Rest | |||
| 13 | Classical | 45 | 30 | 3 |
| 14 | Classic with outstretched arm | 45 | 30 | 3 |
| 15 | Classical | 30 | 20 | 6 |
| 16 | Classic with outstretched arm | 30 | 20 | 6 |
| 17 | Lateral (on each side) | 30 | 20 | 4 |
| 18 | Rest | |||
| 19 | Classic + with outstretched arm/leg | 60+60 | 30 | 2+2 |
| 20 | Lateral (on each side) | 40 | 30 | 4 |
| 21 | Classic + dynamic | 60 seconds + 8–10 repetitions | 30 | 2+2 |
| 22 | Lateral (on each side) | 40 | 30 | 4 |
| 23 | Rest | |||
| 24 | Classic + dynamic | 80 + 80 | 30 | 2+2 |
| 25 | Lateral (on each side) | 40 | 30 | 4 |
| 26 | Classic + dynamic | 80 seconds + 8–10 repetitions | 30 | 3+3 |
| 27 | Rest | |||
| 28 | Classical | 60 | 60 | 8 |
| 29 | Classic with outstretched arm/leg + dynamic | 60 seconds + 10–12 repetitions | 30 | 3+3 |
| 30 | Classic + with outstretched arm/leg + dynamic | 60 seconds + 10–12 repetitions | 30 | 3+3+3 |
Useful video with different types of planks for men:
Plank exercise for men: schedule
First, it is recommended to perform the exercise for one minute, in three approaches. For a beginner, it is enough to hold out for 15-20 seconds, then gradually increase this time to one minute or more. The longer you hold the bar, the higher the effectiveness of the exercise will be.
It is recommended to start the set of exercises with a side plank and end with a simplified plank, on your knees. This exercise is also great for warming up.
It is recommended to exercise every day. As a result, you will get a strong, trained body and sculpted abs. An approximate version of the plank program for men can be found in the table below.
The exercise really helps to achieve excellent results. You can see examples in the photo.
The plank is a universal exercise that is very useful for men and helps to work all muscle groups. But remember that you can achieve maximum results when it is combined with other workouts and, of course, when done correctly and regularly. It is important to avoid common mistakes and, of course, eat right. We invite you to watch a video demonstrating the correct execution of this exercise for men.
Correct elbow stand technique
The elbow plank is practically no different from the classic version of this exercise, but it has its own nuances. To avoid mistakes and muscle damage, pay attention to how to do the elbow plank correctly:
- Take a lying position, leaning on your forearms.
- Place your elbows shoulder-width apart.
- Clasp your hands in a lock (light version) or keep them parallel to each other (for a more intense load).
- Keep your body above the floor surface. It should resemble a perfectly straight line - watch the position of your lower back.
- Shoulders should be relaxed and breathing should be free. You are ready to do the exercise - time it and try to stay still.
- Rest and proceed to the next approach.
Carefully monitor the condition of your body - burning in the muscles, slight trembling or swaying is natural, pain or cramps signal the need to immediately stop the exercise.
Important!
Despite the fact that the plank has a wonderful preventive and therapeutic effect on the back muscles, increasing pain in the shoulders or between the shoulder blades is a contraindication to performing the exercise.