Thanks to this program, you will be able to see excellent results very soon. Girls and men can say goodbye to chubby arms and saggy belly because they will disappear. Today we will tell and show you how to do a plank for weight loss and give a training program for a month, according to which the elbow stand for the press will help you create beautiful abs on your stomach or simply help you achieve a flat stomach.
What are the benefits of planking for weight loss?
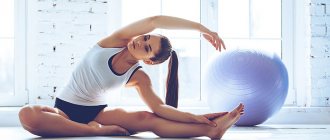
The plank is one of the best exercises for strengthening your core muscles. It interacts with several muscle groups simultaneously, both on the front and back sides of the body. The plank will not only tone your tummy, but also strengthen your lower back and reduce back pain.
Your posture and balance will also improve as you keep your abs engaged.
This exercise is an excellent option that works the muscles of the body - but only if the technique is correct. Keep reading to find detailed instructions and quick tips on how to properly hold an ab plank and get the most out of this exercise in 30 days!
Build muscles or strengthen your body?
The most notable feature of the plank is its versatility. It is equally useful both during regular exercise in the gym and when doing exercises or warm-ups at home. Experienced athletes value it not only for its general health benefits, but also for its effectiveness. Every serious man knows that the plank gives excellent results when drying the body.
Let's look at some useful aspects of this exercise:
- The plank affects all major muscle groups of the human body, be it the muscles of the arms, buttocks or abs. By regularly performing handstands, you will be sure that no part of your body is neglected.
- The plank strengthens the body's muscular corset, preparing it for further stress.
- The plank increases the body's endurance and allows you to exercise with heavy weights without detrimental effects on the muscles.
- The plank trains the vestibular system, develops a sense of equilibrium and balance.
- The plank has a preventive effect, preventing pain in the lumbar region - a common problem for men.
- The plank develops the back muscles, makes your posture straight and your gait confident.
This list clearly shows how great the benefits of the plank exercise are for men. It will be a great addition to your training program.
Toning your core muscles and developing perfect abs
The plank is one of the most effective static exercises, since it affects the upper and lower abdomen and lower back, while also allowing you to pump up your abs. And while she works all those muscles to strengthen your core, your upper and lower body are also getting a workout—your back and shoulders work to keep your upper body stable and balanced, while your quads and glutes keep your core strong. Do you want the coolest thing? Not only does planking improve your posture and strengthen your core muscles, which helps you avoid injury, but it also activates several stiff muscles throughout your body, which will finally give you that flat and sexy stomach you've been dreaming of.
Correct plank technique
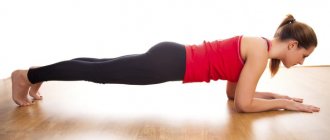
In order for the 30-day exercise program to work in your favor, it is important that your technique is on point. Doing it incorrectly can damage your lower back and stop your progress. Follow these directions for proper technique.
- Place your forearms firmly on the ground, shoulder-width apart.
- Extend your legs, stabilizing yourself with the balls of your toes.
- When you rise from the floor, make sure that your body forms a straight line from the top of your head to your feet.
- Don't let your hips sink too close to the floor, as this will cause tension in your lower back, which can lead to injury.
- Don't raise your hips too high: while this makes the exercise easier, it also puts unnecessary weight on your lower back. In addition, this is self-deception; by making the exercise easier, you reduce its effectiveness.
- Make sure your abs are engaged and tense the entire time. You can do this by imagining that your navel should touch your spine.
- To engage your legs, squeeze your glutes and engage your quads.
- Most importantly, don't forget to breathe. Moreover, when performing the exercise for a long time, it is important to maintain a steady breathing rhythm. Try to breathe deeply instead of holding your breath high in your chest. This may be difficult at first due to the position of your body, but the best trick to control your breathing is to focus on it.
Exercise schedule for beginners
The stand is a static endurance exercise, so good physical fitness is required to stand for 2-3 minutes.
For beginners, the classic version of the plank for a month is ideal, performed on the hands and elbows with a gradual increase in the time of the stand.
| Day, no. | Time |
| 1 | 20 sec |
| 2 | 20 sec |
| 3 | 30 sec |
| 4 | 30 sec |
| 5 | 40 sec |
| 6 | 40 sec |
| 7 | Rest |
| 8 | 50 sec |
| 9 | 50 sec |
| 10 | 1 min |
| 11 | 1 min |
| 12 | 1.5 min |
| 13 | 1.5 min |
| 14 | Rest |
| 15 | 2 minutes |
| 16 | 2 minutes |
| 17 | 2.5 min |
| 18 | 2.5 min |
| 19 | 3 min |
| 20 | 3 min |
| 21 | Rest |
| 22 | 3.5 min |
| 23 | 3.5 min |
| 24 | 4 min |
| 25 | 4 min |
| 26 | 4.5 min |
| 27 | 4.5 min |
| 28 | Rest |
| 39 | 5 minutes |
| 30 | 5 minutes |
For the more experienced, it is suggested to diversify the exercises over 30 days. A total of 15 lessons are presented, after the end of the last one a repeat round is done.
- Day 1. Starting position: the body stands up, elbows under the stoves, feet touching tightly, abdominal and buttock muscles tense. The plank is done three times for 45 seconds
- Day 2. Starting position: from the low plank, the weight is transferred to the right elbow, the body turns. The left hand rises up, followed by the gaze. After 45 seconds, the elbows need to be changed. 3 approaches on each side.
- Day 3. Starting position: under the shoulders, the hands are straightened, the feet are pressed tightly against each other, the muscles are tense, the legs are straight. 3 sets of 45 seconds.
- Day 4. Starting position: from the previous stance you will need to turn around and transfer the weight to your right hand, and straighten your left hand forward. You need to hold the plank for 45 seconds, then change sides. The exercise is performed 6 times.
- Day 5. Starting position: low stand on your elbows. You need to alternate bending your knees for 45 seconds. 2 approaches are done.
- Day 6. Starting position: repeat position 3 days. First, one hand and then the second come off the surface and touch the opposite shoulder. The body should not sway. The stance is repeated three times for 45 seconds.
- Day 7. Starting position: the low plank smoothly turns into a high plank with straightening your arms, after which you need to lower yourself back onto your elbows. The body should be smooth. Do 3 sets of 45 seconds.
- Day 8. Starting position: lower position, bend your knees one at a time, move to a high plank. Then you need to touch the opposite shoulder with your hand and return to the lower position. You should do 3 sets of 45 seconds.
- Day 9. Starting position: low stance, elbows slightly forward. You need to slowly lower yourself so that your shoulders drop to your elbows and return back. Three sets of 45 seconds.
- Day 10. Starting position: low plank, turn the hip to the right until about 10 cm remains to the surface. The exercise is repeated in the other direction. Do 3 sets of 45 seconds.
- Day 11. Starting position: high stance, when jumping, legs are spread shoulder-width apart, buttocks are not raised and back to the starting position. Do three approaches of 1 minute each.
- Day 12. Starting position: low position with a turn on the left side. Then the hips rise for a few seconds, after which they lower almost to the floor. Movement exercises with the hips are performed up and down. Then the side changes. The stand is performed for 1 minute on each side, 2 approaches.
- Day 13. Starting position: high plank, the left knee is pulled up to the right elbow, held for a few seconds and returned back. The exercise is done on each leg for 1 minute, 3 times.
- Day 14. Starting position: low stance, right knee pulled up to the right elbow with a two-second delay and return to the starting position. Everything is repeated in turn with both legs for 1 minute, 3 approaches.
- Day 15. Starting position: high plank with arms extended in front of you as much as possible. The stomach should be tucked in and the buttocks should be tense. You need to stand for 45 seconds in 3 sets.
The main pose of the plank exercise set is taken from yoga and is equally suitable for men and women of any age. To practice, you only need a hard, flat surface the size of a yoga mat, and a few minutes of time. The plank pose should be taken from a position lying face down. Raise your torso and head, leaning on your arms extended or bent at the elbow joints at a right angle:
- support on the hands and feet;
- keep your back straight;
- do not bend your legs;
- look at your hands, they remain shoulder-width apart;
- the abdominal and buttock muscles are tense.
The exercise is static, the first time is performed until pleasant fatigue. The duration of subsequent classes increases.
Depending on the degree of preparedness for physical activity, the duration of the first workout for beginners ranges from 20-60 seconds. It is recommended to increase the time for performing the plank exercise for beginners by 10-20 seconds every other day. In a month, the training time will be only 5 minutes a day, and if the recommendations are followed exactly, the first results of the training will appear.
You should resume exercises after a day of rest by repeating your last achievement. There is no need to dramatically increase the time it takes to perform poses. If you feel tired and the exercise time is not over, do not bend your knees. Lowering your head or lifting your pelvis can relieve tension in your back. After taking a break, return to the starting position and continue the exercise.
The most common mistakes
- Placing your hands too close together will cause shoulder instability
- Holding your breath—blood pressure rises quickly, which can lead to fainting
- Dropping of the head, pelvis or shoulders - the body must be aligned or injury may occur
- Trying to hold the position for too long - it is better to do the plank for a shorter time, but with good technique, than vice versa.
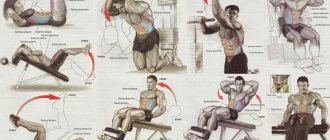
Types of Plank exercises
How to do a plank for beginners?
Do I need to do many variations at once and do all types of abdominal planks in one day? No. If you find forearm stand too difficult, try doing it with straight arms.
- Place your hands firmly on the ground, shoulder-width apart. Avoid elbow locks; they place unnecessary and often dangerous stress on the joint.
- Extend your legs, stabilizing yourself with the balls of your toes.
- Once in position, straighten your spine, tighten your abdominal muscles, squeeze your glutes and quads, and keep your head in a neutral position to form a straight line with your body.
- Again, don't let your hips sag or your butt rise toward the ceiling. Keep your body in a rigidly straight line throughout the entire workout.
If this is already boring for you, then you can diversify your training routine with variations of the plank. Try them all during the 30-day challenge.
- Place your forearms on an unstable surface, such as a Bosu ball.
- Place your feet on an unstable surface.
- Lift one leg off the floor while standing.
- Raise one hand off the floor.
- Bring your legs together and spread them as you jump.
- Alternately bring your right knee to your right armpit and your left knee to your left armpit.
- Swap your legs.
- Extend your right arm forward, then your left.
- Rotate your body from side to side, bringing your left knee to your right armpit and then your right knee to your left armpit.
- March your arms up and down.
- Lift your left arm and right leg at the same time, then switch to your right arm and left leg.
- Place your feet on a smooth surface and squeeze your core muscles to pull your legs towards you, becoming like a corner, and stretch them back.
- Rotate your upper body by raising your right arm into the air, return to the starting position and rotate to the other side by raising your left arm.
- Gently lower your knees to the floor one at a time during the plank.
- From a plank position on straight arms, begin “walking on your hands” forward.
- Again from a straight-arm plank position, begin to move your arms forward until your face almost touches the floor. Pause here to inhale, then return to the starting position.
One thing to remember is that the plank is a compound exercise that involves both your core and lower back. So don't worry if you feel some soreness in your lower back a few days after doing planks. This is actually a good thing because it means those muscles are working and will eventually get stronger with the plank.
We supplement the training program
As we said earlier, the plank will be an excellent solution to diversify and complement your training program. Especially for you, we have compiled a plank schedule for 30 days, which outlines the number of approaches of various types of planks per month for men. Use this as a rough guide to achieve the best results. Remember that any trained muscle becomes stronger, but don't overwork yourself by trying to achieve big results in a short time.
| Day | Type of plank | Time in seconds | Pause in seconds | Number of approaches |
| 1 | Classical | 20 | 20 | 3 |
| 2 | Classic with outstretched arm | 20 | 20 | 3 |
| 3 | Classical | 30 | 30 | 3 |
| 4 | Classic with outstretched arm | 30 | 30 | 3 |
| 5 | Lateral (on each side) | 20 | 30 | 3 |
| 6 | Rest | |||
| 7 | Classical | 30 | 20 | 3 |
| 8 | Classic with outstretched arm | 30 | 20 | 3 |
| 9 | Classical | 30 | 20 | 4 |
| 10 | Classic with outstretched arm | 30 | 20 | 4 |
| 11 | Lateral (on each side) | 30 | 30 | 3 |
| 12 | Rest | |||
| 13 | Classical | 45 | 30 | 3 |
| 14 | Classic with outstretched arm | 45 | 30 | 3 |
| 15 | Classical | 30 | 20 | 6 |
| 16 | Classic with outstretched arm | 30 | 20 | 6 |
| 17 | Lateral (on each side) | 30 | 20 | 4 |
| 18 | Rest | |||
| 19 | Classic + with outstretched arm/leg | 60+60 | 30 | 2+2 |
| 20 | Lateral (on each side) | 40 | 30 | 4 |
| 21 | Classic + dynamic | 60 seconds + 8–10 repetitions | 30 | 2+2 |
| 22 | Lateral (on each side) | 40 | 30 | 4 |
| 23 | Rest | |||
| 24 | Classic + dynamic | 80 + 80 | 30 | 2+2 |
| 25 | Lateral (on each side) | 40 | 30 | 4 |
| 26 | Classic + dynamic | 80 seconds + 8–10 repetitions | 30 | 3+3 |
| 27 | Rest | |||
| 28 | Classical | 60 | 60 | 8 |
| 29 | Classic with outstretched arm/leg + dynamic | 60 seconds + 10–12 repetitions | 30 | 3+3 |
| 30 | Classic + with outstretched arm/leg + dynamic | 60 seconds + 10–12 repetitions | 30 | 3+3+3 |
Useful video with different types of planks for men:
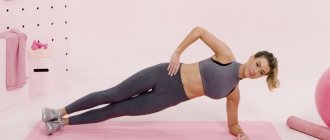
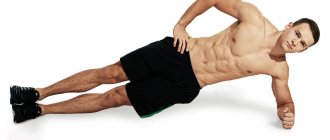
How to do a side plank
There aren't many core exercises that are as effective as the side plank. Most people ignore their sides and focus on their core muscles. There's nothing wrong with that, but if you neglect the sides, you're neglecting a weak muscle called the quadratus lumborum, or quadratus lumborum. It is an important muscle on the back of the abdominal wall that plays a crucial role in soothing and reducing back pain.
Be sure to include this exercise in your workout.
Technique:
- Get into a plank position, then twist to the right.
- Keep your legs extended, your hips and feet flat on the ground, legs stacked on top of each other.
- Place your right elbow directly under your shoulder to lift your torso and align your head and spine.
- Place your free hand along the length of your body, or if you want to increase the difficulty, raise your hand.
- Repeat the same movements for the left side.
The effect of planks for weight loss
The rack is one of the components of the bodybuilder training system, athlete training and fitness programs.
Thanks to it, you can strengthen the muscle corset of the back, abs, buttocks, legs and arms. The following effects are noted from regular exercises:
- Beautiful posture.
- Legs and arms become slimmer.
- The risk of developing osteoporosis is reduced.
- Tightened ligaments and tendons.
- Waist size and the appearance of cellulite are reduced.
- The health status of cervical and lumbar osteochondrosis improves.
Such good results are achieved by a certain amount of muscle tension when balancing the torso and overcoming the force of gravity to keep it in a horizontal position.
Don't Always Follow Your Workout Schedule
First of all, everything is fine! Life goes on. Sometimes we forget, sometimes we're too busy, and let's be honest, sometimes we just feel like we don't need it in the moment. If you miss one day, it's okay. It's best to pick up where you left off and not worry about trying to make up for the lost day. Just turn it into 31 days with an extra day of rest. It's OK.
However, if you miss several days in a row, the rules change slightly. If you miss a few days, it's best to just start again. And there is nothing wrong with that! You'll likely be more determined and prepared the second time you take on the challenge. The goal of the 30-day challenge is to gradually prepare your body for stable performance by allowing it to adapt to the exercise. And always, if pain begins to prevail, stop the exercise.
Small tips
Completing the 30-Day Plank Challenge is a great way to jumpstart your fitness lifestyle, push yourself to undiscovered horizons, reach new goals, and see the results you want. Here are some quick tips you can follow for any fitness challenge!
- Invite your friends! Everything is more fun when your best friends train with you. This way, you will be responsible for each other and push each other to new heights!
- Listen to your favorite music! Even though you don't need too much time, it's always better if you're listening to a hot new hit or your favorite indie band.
- Be consistent! Do the exercises in the challenge every day at the same time and in the same place (if possible, I know this is not always possible due to active work, so do it to the best of your ability).
- It will be very good if you use a soft mat during the exercise, because... knees and elbows must be protected. If you don't have a mat, you can use a towel.
3 Ways to Increase Your Plank Time
Practice is the only way to improve your plank time. Follow these 3 tips:
- Do bodyweight exercises—pull-ups and push-ups increase your core strength.
- Additional Weights – Do squats and deadlifts to really strengthen your core muscles.
- Practice.
Now that you know everything, it's time to start sculpting a beautiful baby bump!
30-day Plank Challenge
So here's the plan: after 30 days, you'll be able to do a plank for two minutes. Don't worry that you can barely hold it for 15 now, that's all you need to get started. Now, for those of you who can hold a two-minute plank without problems right now, first of all, well done! Second, you can still use this training program to improve your core strength and plank time. Just add one minute to each day and by the end of the challenge you will have doubled your time.
During these 30 days, you will perform the basic plank every day (its technique was previously explained), and the duration for which you must hold the plank increases throughout the entire time. Rest days are also included in the program, and I encourage you to use them to your advantage, as it is likely that without them your muscles will cry. Rest days are important because they give your muscles time to recover and grow.
Two minutes! Smart girls! What's your tummy like? Flat, slim, toned? Great. Now that you feel confident doing planks, you can make yourself even better by adding a minute to the recommended time each day and upping your plank time to four minutes.
Why do planks every day for a month?
A girl's story to a friend, overheard on a tram. “Lenka, I read yesterday that it’s useful to do the plank. Like the abs will be cubes and the waist will be aspen. Well, I returned to my original position. Elbow plank. I’ve read that it’s difficult... And I myself stand for almost 5 minutes, rejoicing. Then my daddy came into the room and laughed so hard!! He says: “Natasha! Why are you hanging like a hammock? A? Are you doing a plank? Well now... Now I’ll straighten you up.” Think about it, he came over and positioned my legs and arms correctly, showing me how to hold my pelvis. That's when I was exhausted after 10 seconds. I thought it was all so simple.”
Plank is a static body position. With proper fixation in the plank position, you will get the effect of an exercise that trains the deep muscles of the body. If you stand in the plank for 1 minute every day for a month, your muscles will get a tremendous workout and well-deserved tone.
The benefits of the plank exercise are undeniable. Below are just a few reasons that will undoubtedly make you say goodbye to laziness and plank for 1 minute a day:
- exercise is the first assistant in the formation of steel abs. Although you are not performing dynamic movements, your muscles are working. Moreover, the load is placed on the deep abdominal muscles, which form a beautiful flat stomach.
- By doing the plank, you strengthen your back muscles. Their role is to support the spine. The stronger the back muscles, the stronger the spine. A strong spine eliminates back pain, which is very annoying and prevents you from enjoying life to its fullest.
- In the plank position, all muscle groups in the body work . At the same time, performing the exercise does not require a lot of space or additional equipment.
- The plank not only shapes your muscles and your figure . This exercise allows you to train endurance. Isn’t this the quality that is so necessary in modern life?
- Women. exercise is a deadly weapon against cellulite. By combining the plank with scrubbing and wrapping procedures, cellulite simply has no chance.
Important! It is very important to remember the contraindications to doing the plank:
- Pregnancy. Additional abdominal muscle tone is contraindicated for a pregnant woman. Therefore, it is better to return to the bar 1 month after giving birth. If, of course, the birth took place without complications.
- Spinal injuries and intervertebral hernias. There is no need to put additional stress on an injured and unhealthy spine. If you want to do planks, you cannot do without consulting an osteopath or traumatologist.
- Diseases of body systems in which physical activity is prohibited.
The plank exercise is not regulated by age. If there are no contraindications and the exercise is given to you, then you can strengthen the muscles in the plank even for 3-4 year old children.
PS Sincerely, site administration.