Content
- 1 Classic bench press technique
- 2 Phases in the Bench Press
- 3 Technical nuances in the bench press. 3.1 Grip technique
- 3.2 Wrist bandages
- 3.3 Position of legs, buttocks, head, shoulder blades
- 3.4 Techniques for taking the starting position “standing on the bridge”
- 4.1 Bar pressing technique
Phases in the bench press[edit | edit code]
For convenience, we divide the exercise into phases:
Phase I – preparation for the starting position.
- Set the racks to the required height (the racks should be positioned so that when removed, the rod rises 2-3 cm above the racks).
- Lie down on a bench (the bar should be approximately at eye level).
- Place your head on the bench.
- Take the bar with an overhand grip (grip width should not be more than 81 cm).
- Bring your shoulder blades together and lower them down.
- Bend over in the thoracic region (stand in a bridge).
- Place your feet in a comfortable position and rest, fix the bridge.
Phase II - starting position.
- Remove the barbell from the racks - while taking the barbell into the starting position, bend as much as possible (lean into the barbell and “hide your shoulders”).
- Fix the barbell on straightened arms.
Phase III – lowering the barbell to the chest.
- Start lowering the bar – the speed should be maximum, at which it is possible to control the lowering process and maintain the correct body position (lowering for a long time wastes a lot of effort).
- When lowering, bend as far as possible towards the bar, keeping your pelvis pressed.
- Lower the barbell under your chest.
Phase IV – squeezing the barbell.
- After touching the barbell to your chest (or the judge’s command, if this is a competition), press the barbell up.
- You should press from yourself in a small arc towards your head (in some cases you can press up without an arc if in the final phase your arms are perpendicular to the floor (above the shoulder joints) and not tilted forward)
Phase V – fixing the bar and returning to the racks.
- Fix the barbell on straightened arms.
- Return the bar to the racks.
The classic bench press technique is considered generally accepted, and this is what your coach will teach you if you come to a powerlifting gym. Its effectiveness lies in the fact that it suits the majority, which is why it is so popular.
Classic bench press
bench press - video
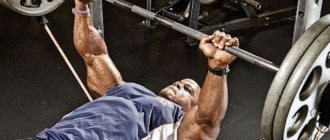
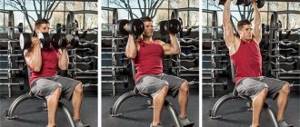
Correct technique for performing the bench press
- lie down on the bench so that your gaze is at the level of the bar;
- grab the barbell with your hands, grip width is medium (wider than shoulders, about 55-60cm);
- remove the barbell from the holders, starting position – elbows are fully straightened, arms are perpendicular to the floor, the bar is at the level of the top of the chest;
- a bend in the back is acceptable, but the pelvis must be pressed against the bench;
- under control, lower the bar down for 2 counts, lightly touching it to the top of your chest;
- for 1 count, press the barbell up, straightening your elbows;
- in the lower position, the forearms are perpendicular to the floor, and the elbows are slightly brought forward, the shoulder blades are brought together, the chest is forward;
- be sure to squeeze the pectoral muscles at the top point, try to feel their work;
- During the exercise, press your feet into the floor, keeping your whole body tense.
The bench press is a rather traumatic exercise.
Be sure to follow safety precautions :
- always try to perform the exercise with a trainer or partner who can back you up, especially when working with heavy weights;
- if you train on your own, then never use barbell locks - because if you cannot squeeze the weight, you need to squeeze the edge of the barbell up with your strong hand (for left-handed people, right-handed for right-handed people) so that the weights at the other end slide off the bar and you were able to free themselves from under the barbell;
- there is a high risk of the barbell falling on your throat or face - this can be fatal, so always follow the technique and lower the barbell to the top of your chest;
- To avoid shoulder injury, move your elbows slightly forward during the press - your shoulders and body will form an angle of approximately 60 degrees.
Grip width when performing bench press
- classic grip – 55-60 cm wide, slightly wider than shoulder width;
- a narrow grip – shoulder-width apart and narrower – increases the load on the triceps and inner pectoral muscles;
- A wide grip can be used in powerlifting; due to a very wide grip, the range of motion of the barbell is reduced and more weight can be lifted.
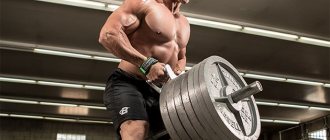
The bodybuilding style of performing the bench press described above differs from the strength style (in powerlifting). In powerlifting, the main goal is to push as much weight as possible. Therefore, to maximize the involvement of all muscles in the work, you need to make a “bridge” (bend your back very strongly) and place your feet on a bench. In bodybuilding, the main goal is to build muscle mass. Therefore, it is important that when bench pressing on a bench, more load is placed on the pectoral muscles (as well as the triceps, if you are doing the bench press with a close grip). The legs must rest on the floor, and the deflection in the back is minimal. Don’t chase super-heavy weights on the bar if your main goal is not just to lift this weight, but to properly pump your pectoral muscles.
Technical nuances in the bench press.[edit | edit code]
Yuzhakov Anton Grips in the bench press
Grip technique[edit | edit code]
Grip with straight hands
When gripping with straight hands, keep the hands straight, with the fingers completely encircling the bar, the thumb facing forward (the hand is clenched into a fist), the bar rests on the base of the palm.
The extended wrist grip is the optimal grip for beginners for a number of reasons:
- The barbell is easier to control throughout the entire movement.
- The mobility of the hand allows you to vary the position of the elbows.
- The load falls on the joint and is not transferred to the ligaments, which minimizes the chance of injury.
Flaws:
A straight wrist grip increases the range of motion.
Bent wrist grip
When using a flexed grip, there are two similar grips. The first is that the bar rests on the base of the palm. The second is that the bar lies closer to the fingers. In this case, the fingers do not completely clasp the bar, but hold it in the position of the barbell, the thumb is moved to the side (the hand is not clenched into a fist, since when the fist is clenched, the hand will straighten).
A barbell at the base of your palm is the optimal grip for bench presses because:
- The amplitude decreases significantly.
- The mobility of the hand allows you to vary the position of the elbows.
- The load is placed on the joint and not transferred to the ligaments, which minimizes the chance of injury.
Flaws:
Such a grip (with a wide grip of 75-81 cm) will not allow you to press your elbows very hard when doing the press, especially for athletes with short arms.
The bar lies closer to the fingers
- The amplitude decreases as much as possible.
- The mobility of the hand allows you to vary the position of the elbows.
Flaws:
- The load is transferred to the ligaments, which can lead to injury.
- It is more difficult to control the amplitude; when pressing heavy weights, the barbell may be pulled in an arc, closer to the neck, which will disrupt the correct amplitude of movement.
Fedosienko style
With this grip, the bar rests on the base of the palm, while the palm is slightly pronated, relative to the bench press with a bent hand (the bar rests approximately on the adductor thumb muscles, depending on the structure of the palm).
This grip is not popular in the raw bench press, but has a number of advantages for athletes with strong pectoral muscles.
- The amplitude decreases significantly.
- The load is placed on the joint and not transferred to the ligaments, which minimizes the chance of injury.
- Allows you to actively engage the pectoral muscles throughout the entire amplitude.
Flaws:
- Almost the entire load falls on the pectoral muscles.
- In the final phase, the triceps are weakly activated, which can complicate the push-up.
Bar Compression Force
Regarding the compression force of the barbell, opinions differ, from the most titled athletes and coaches to diametrically opposed ones. Some say that the compression force of the bar should be greater, almost maximum. Others - the bar should lie freely, holding it slightly with your fingers. Everything is purely individual. My opinion is that it is better for beginners to squeeze hard and then experiment.
PS The grip, Fedosienko Style, was only seen by this athlete, in the bare bench press. Since my classification is mine, I decided to name it after him.
Execution technique
You should start performing the exercise with warm-up approaches with an empty bar or light weight. In addition, technique is inextricably linked with taking the correct starting position.
- Leg position
The legs are laid back as far as possible (in the direction of the head), and the feet are pressed to the floor. By fixing the position of the feet during the exercise, the barbell receives maximum power impulse.
- Back
In order to protect the shoulder joints, it is necessary to bring the shoulder blades together and position yourself on the bench so that the force supports do not interfere with the exercise. The lumbar bend is performed without lifting the buttocks, the back is tense.
- Head
The back of the head is fixed on the bench press, the gaze is directed upward, you should not accompany the bar during the approach.
- Hands
In the starting position, the barbell should be held with outstretched arms above the chest. With the help of a partner, remove the barbell from the rack and pause, fixing the barbell at chest level. The barbell is lowered until it lightly touches the chest, after which it is pressed back to the starting position. At the lowest point, your forearms should be parallel to each other. The barbell should be held closer to the center of the palm. The placement of the hands should be strictly at the same distance from the center of the bar, as this will make the load as symmetrical as possible. When performing the exercise with a wide grip, your elbows should be slightly spread to the sides. The trajectory of the exercise is vertical and slightly curved towards the head. When lifting the barbell, you need to exhale, and at the top point, take a short pause.
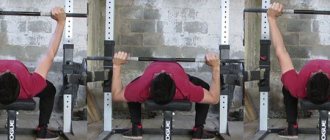
Correct position of the barbell on the chest
Do not place the barbell close to your neck
Non-classical bench press techniques[edit | edit code]
Bar pressing technique[edit | edit code]
Yuzhakov Anton Technique “Press with indentation”
Technique:
After the judge’s “Start” command, the barbell is lowered under the bottom of the chest; if with the classical technique the barbell is fixed at the highest point, then with the pressing technique the barbell is pressed into the chest a couple of centimeters, but the athlete does not relax, but remains tense. After the judge’s command “Press,” the chest moves up, thereby pushing the barbell, and at the same time the barbell begins to be squeezed, thereby making the movement more powerful. With this technique, most athletes do not use a maximum grip, but an average one.
It should be noted that with this technique it is important to have very strong long back muscles, they are the ones that help push the chest forward when starting.
Pros:
- More muscles are involved in the work (the more muscles are involved in the work when lifting weights, the easier it is for the body to cope with the load).
- Helps athletes who have a weak start (the long back muscles will help with the start).
- For athletes who have strong triceps but weak chests, a medium grip and compression will help them handle more weight.
- When pressing, it is easier to cope with the delay (in competitions, a long delay can greatly exhaust the muscles, they will not be able to cope with the load, when pressing, part of the weight falls on the long muscles of the back (it leaves the chest, deltoids and triceps), pressing will help cope with this task) .
Minuses:
- Pressing in increases the range of motion (the shorter the movement, the easier it is to handle the weight).
- When pressing after the judge’s command, the weight is not considered lifted (some athletes accidentally press the barbell into the chest a little more after the command; this is prohibited by the rules).
- The technique is more difficult to master than the classical one.
Assistive exercises
It is very important to pay attention to the back extensors. If with a classic bench press they only maintain the position of the body under a static load, then with the pressing technique they perform a dynamic load at the beginning of the movement of the barbell. Therefore, you should include some of these exercises in your training program.
- Deadlift from plates.
- Bent-over barbell row (not performed in the classic bodybuilding style, when the body is tilted almost parallel to the floor, but the body needs to be tilted about 45%. The movement is performed in a high-speed manner with full retraction of the shoulder blades, the emphasis should shift to the long back muscles, rhomboids, and not on the widest ones).
- Snatch deadlifts (a weightlifting exercise for improving speed, which will provide the opportunity to develop a fast and powerful start when pressing).
- Boat on a bench with weights (an exercise to strengthen the long back muscles, performed dynamically plus 2-3 seconds of statics with each repetition, or simply in a static manner for 15-30 seconds)
Conclusions:
The pressing technique when pressing is not suitable for all athletes, it is mainly suitable for those with weak pecs, but strong deltoids and triceps, and a weak start. When mastering the technique, it really works, which is evidenced by many athletes who have achieved long-time bench presses using the pressing technique, these are Vadim Kahuta and Jeremy Hoornstra.
Oncoming traffic technique[edit | edit code]
Dmitry Golovinsky “Oncoming traffic technique”
Technique:
The counter movement technique is very similar to the classic press technique, but with one change. This technique was first noticed by American athlete Ryan Keneally. When taking the starting position, the athlete stands in a bridge, bending towards the bar as much as possible, after taking the bar from his partner’s hands, he bends even more, brings his shoulder blades together and strains his legs. When lowering the barbell, the athlete, bending, meets the barbell with his chest; when he touches the barbell (or the judge’s command), he starts with maximum effort, and when passing the dead point, the pelvis is pressed against the bench, thereby the movement becomes faster and more consistent.
Pros:
- A fast movement in which the athlete overcomes the trajectory at maximum speed, conserving strength for future approaches (slow presses always greatly deplete physical and psychological energy, which leads to the fact that the athlete is not able to give his best in the third approach).
- With established technology, dead center problems are eliminated.
- Due to the speed of execution (less energy expenditure), the athlete is able to train longer and perform more volume in training, which has a beneficial effect on the final result.
Minuses:
- The technique is difficult to master.
- If the dead point has not been passed, but the pelvis is already pulled back, all the rigidity of the starting position will be lost, the speed will drop and the attempt will be blurred (with the classical technique, when the pelvis is not pressed against the bench, the rigid position of the body is maintained and the athlete is able to “fight” and push the bar ).
Auxiliary exercises:
The counter movement technique is a very complex technique (unlike other pressing techniques), so it is worth including a lot of training to improve the pressing technique.
- Delayed press;
- Presses in the range of 40-50% (to improve technique).
Speed is a very important element of technology; special attention must be paid to it.
- Speed presses.
- Presses from bars, with rubber bands, with chains in a high-speed manner.
Conclusions:
A fairly new, but increasingly popular, counter-traffic technique works. After mastering the technique, it really helps, especially well on bench presses in the rep range of 10+ (here it has no equal, if you don’t take into account the repulse, like they do in the folk bench press).
Press technique with an emphasis on the chest[edit | edit code]
Yuzhakov Anton Technique “Press with emphasis on the chest”
Press techniques with an emphasis on the chest are very popular, especially among beginners, for a number of reasons. Most people who come to the gym have one goal - to pump themselves up, and only then when they do the bench press well or they learn about powerlifting and decide to compete. Also, the chest is the largest muscle group and many people rely on it when doing bench presses. There are also a lot of high-level athletes with well-developed chests (they are genetically dominant or they were simply emphasized during training).
Technique:
The technique is very similar to the classical one, the athlete also stands in a bridge (trying to reduce the amplitude), rests his feet. The difference is that with the classic technique, the elbows are pressed to the body (usually an angle of 45 degrees or less), and when the emphasis is on the chest, the elbows are spread out to the sides (usually an angle of more than 45 degrees, but less than 90). Usually these athletes have a pronounced dead point in the middle of the amplitude, sometimes at 2/3 of the amplitude.
Pros:
- The technique is easy to learn.
- Suitable for many athletes with developed breasts.
- The press looks cleaner.
Minuses:
- The triceps are weakly involved in the work.
- Obvious problems with dead spots (the chest is almost contracted, but the triceps have not yet engaged).
- Due to less activation of muscle fibers, the speed is low (which makes the movement more difficult).
Auxiliary exercises:
The main load falls on the pectoral muscles, so you should work with them:
- Incline press;
- Dumbbell press;
- Dumbbell fly press.
It also makes sense to work with the dead point:
- Delayed press.
- Bar press 3-5 cm.
Due to the low speed of the bench press, it is recommended to include MMB training in your preparation (they are very helpful for athletes with slow speeds)
Conclusions:
The technique is working and has proven its effectiveness over time and popularity. Also, many athletes who used this technique achieved very high results (Sergey Grishko, Ange Galati), and some of them even achieved high results (Roma Eremashvili).
Bench press variations
The classic version of the press is performed in a lying position on an appropriate bench with free weights. Starting position – the barbell is extended above the chest with straight arms. Next, you need to slowly and under control lower it to the chest muscles and press up again. Try to raise the barbell a little faster than lowering it .
Touch press
The exercise is performed in a horizontal position. The barbell press occurs without a pause: as soon as you lower it to your chest, immediately lift it with a jerking movement.
Please note that this technique is not allowed in competitions. There you are allowed to press the barbell only after you have lowered it to your chest, waited a pause and received a command permission from the judge.
Bench press in rack
The exercise is performed the same way, except that everything happens inside a power rack with additional limiters that make the pressing process as safe as possible .
Incline Bench Press
The essence is the same, only the exercise is performed at an angle. The higher you set the bench, the greater the level of load will be transferred to the upper pectoral muscles .
Read also[edit | edit code]
- Basic triceps exercises
- Pectoral muscles - exercises and training features
- How to create a training program
- The best training programs for mass
- Iron World 2011 No. 3 “Bench Press” - page 18. and “Tips for Beginner Benchers” - p.40.
- Iron World 2012 No. 1 — — p.28.
- Bench press for girls
- Close grip bench press
- Smith machine bench press
- Incline Bench Press
- Incline Bench Press
- Bench chest press
- Dumbbell Bench Press
- Incline Dumbbell Press
- Arnold press
- French press
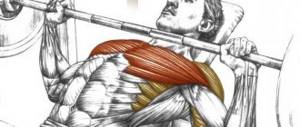
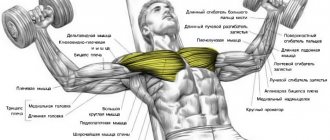
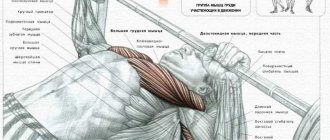
What muscles are used when bench pressing?
The main purpose of the bench press is to develop the pectoral muscles . In addition to this area, the triceps and the anterior deltoid muscles (shoulders) are well worked out during the exercise. If you perform a strength-style exercise, involving the whole body, then the forearms, biceps, abs and even hips are also indirectly involved.
The bench press is an excellent tool for the comprehensive development of the entire body. It is especially interesting to use this exercise to track the results of personal progress in developing strength. Many people even set a certain goal, for example, to squeeze 100 kg by the end of the month. However, we recommend that you do not focus on weight, but work out your muscles efficiently .
“Victory does not give strength. Fight gives it. If you fight and don’t give up, then that is strength” (Arnold Schwarzenegger).