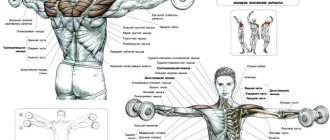
The bridge is the best exercise for the back. In the East, the ability to perform it is considered an important indicator of physical health. This exercise is found in Taoist systems, Shaolin kung fu, and yoga. In the West, not many people know how to perform it correctly from a standing position. Typically, these are gymnasts, dancers, wrestlers and some advanced weightlifters. Most of us, unfortunately, have no idea how to stand on a bridge at home. And he makes a terrible mistake. Why? Let's figure it out.
Benefits of the bridge
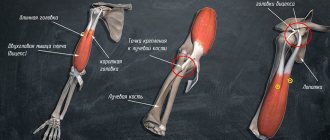
The most important organ in our body is the brain. It controls the operation of all other life support systems. Without impulses coming from it, other organs will not function. The spinal cord, which is a complex plexus of tiny nerves, helps maintain communication between the brain and the body. It is placed in the spinal column, to which ligaments and muscles are attached. They are designed to protect the fragile spinal cord from damage that can lead to serious consequences, including complete paralysis.
A person’s task is to maintain the functioning of the spine and strengthen the muscles around it. Unfortunately, instead we lead a sedentary lifestyle and gain extra pounds. It is not surprising that muscle flexibility is lost, stooping appears, and the back begins to hurt. Inattention to the spine can lead to displaced discs, pinched nerves, and malfunctions of the body. The bridge exercise is the best way to correct a bad situation, develop good posture, return the discs to their place, improve blood flow in the tissues, and also strengthen the deep back muscles. Thanks to it, digestion improves, the lungs begin to work at full strength, and the arms and legs become strong.
Preparatory exercises
The bridge does not fit well into the usual fitness training; you rarely see it in the gym. We spend more time on tightening our abs, arm and leg muscles. Therefore, most people require training to perform a full bridge. Do not rush to set records right away - instead of the desired benefit, you will get a broken back.
Before exercise, you need to warm up your muscles well. To do this, do:
- hand rotations;
- twisting the spine to the sides;
- stretching upward;
- bending the back backwards with the head thrown back, hands on the lower back;
- bending forward and to the sides;
- bending the back up and down from a standing position on all fours;
- push ups;
- lifting the upper body from a lying position on the stomach, hands clasped behind the back;
- bending from the same starting position, during which you grab your ankles with your hands and begin to swing back and forth.
Bridge on the shoulders
Let's move on to the main workout. If you don't know how to stand on a bridge, learn the lightweight version first. To do this, you need to lie on your back with your knees bent. Take your ankles with your hands. As you exhale, lift your pelvis off the floor and bend your back as much as possible.
This is a great exercise for those who suffer from slipped discs. If pain occurs, reduce your range of motion. Most people find shoulder bridges easy. In this case, it can be a little more complicated.
Bridge on straight arms
This exercise uses more muscles. It allows you to include your hands in the work, as well as the interscapular area. How to stand on the bridge correctly? To begin, sit with your legs extended forward and your palms on the floor. Then lift your body up so that your body weight is evenly distributed between straight arms and heels. The torso forms a straight line. The head is directed towards the ceiling.
If the exercise is difficult, at first it is permissible to bend your knees. Stay at the top for a few seconds. It is recommended to master the bridge on straight arms gradually, starting with 10 repetitions. When you get to 40 reps in three sets, it's time to move on.
How to bridge on your elbows. Second step. We train to stand on the bridge from a standing position
For those who have become comfortable with the exercise from a horizontal body position, you can try to perform a more complicated version - from a standing position. Just like before a simpler bridge, you need to warm up and warm up your muscles. It is not advisable to immediately try to stand on a bridge while standing, since not everyone will be able to complete this exercise the first time. For training you will need a Swedish wall or a regular wall.
- You need to position your back at a distance of a little less than a meter from the chosen assistant.
- You need to carefully monitor the position of your legs and arms - your feet should be shoulder-width apart, and your arms should be extended upward.
- Next, you need to start bending back until your palms touch the wall.
- With your palms resting on the wall, you need to start lowering further, gradually moving your hands a few centimeters lower.
- As a result, your hands should be on the floor and your body should be in a stance position.
- In order to master the technique of performing the element, it is advisable to repeat the exercise with the wall several times.
After you can easily bridge with the help of a wall, you need to proceed to the next stage of mastering the exercise. For subsequent training you will need a gymnastic mat. It is best that, in addition to the mat, there is a person who can provide backup when performing the element.
How to get on the bridge from a standing position:
- first of all, you need to stand facing the belayer, if there is one;
- the legs should be, as in the previous exercises, at the width of the shoulder joints;
- Next you need to raise your straight arms up;
- after your legs are positioned at the required level and your arms are raised up, you can begin to lean back;
- at the moment of bending, the belayer should already easily support the back of the person performing the exercise;
- It is advisable to go down as slowly as possible, excluding sudden jerks;
- in order to return to the starting position, you need to push off the floor with your hands and use your back to rise, also being supported;
- You should not refuse the help of the belayer until the technique of the gymnastic bridge element is fully mastered.
The most common mistake among beginners is to use only the lumbar and shoulder regions for the bridge, forgetting about the arms. They are the main ones in this exercise.
Lightweight bridge options
To prepare your body for a difficult exercise, use the tools at hand. It is known that the higher the initial position of the body, the easier it is to stand on the bridge. Therefore, learn to do it, starting from the table, and then from the bench (if you don’t have one, a regular bed or sofa will do). This strengthens the arms, shoulders, and thoracic spine.
How to stand on the bridge from an emphasis? To begin, place your feet shoulder-width apart. Lean back, placing your upper torso on a bench or table. Bend your arms, lean on the surface, turn your fingers towards your feet. Now straighten your elbows until your head and neck are supported. Raise your hips too. Try to see the wall behind you. Don't be upset if you can't fully straighten your arms. Keep training and the results will come.
How to learn to stand on a bridge from a lying position?
You will need a non-slip surface to avoid injury. Lie on your back with your knees bent. Place your hands near your head, fingers pointing toward your feet, elbows pointing toward the ceiling. Now lift your pelvis, pushing off with your limbs. An ideal bridge has 4 characteristics:
- arched back;
- high raised pelvis;
- straight arms and legs;
- deep even breathing.
To achieve them, you need strong back muscles, good mobility of the joints of the arms and legs, and a resilient diaphragm. Go for it gradually. To begin with, it is quite acceptable to place a pillow, a soccer ball or a folded blanket under your back. Straighten your arms and legs as much as you can. To properly distribute the load between them, rock slightly. Make all movements smoothly.
Over time, reduce the distance between your hands and feet. You will notice that doing the bridge exercise is much easier this way. Only after properly mastering this stage can you move on to the next one.
Gymnastic bridge: how to stand on a bridge from a standing and lying position
> Exercises > Bridge
The gymnastic bridge is a classic “arch” and is included in the school physical education program and some disciplines. In the gym, it is very rare to find athletes who perform the bridge exercise.
However, this is one of the most beneficial movements for developing the back, lower back, buttocks and hips, which has no disadvantages.
With proper implementation of the bridge into the training program, the level of physical fitness and the health of the spine can be significantly improved.
The benefits and harms of a gymnastic bridge
The bridge is a basic gymnastic exercise during which a large number of muscles and almost all joints are involved.
The exercise provides significant progress in the development of muscle endurance, flexibility, and coordination.
Benefits of a gymnastic bridge:
- Versatility and easy technique that even beginner athletes can master.
- Can be performed anywhere without special equipment.
- High-quality training of the muscles of the back, lower back, hips and buttocks.
- Natural stretching of the spine (decompression).
- Improved mobility in the hips and hips.
- Strengthening your core muscles.
- Improved posture.
In general, to learn how to make a bridge, you need a free area of floor and desire. The bridge is also ideal for correcting pelvic rotation, strengthening the buttocks, hamstrings, abs, and also increasing lower back mobility.
How to learn to make a bridge
Before learning how to stand on the bridge, you need to understand that there are two different options:
- Normal (from the floor) - performed from a lying position. This technique is intended for those who do not have sufficient flexibility.
- From a standing position - a more advanced version of the bridge involves bending backwards and then forming an “arch”. This is one of the most difficult options, which should be attempted only after completely mastering the bridge from a prone position.
Lead-up exercises
To get on the bridge, it is not always necessary to perform lead-up exercises. However, this is a universal way to tighten up lagging muscle groups, especially if they interfere with mastering the technique.
Exercise "superman"
This is the basic “starting point” for those who decide to master the gymnastic element without preparation. The movement is aimed at strengthening the lower back to prevent injury while mastering the bridge.
Technique:
- Lie on the floor on your stomach. Stretch your arms forward, legs brought together.
- At the same time, lift your legs and arms off the floor, trying to bend your lower back as much as possible.
- Hold the position for 4-6 seconds, then repeat the movement.
Read more about the superman exercise →
Gluteal bridge
In fact, it is the initial phase of the movement that is considered a separate exercise. It is a mandatory element to master.
Technique:
- Lie on the floor, legs bent at the knees, arms along the body. The back and back of the head are pressed tightly to the floor.
- Lift your pelvis off the floor, lifting it as high as possible. At the top point, a straight line should form between the knees and shoulders.
- Take a short pause (or hold for 5-6 seconds to maintain muscle tension) and return to the starting position.
Learn more about the glute bridge exercise →
Reverse plank
Works the muscles of the core, lower back, buttocks and back - the main muscle areas that receive active load when performing a bridge. Static load helps increase endurance and improves balance.
Technique:
- Lie down on the floor. Place your palms on the floor and support yourself with your arms straight (your back should be straight). In your feet, take the emphasis on the heel or the entire foot.
- Straighten up so that your body is straight from your heels to your neck.
- Hold the position for as long as possible.
Learn more about the reverse plank exercise →
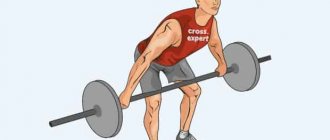
Bridge from a bench
To perform this you will need any bench or stable chair. This technique is halfway to performing a classic bridge. It allows you to start working on the “arch” (with simplification) and increase the flexibility of your back.
Technique:
- Place the spatulas on the bench. Bend your legs at the knee and place them on the floor. The back is straight, the body is parallel to the floor.
- Place your palms on the bench just above your head, then rise up, transferring the support to your hands.
- Bend your lower back as far as possible and hold the fixed position for at least 5 seconds.
Bridge supported on a fitball
Most often, this type of bridge is performed on a fitball, as the most suitable type of sports equipment. This technique is also often called a “half bridge”.
Performance:
- Sit on the fitball. Place your legs forward and bend your knees to maintain support.
- Lean back and gently roll so that the fitball is under your back. Place your hands behind your head and place your palms on the floor. The entire surface of the back and the back of the head should be adjacent to the ball.
- Straighten your arms and legs, bending your lower back as much as possible to create an “arch” (your pelvis lifts off the ball, only your upper back and buttocks touch the surface).
Standing wall bridge
This is one of the most difficult approach movements. Necessary for mastering taking a position from a standing position. Performed against a wall or wall bars.
Technique:
- Stand with your back to the wall, at a distance of 1.5-2 steps. Lean back and place your palms on the wall (fingers pointing down).
- Take short steps, resting your hands on the wall. At the same time, increase the level of arch in your back as you lean your body back.
- Try to reach the very bottom, fixing the position for 3-4 seconds.
Bridge technique
An alternative option is the gradual development of the bridge without “eyeliner”. To do this, the athlete starts with the easiest technique (or partial/pelvic bridge), gradually increasing the incline as flexibility develops.
Bridge from a prone position
- To perform it, you need to lie down with your knees bent, raise your pelvis and fix the position.
- After this, the emphasis switches to the top. The arms are placed above the head in order to intercept the fulcrum.
- After this, it is necessary to form an “arch”.
- The return to the starting position begins with the shoulder blades, after which the buttocks are lowered to the floor.
If you are doing a series of several repetitions , to increase the benefits of the exercise, at the bottom point, do not completely lower your pelvis to the floor until the end of the set.
This will make the movement more efficient.
Bridge from a standing position
This is the most difficult implementation option. To stand on the bridge from a standing position, you must have a high level of physical fitness and sufficient mobility.
Technique:
- Stand straight, feet shoulder-width apart, arms raised above your head.
- Bend your knees slightly and begin to lean back, arching your lower back.
- Extend your arms and land softly on your palms. Align the “arch” so that the support is evenly distributed on the hands and feet.
Flip from the bridge
In this technique, the bridge is only one of the phases of the movement called “backward flip”. To do this you need:
- Make a bridge from a standing position.
- After completely fixing the position, tear off one leg and lift it above you with a powerful push from the heel.
- After pushing off, push with your other leg to give your lower body momentum.
- When successfully performing a flip, land on your toes and/or knees (it is advisable to do the exercise on soft mats or mats).
Elbow bridge
Another way to make the classic technique more difficult. Due to the support on the elbows and forearms, the bend in the back increases, which makes the exercise even more effective.
Technique:
- Perform a regular bridge and fix the position.
- Gradually move your palms closer to your legs, bending your elbows. Do this until your entire forearm is flat on the floor (biceps perpendicular to the floor, elbow bent at a right angle).
Knee bridge
The position is also called vertical bridge due to the position of the body. It is considered an incredibly difficult technique that is only suitable for experienced athletes.
Technique:
- Get on your knees, raise your arms up.
- Begin to slowly lean back, increasing the arch in your lower back.
Place your hands on your heels and hold the position.
Recommendations
Key recommendations that will help you quickly master all elements of the exercise and avoid injuries:
- Start with the easiest option , regardless of your level of physical fitness. Do not try to immediately stand on the bridge while standing, this is almost guaranteed to lead to injury.
- Control your breathing. During the movement, a strong load is placed on the body, which will make breathing difficult. Take deep breaths and exhales.
- When reaching the peak point, the arms and legs should be almost completely straight (minimal bend at the knee and elbow to reduce stress on the joint).
- Regardless of the technique, the pelvis must be carried as high as possible ; this is a key element of the exercise.
And also read how to increase back flexibility →
You may also like
Source: https://bodybuilding-and-fitness.ru/uprazhneniya/mostik.html
How to stand on a bridge while standing
Starting this exercise is always scary. For insurance at first, use a regular wall. Stand with your back to her at arm's length. Lean back and touch the wall with your arms raised up. Turn your fingers down and begin to carefully move along the wall, arching your back. Knees and arms should be bent. Don't rush anywhere. You will have to move away from the wall a little as you descend. As a result, the hands should touch the floor, and the body should bend in a full bridge.
How to stand on a bridge from a standing position without the help of a wall? You need a gym mat or a regular mattress that can protect you from a fall. If you have an assistant who wants to back you up, that’s great. Stand straight, place your feet shoulder-width apart, raise your arms up. Slowly bend back, moving your hips forward. Throw your head back. Seeing the floor beneath you, gently lower yourself onto your straight arms. Remember that to perform the exercise you need a good arch in your back. If you bend your knees instead, you will fall. Walk onto the bridge with your hands, not your shoulders.
How to stand on the bridge. Flexibility exercises
To quickly learn how to stand on a bridge, you need to perform various exercises daily to develop flexibility.
Without them, it will be difficult for your body to accept this position, which, in principle, is unnatural for it. We immediately warn you that most of the exercises are very difficult and will not work out the first time. But with each workout, the muscles will become more and more firm and elastic.
Warm-up
- Mill.
- Turns in different directions.
Shoulder girdle
- Rotations with straight arms: simultaneously / alternately, forward / backward.
- Palms lock. Straightened arms, lowered down. Lift up, bending your back and shoulders.
- Bend your right arm at the elbow at chest level so that your forearm is parallel to the floor. Rotate your upper body to the left, twisting your spine. Repeat on the other side.
- Raise your arm bent at the elbow. Place your forearm behind the back of your head. With your other hand, pull it as far as possible to the side and down. Do the same for the other side.
+ lumbar region
- The most effective exercise for a bridge: bend your back as far back as possible, throwing your head back, but maintaining your balance. Can be done from a standing or lying position.
- Tilts in different directions, forward and backward.
- The upper body is parallel to the floor. Palms lock. Swing your straightened arms so that they are above the back of your head. Repeat several times.
- Holding the back of the chair, bend your spine as far as possible with your legs straight.
Back
- Rotation of the body in different directions.
- Starting position - on all fours. Arch your back up and down at the same time as much as possible, like a cat.
- Lying on your stomach, with your palms clasped at the back of your head, bend your lower back as far as possible.
- Lying on your stomach, with clasped arms extended forward, bend your spine backwards in an arc. Roll from your hips to your chest and back.
- Place your palms on the floor, lie on the floor on your hips, bend at the lower back. Tilt your head back, touching the back of your head with your toes.
- Standing on your knees, rest your hands on your heels. Bend at the waist.
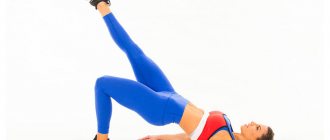
- In the same position. Perform leg swings, bending at the lower back. Try to see your foot above your head.
As soon as you begin to get the hang of the exercises, you can make your first attempts to stand on the bridge from different positions - lying, sitting, standing.
Climb
How to get up from the “bridge” position? This task requires good preparation. First, learn to go down and up the wall by “stepping” with your hands. What is important here is not so much flexibility as strength. To master lifting without support from a wall, stand facing it at a short distance. Place a mat at the back. This will protect you from falling back and forth.
Lifting is performed by transferring weight to the legs, bending the knees more. We move our pelvis forward, lift our fingers off the floor and straighten up using the muscles of our back, abdomen and legs. Hands are always near the ears. No need to pull them forward. The exercise is easier to perform if your legs are spread wider.
Once you know how to stand on the bridge, start training. Remember: thanks to the exercise, you will gain not only strength and good stretching, but first of all a healthy spine. It is the framework that ensures the proper functioning of other organs. Take care of your body and it will respond well to you.
General recommendations
So, you want to learn how to stand on the bridge by all means, but you don’t know where to start. Before moving on to the practical part of the classes, familiarize yourself with the general recommendations.
To begin with, objectively evaluate your initial data: weight, flexibility, physical fitness. If your body weight exceeds 80 kg, if your back is not flexible and you have never done gymnastics before, you should not expect to get on the bridge in a week. You will have to work hard for at least a month, or even more.
Check the degree of flexibility of your spine. To do this, attach a mark to the wall at shoulder level.
- Stand with your back to the mark. Take one step away from the wall. Bend your back backwards. If you see the mark - you are a flexible person and it will not be difficult for you to get on the bridge even in a week with good intensity of training and perseverance.
- Turn to your left side, raise your straightened right arm up, and try to touch the mark. Repeat the task for the other side.
Choose a set of flexibility exercises. Home exercise plans can be different, depending on your physical fitness and mood:
- daily for 15-20 minutes;
- every other day for 30-40 minutes;
- twice a day for 15 minutes.
We have selected for you two videos with training courses for beginners from professional fitness trainers. By completing their tasks exactly, you will be able to do this quickly.