Author: Timko Ilya - the ruler of the entire site and fitness trainer | more details >> Rod. 1984 Trained since 1999 Trained since 2007. Author and creator of the site tvoytrener.com. CCM in powerlifting. Champion of Russia and South Russia according to AWPC. Champion of the Krasnodar region according to IPF. 1st category in weightlifting. 2-time winner of the Krasnodar Territory championship in t/a. Author of more than 700 articles on fitness and amateur athletics. Author and co-author of 5 books.
Place in the author rating:
out of competition
(become an author) Date: 2016-09-11 Views: 12,472 Rating: 5.0
| All articles by the author >> | Medals articles >> |
Loading articles...
Primary muscles - front of the thigh, glutes, back extensors, trapezius, calf muscles
Additional - latissimus muscles, forearms, hamstrings, inner thighs, biceps
Difficulty : high
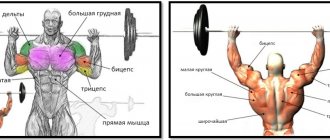
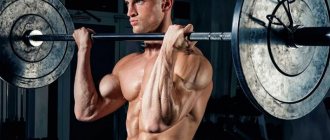
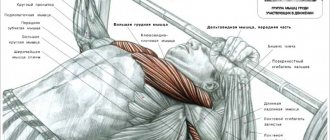
Features of exercises with a barbell for the pectoral muscles
If you are having a hard time getting results, listen to expert advice:
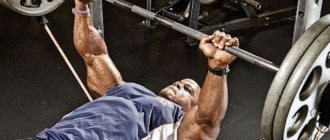
- The principle “the wider the better” is fundamentally wrong; it cannot be applied to bench press exercises with a barbell. Yes, this will shorten the range of motion and you may be able to lift a little more weight. But a grip that is too wide increases the risk of shoulder injury, and the main load goes to the front deltoids. Use a moderately wide grip (about 15-20 cm wider than your shoulders), in which you do not experience discomfort in the joints and ligaments and at the same time feel the work of the pectoral muscles well.
- Don't over-bridge during the bench press, a technique used by powerlifters to shorten the range of motion and lift more weight. If your goal is harmonious breast development, you don't need this. It is enough just to bring your shoulder blades together and rest your feet firmly on the floor when you are lying on the bench, so your position will be more stable. Only a slight natural deflection is allowed.
- Use a closed grip, in which your thumb grips the bar underneath and rests on your index finger. This will make it much more comfortable and safer for you to work with weights than with an open grip. When working with heavy weights, grip of the palm with the bar is necessary, so it is advisable to additionally use magnesium.
- Never forget about warm-up approaches. To properly warm up your joints and ligaments, start performing any chest pressing exercises with an empty bar and gradually increase the weight of the apparatus.
- You should not fully extend your elbows at the top point of the amplitude every time. It is better to leave a few centimeters in the final phase of the movement and work without pauses at the lower or upper point, then you will feel that the pectoral muscles receive maximum load. Neuromuscular connection in fitness and bodybuilding is much more important than huge working weights.
- Maintain the correct breathing frequency: inhale when lowering the barbell down, exhale when lifting. Improper breathing can lead to increased intracranial pressure. Try to make lowering the barbell about two or three times longer than lifting it, so that the pectoral muscles receive maximum stimulation to grow.
- Adhere to the principle of progressive loads; without this, gaining muscle mass is impossible. Each workout, you should try to do a little more than the last: lift the barbell a few kilograms heavier, do a few extra reps, or one more full set. But at the same time, deterioration of technology is not allowed.
- Use different ways to increase the intensity of your workout. The pectoral muscles respond well to negative and forced repetitions, drop sets and supersets.
- Train in a variety of ways. Work in different rep ranges and alternate between barbells, dumbbells, kettlebells, bodyweight, and machines to regularly challenge your muscles and encourage them to grow.
- Do not lift your head off the bench while performing pressing exercises. This increases the axial load on the cervical spine.
- Avoid overtraining. There is no point in performing more than five chest exercises in one workout. As a rule, even three or four are enough. It will be very difficult to recover from more. For girls and beginner athletes, two or three exercises will be enough. Don't forget about quality restoration.
Cleaning weights to the chest
Performed with one or two kettlebells, depending on your training. Starting position - the weights are between the legs.
Doing a small kettlebell swing
By extending the legs of the hip joints, we lift the weights as high as possible
We throw the weights on our chests so that they look in different directions. Like all cleans, we perform the technique either in a squat position or in a standing position. The main thing is not to relax your back, keep it straight.
We stand up until the joints are completely straightened.
Below I will show images of one kettlebell clean on the chest.
As you can see, there is nothing complicated in this exercise. The main thing is not to rush and take the projectile correctly on the chest.
Training programs
Creating a program
The exercise is performed in sets of 1-3 repetitions, in some cases 5 repetitions are possible. When working on technique, the weight should remain light (75% of the possible maximum and below). To work on aggressiveness and stretching when diving (squatting) under the bar, you should use a heavier weight (75% or higher). If the exercise is used as a lighter version of the classic Barbell Clean, then the weight can vary depending on the needs of the athlete, but most often it is about 70-80% of the possible maximum. For pure speed work the weight should be around 65-75%.
Barbell clean exercise technique, tips and tricks
The barbell clean is a powerful basic strength exercise that was borrowed from weightlifting into bodybuilding, CrossFit, and other related disciplines in sports.
Benefits and what muscles work
The barbell clean is one of those heavy exercises, thanks to which an athlete can significantly increase such indicators as strength, endurance, reaction speed, as well as the mass and volume of several muscle groups.
As a result, it is possible to increase working weights in other exercises.
The barbell jerk also provides the necessary aerobic exercise, develops coordination of movements, and promotes the body's production of testosterone.
"Ring push-ups"
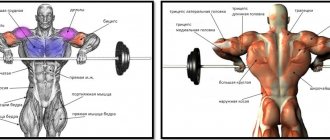
When doing a barbell clean, the main load falls on the following muscles and muscle groups:
- Gluteal.
- Quadriceps.
- Thigh biceps.
- Deltoid and trapezoid.
- Spinal extensors.
A considerable load also falls on the abdominal muscles, which serve as a stabilizer of the body position.
Execution technique
Lifting the barbell to the chest is performed in three stages: the barbell is torn off the floor, then thrown onto the chest and, finally, a squat under the barbell occurs.
"Air squats"
Take starting position:
- The back is absolutely straight with a natural arch in the lower back (and it should remain that way at all times).
- The gaze is directed forward.
- legs with feet pressed tightly to the floor should be shoulder-width apart so that the center of gravity falls on the heels;
- The knees are apart.
- The bar itself should be located as close to the shin as possible (so that the toes are under the bar).
Keeping your back straight and your shoulders slightly back, squat down and with your straight arms grab the bar with a wide overhand grip. The bending angle of the knees is about 45°.
While clearly controlling your movements, pull the projectile upward, creating sufficient inertia for the subsequent jerk.
When the bar is approximately mid-thigh, make a strong push almost from your knees and jerk the barbell onto your chest.
“Sitaps: execution technique”
At the same time, fully straighten your legs and body to give greater acceleration to the rise, bring your pelvis forward slightly, and move your upper body slightly back (but just slightly).
During the squat process, the acceleration of the barbell is dampened, and its bar ends up on the upper chest. The triceps are parallel to the floor.
Having completed the exercise in this way, you can either return to the rack, that is, to the starting position, placing the barbell on the floor, or lower it to the middle of the thigh and begin a new repetition (advanced athletes perform 8 repetitions in this way).
Execution options
The barbell chest lift can be performed in several ways:
- directly from the floor/platform;
- from the hanging position, when the projectile is a few centimeters from the floor/platform;
- from below the knees/mid-thigh, especially if several repetitions are performed in one approach.
Basic mistakes
Beginners often make a number of mistakes when performing this exercise. Here are the most typical ones:
- lack of warm-up, due to which the joints and ligaments are unprepared for the upcoming serious load, especially the joints of the elbow and hand, as well as the hamstrings;
- rounding of the back and lower back - even when using an athletic belt, it is necessary to control their position: the back should be straight, with a natural arch in the lumbar region;
- the weight of the projectile is too heavy, which makes it impossible to technically perform this exercise correctly.
Tips and tricks for implementation
First of all, about contraindications: due to the high risk of injury, this exercise is categorically not recommended if there are injuries, and the spine, shoulder/knee joints and wrists cause unpleasant problems.
when starting to master the exercise, it is better to use one bar or barbell with minimal weight; wrap your knees and elbows with elastic bandages to reduce the risk of injury; do not forget to warm up properly: triceps extensions, bench press, dumbbell lifts will help here; light weight front squats, seated extensions, etc. the movement of the bar should not occur vertically, but along the body; the exercise should be performed as a single whole, and not as three separate phases - the transition between them should be smooth, but you can start by practicing each phase separately; special attention should be paid to ensuring that all muscles and muscle groups involved work in a coordinated manner; If any group lags behind, it is necessary to engage in its development.
What muscles does it work?
What muscles work when doing a barbell clean? The lion's share of the load is distributed between the gluteal muscles, quadriceps, deltoids and trapezius. The hamstrings and spinal extensors are slightly less involved. It is worth noting that the abdominal press also significantly influences the execution of the exercise, helping to stabilize the position of the body, so it should be in static tension throughout the entire movement.
The benefit of performing barbell cleans is that it helps develop muscles such as deltoids, trapezius, quadriceps and glutes.
Moreover, due to its multi-joint nature, an experienced athlete is able to lift decent weights in this movement, which has a beneficial effect on the production of one’s own testosterone. Due to the fact that the barbell clean is a basic exercise, an increase in strength indicators in it will lead to an increase in working weights in exercises such as the snatch, front squats, deadlifts, good-mornings, thrusters, etc.
Bring your heels, pelvis and arms together in time
Coordination is very important in weightlifting. It increases your chances of snatching heavier weights. To do this, you need to try to perform three actions in one instant: (1) your heels stomp on the platform, (2) your elbows “turn on,” (3) your pelvis reaches the lowest point of the squat.
“You'll never do it perfectly, but that's the way it has to be,” Pendlay says. – There are a lot of world-famous weightlifters who also cannot perform all these three actions in an instant
But it is very important to try to do this. Surely you have already seen beginners who will have a large time difference between landing their feet and fixing their elbows
So even if you can combine landing and locking your elbows, just those two things, that's a great improvement over most of them."
Coaching Tips
The key to synchronizing these three things lies in Pendlay's "Note #2": don't pull the bar up for too long. “It all comes together with the desire to dive under the bar while it's still moving up,” Pendlay says. - If your feet touch the floor, and your elbows turn on noticeably later, it means that you find yourself under the bar when it is already moving down. The greater the time difference between these movements - the engagement of the elbows and the landing of the heels, the... you just have to know that for every tenth of a second the bar moves several inches.”
Barbell cleans SportWiki encyclopedia
Barbell Chest Raise
This movement can be divided into 6 successive phases:
Phase 1 – Starting position
The starting position is very close to the bar. Shoulders, knees and toes are in front of the bar. The shoulders are slightly ahead of the knees, and the knees are slightly ahead of the fingertips. The feet stand flat, with emphasis on the metatarsal part. The distance between your feet may vary from person to person, but it is recommended to start with your feet slightly wider than hip-width apart as the support points will move apart as you transition under the bar.
The barbell is grasped with a pronated grip, hands shoulder-width apart.
Finally, the back is aligned with its natural curves while the shoulder blades are retracted and locked in position.
Bringing your shoulder blades together
Most back pain in everyday life occurs due to pronounced kyphosis (slouching), with the shoulders drooping forward. This posture is often the result of weakness in the muscles surrounding the shoulder blades and the muscles of the shoulder girdle. If you cannot correct this posture, you must strengthen these muscles. When you perform strength exercises, in which you push your chest forward, pull your shoulders back, and bring your shoulder blades together, these muscles strengthen
Phase 2 – First Pull
We are talking about the first acceleration of the barbell, from the floor to the knees. This phase begins with the legs and occurs on straight arms. The tilt of the back does not change. At the moment the bar lifts off the floor, the knees are turned out and slightly pulled back, the legs are bent. During this phase, the emphasis shifts to the forefoot.
The main driving muscles of this phase are the quadratus femoris, gluteal and hamstring muscles, and the stabilizing muscles are the vertebral, dorsal and paravertebral muscles.
Phase 3 – Transition
This deceleration phase should be as short as possible. Indeed, it is a preparation for the second, decisive acceleration in phase 4. During this transition phase, the back straightens slightly, allowing the knees to come under the bar and the bar itself to slide towards the middle of the thigh. The feet are firmly planted on the floor, even if the emphasis moves from the toes to the heel, and then to the base of the sole.
Phase 4 – Second Pull
As with the first row, the impetus for the movement in this phase is provided by a very strong push from the legs, which drives the barbell upward and assists in the extension of the arms (raising the shoulders, then the elbows), which precedes the “fall” under the barbell. Lifting onto your toes is carried out simultaneously with straightening your back, causing the pelvis to move anteriorly.
A large number of muscles are involved in this phase; almost the entire body is involved in supporting the large locomotive muscles.
- Raising the shoulders precedes the exit (“fall”) under the bar
- Very strong leg push causes triple hip/knee/ankle extension
Phase 5 – Squat under the barbell
Having received the acceleration produced during the previous phase, the shoulders, arms and trapezius muscles strengthen the vertical lift of the barbell, allowing you to sit under it before the clean. The elbows are now forward and the bar rests on the collarbones.
During this “squat,” the feet move laterally to improve stability. The stability of the pelvis is provided mainly by the abdominal, spinal and gluteal muscles. The abdominal and back muscles are actively involved, among other things, in fixing (bar) the torso. The shoulders, arms, dorsal and paravertebral muscles provide support to the shoulder girdle.
Phase 6 – Straightening
The squat during the exercise is used to further lift the load through the concentric action of the quadriceps and gluteal muscles.
The end of the movement is marked by the return of the feet to their original position, a slight anterior tilt of the pelvis, a pronounced opening of the chest, pushing forward of the elbows and a significant plank of the torso.
Examples of workouts with barbell cleans
Training – Nordic combinations
- 12 episodes, with minute start, with alternation; even series of 2 full cleans
- 2 lifts from half a 6-ed.
- 2 alternating lunge jerks
Workout – English Breakfast
- 3 x 10 full front squats
- 3 x 10 full pull-ups with elastic band
- 3×3 deadlifts – 1 barbell clean – 3 front squats – 1 snatch, recovery 1.5 minutes, 5 sets
Workout – push-ups and squats with a barbell
- repeat in conjunction as many times as possible in 3 minutes:
- repeat the sequence 5 times, with 1 minute of rest between circles
Types of exercise
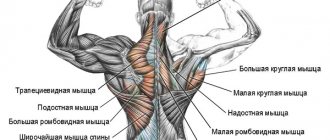
Lifting the barbell to the chin is performed in 2 main ways - rowing with a narrow and wide grip. Each of them has its own techniques and implementation features, since the exercises are done in different trajectories of movement and with varying degrees of load on the muscles. In both options, the deltoid and trapezius muscles receive the main load.
Lifting the barbell to the chin, which muscles are used during the exercise.
Also, during the training process, additional muscles are used:
- anterior serrated;
- round muscle of the back;
- muscles of the forearms (responsible for holding weight and distributing the load in the hands);
- brachialis (brachialis muscle, located under the biceps and allowing flexion of the arm);
- biceps (ensures correct elbow flexion);
- abs and lower back muscles (help keep your back straight during training and take the correct body position).
The table below shows the characteristics of the load on the muscles for various options for lifting the barbell:
| Exercise | Description |
| Narrow grip | The trapezius muscles (upper and middle parts) and biceps experience greater stress. |
| Wide grip | The main load goes on the deltoid muscles (consisting of 3 parts - anterior, middle and posterior), in particular, on the middle bundle. |
The number of approaches for any of the options is 3, each of which includes from 10 to 14 repetitions. N
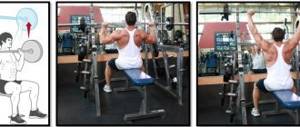
Wide grip row
The wide-grip barbell row to the chin is a classic way to perform the exercise.
Its correct sequence looks like this:
- The barbell must be lifted from the racks or from the floor, placing your hands on it slightly wider than your shoulders (the bar should touch the front of the thigh). The shoulder joint at this moment should be in its natural position. The gaze should be directed forward, the back should be kept straight, and the shoulder blades should be brought together. To relieve the load on the lumbar region, it is permissible to bend slightly at the lower back and bend your knees.
- As you inhale, the barbell should be gradually and smoothly pulled up, directing the main force to the deltoid muscles. It is important that this movement be traction - without jerking, throwing or other sudden movements.
- In the process of lifting the barbell, your elbows need to be slightly spread to the sides - this will help reduce the deltoid muscles as much as possible.
- Upon reaching the top point without delays or pauses, the bar should be lowered, returning to its original position. The movement must be performed smoothly, without throwing the projectile - this can lead to injury to the shoulder joint.
- After this, you need to perform subsequent repetitions of the exercise.
Beginners can place their hands at different distances during training. This will help you understand in what position the shoulder muscles receive maximum load.
Close Grip Row
The narrow barbell row technique includes the following steps:
- To begin, the barbell should be lifted from the floor or rack, placing your hands on it narrower than shoulder width. The bar must be kept as close to the body as possible to prevent the body from leaning forward.
- Next, you need to smoothly pull the barbell up, trying to use only the shoulder muscles. It is important to monitor the position of the barbell - moving it in front of you will strain your arms.
- The movement should be completed smoothly without jerking or tossing the barbell. It is permissible to use the trapezius muscles at this moment - this will allow you to work out 2 muscle groups at once.
- As you inhale, you need to lower the barbell to its original position and, without pausing, immediately move on to the next repetition.
When lifting a barbell with a narrow grip, your hands are in an unnatural position, which increases the risk of injury. Because of this, it is recommended that beginners start with wide-grip rows. There are other variations of the exercise, such as deadlifts using a Smith machine. It is a projectile in which the bar of the bar rises up and down in two directions. This allows you to use the core muscles when rowing a barbell without loading the stabilizer muscles.
It is recommended for beginners to use this machine to practice their technique and feel which muscles are being pumped. More experienced athletes use the Smith machine to give their muscles definition or when restoring the training process (for example, after injuries).
The safest exercise option is the crossover chin pull. The blocks in the simulator are fixed, which eliminates the possibility of weight falling. The projectile also has different variations of the handle - straight, cable and curved. This allows you to choose the most suitable and convenient option for yourself.
To get the maximum effect from training with a crossover, it is recommended to lift the barbell while standing close to the machine.
This will allow you to engage both the trapezius and deltoid muscles, forcing them to work in static tension.
Features and nuances
The distinguishing personality between the first and second will be the initial location of the explosion or movement and the method of throwing. When conducting such trainings, a safety belt fixed on the lower back is an irreplaceable thing.
In general, at first, in order to gain impeccable qualifications, you need: a slow pace, a minimum value of the weighting agent. At the same time, at each stage it does not interfere with recording the sensations of the body and the degree of tilt of the body.
When the “iron” is located at the end point of the first phase, you need to carefully watch your hands and fingers, since there is an objective possibility of slipping.
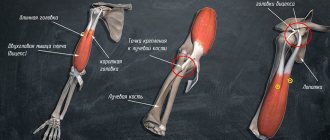
Holding a barbell overhead
Now I invite the student to show how he will hold a barbell of the maximum weight for himself above his head. Typically, students raise the bar above their head in such a way that the head and neck remain behind the raised arms, and the gaze is directed somewhere at the ceiling.
Incorrectly holding the barbell overhead
I immediately explain to the student that he should not hold the barbell above his head in this way, since you cannot hold the maximum weight in this position. Then I invite the student to hold the barbell above his head so that his hands are behind his head and the closure of his shoulder blades is felt, his head is pushed forward as far as possible between his hands, and his gaze is again directed forward and down. The student’s torso should be slightly tilted forward, and his arms, on the contrary, should be slightly tilted back
Here it is important to ensure that the hands are tilted back and down, and the arms are straight at the elbows - so if the student is wearing a shirt, then you need to insist that he either take it off or roll up the sleeves above the elbows
Correctly holding the barbell overhead
So, at this stage, the natural “standing” pose with the barbell above your head should be firmly learned. Any deviations of the body from the natural position back, “not pushing” the head forward between the hands, looking not forward and down, but in any other direction, not straightening the arms at the elbow joints, lack of a feeling of “closing” the shoulder blades, not bending the hands back - all these are very serious errors that the coach must initially keep in mind and eliminate in the bud.
Chest training program
With the help of the above and several other exercises, you will pump up your chest as quickly as possible. A basic workout in the gym, in which you will work all parts of the pectoral muscles in one day, looks something like this:
| Exercises | Number of approaches and repetitions |
| Wide grip bench press | 4х12,10,8,6 |
| Incline Barbell Press | 3x10-12 |
| Incline Dumbbell Press | 3x10-12 |
| Dips | 3x12-15 |
| Dumbbell flyes lying on a horizontal bench | 3x15 |
If you can equip a small gym in your apartment, home workouts will be much more productive. You don’t need much for this: a barbell, discs, a bench (preferably with an adjustable angle), a pair of collapsible dumbbells, a wall bars with parallel bars. Then you can fully train your pectoral muscles without leaving home.
An approximate program of chest exercises at home with a barbell and your own weight:
| Exercises | Number of approaches and repetitions |
| Wide grip bench press | 5x8-10 |
| Upside down push-ups | 4x15-20 |
| Push-ups with cotton | 4x10-12 |
| Pullover with barbell | 4x10-12 |
If you have dumbbells and parallel bars, you can diversify the complex:
| Exercises | Number of approaches and repetitions |
| Bench press | 5x8-10 |
| Upside down push-ups | 4x15-20 |
| Dumbbell Bench Press | 4x10-12 |
| Dips | 4x12-15 |
| Pullover with dumbbell | 3x10-12 |
When gaining muscle mass, pay more attention to the basic movements - they are the ones that form the main array of pectoral muscles. This program guarantees you proportionately developed chest muscles. The working weights should be quite heavy, and the rest time between approaches should be several minutes.
In practice it looks something like this:
| Exercises | Number of approaches and repetitions |
| Wide grip bench press | 4х12,10,8,6 |
| Incline Dumbbell Press | 4x10-12 |
| Dips with extra weight | 3x10-12 |
| Bench press | 3x10-12 |
During the period of weight loss and cutting, the training principles are slightly different. Isolated exercises are used to give the pectoral muscles the desired shape.
Of course, working weights will fall, since on a low-carbohydrate diet it is difficult to maintain the same strength indicators. However, you need to try to retain them as much as possible in order to preserve muscles, and not burn them along with fat.
An option for drying breast training looks like this:
| Exercises | Number of approaches and repetitions |
| Bench press on an incline bench | 4x10-12 |
| Dumbbell bench press | 4x10-12 |
| Incline Dumbbell Flyes | 3x15-20 |
| Crossover | 3x15-20 |
Author
Project expert. Training experience – 12 years. A good theoretical basis on the training process and proper nutrition, which I am happy to put into practice. Need a recommendation? This is for me