Push-up program: how to do it correctly?
Push-ups are an effective, versatile and powerful exercise that helps work the core in any conditions.
They can be performed at home, at work, on the street, and in any other convenient place. Doing push-ups is useful and practical. With their help, you can strengthen muscles, develop endurance, and increase tone. This is one of the simplest tools with which you can keep yourself in relatively good shape. But this will require a set of push-ups.
It is important to understand that working out at home with no or minimal weights is different from the gym. Don't expect big gains in strength and muscle mass.
To achieve positive results, there must be a system of push-ups. A competent approach to the issue will make training as effective as possible. Only regularity and a properly designed push-up program will allow you to get the maximum benefit from the exercise.
In this material we will try to tell you how to correctly create a course and schedule of push-ups, and give practical advice and recommendations on organizing the plan. This will allow you to get maximum results in a short period of time.
What are the benefits of push-ups?
Many people neglect this exercise because they consider it not effective enough.
However, with a well-designed training program, push-ups have the following advantages:
- Helps strengthen the circulatory system and heart;
- Increases the overall tone of the body;
- Helps increase strength and endurance;
- Develops the muscles of the shoulders, triceps and chest;
- Loads the buttocks and abs;
- Form the habit of active sports;
- Makes the body more resilient;
- They speed up metabolism, which in combination with a balanced diet allows you to achieve a good figure;
- Useful for those who practice various types of martial arts;
- Representatives of the fair sex are helped to tighten their bust and make it slimmer.
Separately , it is worth noting that push-ups, according to research, have shown to be an excellent tool in the prevention of diseases such as bursitis and arthritis. If you start exercising at an early stage, performing at least 80 push-ups every day, then within a month you will notice a general improvement in your well-being, as well as a lack of pain in the joints.
In principle, like any physical activity, push-ups are useful in the early stages for people who have certain problems with their joints. However, it is very important to consult with relevant specialists so as not to harm yourself.
However, push-ups are not useful for everyone. For example, for health pathologies such as high blood pressure, heart problems, weak bones, etc. – physical activity is not recommended at all. It is better to solve all the problems first, and only then deal with it.
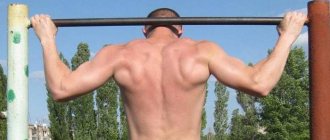
Pull-up on the horizontal bar from scratch
There are several methods for learning how to do pull-ups on a horizontal bar from scratch.
Negative pull-ups. With these pull-ups, the main goal is to perform the exercise as slowly as possible, not as many times as possible. Negative pull-ups are hands-down movements from the top of a regular pull-up. In order to perform this exercise, you need to place a chair or stool under the horizontal bar.
Then stand on it and take the top position on the bar. Bend your knees and slowly lower yourself down. Try to stay in this position for a few seconds. Hand positions can be of three types: narrow grip, wide grip and shoulder-width grip. It all depends on what type of pull-ups you want to develop. In negative pull-ups, the main load goes to the biceps, the rest is distributed to the chest, triceps and deltoids.
Exercises with a partner. Hang from the bar with a shoulder-width grip. Try to squeeze your shoulder blades together as much as possible and pull your chest toward the bar. At this time, your partner stands behind you, holding your hips, thus easing the load. Never rely on your partner's full strength. All efforts must be solely yours.
Basic principles of training
It is worth understanding that at first many people do not think about how to progress in push-ups. And for what? If so everything works out well. However, it won't be long before progress becomes noticeable.
Why is that? The fact is that the body needs regular changes in load. And if you do only classic push-ups, you won’t get far. Therefore, over time, you need to change the methodology and expand the training program in order to achieve the highest possible results.
Here are the main points that need to be taken into account in the training process:
- Correct technique. This is the only way to get maximum results and avoid injuries. If you can’t do it correctly, it means your body is not yet ready for such a load. Start with building exercises, but under no circumstances injure yourself.
- Breath. We lower ourselves as we inhale, rise as we exhale, and nothing else. No holding your breath or changing turns. The circulatory system and heart are not “official” and will not be happy with such bullying. Pressure surges have never benefited anyone.
- Warm up. It is necessary to prepare joints, ligaments and muscles for work. Never do push-ups, especially with weights, without warming up. This can be fraught with negative consequences. As a result, push-ups, like any other physical activity, will be inaccessible to you for a long time.
- Monitor your well-being. An important aspect in any training process. If you are tired, you don’t need to forcefully perform the exercise. It’s better to rest and reschedule the workout than to make things worse for yourself. If you feel that there is not enough load, then you need to add.
- Be flexible. You should not “blindly” follow the training program. After all, it is compiled as a guideline, and not as detailed instructions. Adjustments to the training program are allowed and this is normal. We are all individual and must adapt to our body characteristics.
- Variations are a must. Muscles do not like the same type of load for a long time. They just adapt to it and that’s it, goodbye progress and results. Therefore, you should not get hung up on one classic variation; it is enough to use variety - this is the key to success. Alternating between different variations will have a positive effect on progress, so build the program in such a way that it is as varied as possible.
- Don't forget to rest and eat right. Perhaps this is one of the main rules in terms of correcting shape and figure. Many people neglect this rule and end up not getting the desired results. But this is 60-70% success. By establishing proper nutrition and rest, there will be a good response from physical activity.
How to learn to do push-ups from scratch: a ready-made plan
It's okay if you've never done push-ups before or had a long break from fitness and have lost this skill. Anyone can learn to do push-ups, regardless of gender or age! Of course, you'll need regular practice, but learning how to do push-ups is not as difficult as, say, doing pull-ups.
The most important thing to remember if you want to learn how to do push-ups efficiently and effectively: you must always follow the correct technique from the very first repetition of the exercise. Even if you start with simple variations of the exercise, remember to use proper form and technique.
In order to start doing push-ups from scratch, we offer you a step-by-step program for beginners. Thanks to this scheme, everyone can learn push-ups!
A ready-made diagram of how to learn to do push-ups for beginners
In order to learn how to do push-ups, you will need to master 3 levels of push-ups . You need to exercise daily, you need to perform 3-4 approaches with the maximum number of repetitions in each approach. Perhaps your first attempts will not allow you to do more than 5-10 push-ups, but every day you will progress.
If you feel like you haven't made the progress you want at the end of the week, then continue doing the same push-up modification for another week. It is better to move to the next level of difficulty after you can do 30-40 push-ups without interruption . Don't forget about the correct push-up technique!
Week 1: Wall push-ups
Wall push-ups are an exercise that everyone can do. These vertical push-ups are a great introductory exercise that will help you master push-ups later on.
Week 2: Knee push-ups
The next level is knee push-ups. Please note that even when doing push-ups from the knees, the body should maintain a straight line, the pelvis should not go up.
Week 3: Push-ups
Once you have mastered knee push-ups, you can move on to bench push-ups. Attention, there is a nuance here. The higher the bench, the easier it will be for you to do push-ups. Therefore, you can change the height of the surface, thereby slowly preparing yourself for push-ups from the floor.
Week 4: Push-ups
After three weeks of regular push-ups, your body will be ready for push-ups. Remember that it is better to do fewer repetitions, but with full amplitude (elbows should bend 90 degrees).
You can continue to progress in push-ups by choosing the option with your feet resting on the bench . There are also various more complex modifications of the exercises, which will be discussed below.
Warm-up before push-ups
Perhaps one of the main training points that many people forget about and train without warming up. As a result, this results in injuries, sprains and other unpleasant things.
Naturally, everything is individual and this does not mean that if you don’t warm up 1-2 times, you will get injured. Certainly not. Let's try to figure out whether a warm-up is necessary before push-ups? Or is this all an exaggeration regarding its importance:
- Warming up allows you to warm up your muscles and prepare your joints and ligaments for stress. Physiologically, the human body is designed in such a way that it always strives to be at rest and spend as little energy as possible. And if you immediately give a high load, it will be stressful for the ligaments.
- Warm-up is a kind of gradual load, with the muscles warming up, in the process the blood vessels dilate, and blood flow improves.
Without warming up, you shouldn’t even start doing not only push-ups, but any other physical activity.
How to warm up before doing push-ups?
- 3-5 minutes of standard warm-up is enough.
- We start from the top (arms) and end with the bottom (feet).
- Be sure to warm up the pelvis, do bends and bends.
- Stretching will not be unnecessary either.
There are many warm-up schemes on the Internet. In the case of push-ups, a classic warm-up and stretching will be enough. Then start doing the exercise.
Warm-up
Warm-up can be divided into two types: before performing exercises (pull-ups) and directly during the exercises (pull-ups).
Warm up before doing exercises (pull-ups).
Warming up before stretching can be divided into two stages: warming up and stretching.
Warming up
As you know, before starting any type of sports exercise, be it jogging, playing basketball or doing pull-ups on a horizontal bar, a warm-up is necessary. That is, you need to warm yourself up. To do this, perform light aerobic exercise for 5-15 minutes, depending on your level of training. Warming up should bring into working condition those muscle groups that you plan to load during exercise.
Here's a good warm-up program.
1. Jumping legs apart with clapping overhead - 20-30 times.
2. Alternately touching the toes of the spread legs with the fingers—20-30 times in each direction.
3. Push-ups from the floor—10-15 times.
4. Tilts to the sides - 20-40 times.
5. Rotation in the shoulders, elbows and hands – 20-40 times.
Remember that you need to do the exercises one after another without pause in order to be well prepared for the workout.
Cross touching toes with fingers
Stand straight, feet shoulder-width apart, arms freely lowered. Slightly bending your knees, bend down slowly, trying to touch your right ankle with your left hand, and straighten without pausing. Perform bends in both directions for the required number of repetitions.
Pushups.
Lying prone, legs straight, hands on the floor under your shoulders. Push up from the floor using the muscles of your arms and chest. Slowly lower yourself again until your chest touches the floor and repeat the exercise. When performing this movement, point your elbows to the sides, do not bend your body.
Side bends.
Stand straight with your feet slightly more than shoulder-width apart. Place your left palm on your right side at the hip joint, raise your right palm above your head. Lean to the left without leaning forward. In this case, the left hand slides along the left leg for support. Make the same movement to the right side. Repeat.
Jumping legs apart with clapping hands overhead.
Stand straight with your arms hanging freely along your body. Jump slightly, spreading your legs out to the sides, and at the same time raise your arms above your head until your palms touch. Without pausing, lower your arms and return your legs to the starting position. Repeat.
Rotation in the shoulders, elbows and hands
Stand straight with your feet slightly more than shoulder-width apart. Move your arms forward and backward in a circular motion, try to set the amplitude of rotation as large as possible, without bending your elbows. Then, raising your elbows to shoulder level, perform circular rotations with your forearm, thoroughly stretching your elbow joints, then stretch your hands. When warming up your hands, make sure that your arms are straight at the elbow joints.
The longer and more actively you plan to train, the longer the warm-up should be. Beginners should be given more time to warm up, since their body is not yet capable of quickly mobilizing strength. If you are a beginner, then any exercise will be difficult for you, and if you have been doing it for a long time, then the body will “remember” what and how to do, so you can prepare yourself for training much faster.
What does warming up actually do? Firstly, the body warms up in the literal sense of the word. The temperature rises in the muscles themselves and the tissues that connect muscles to bones and bones to each other. Warm muscles and joints become more flexible and are less susceptible to damage. Secondly, warming up promotes the redistribution of blood in the body: it flows from the intestines and spleen to the skeletal muscles. Along with blood, nutrients and oxygen are supplied to the muscles, which increases physical endurance. In other words, if you don’t warm yourself up before training, you’ll get tired much faster. Finally, warming up before exercise is necessary to gradually bring your heart rate up to the target zone. Without warming up, the load on your heart will be too high, and you may feel like you are running through deep snowdrifts.
Stretching
Warming up is followed by stretching. Stretching helps prevent muscle strains and prepares them to contract more; Stretching also reduces muscle pain, increases blood circulation, and helps relieve muscle spasms.
When you stretch, follow certain rules:
1. Avoid sudden movements while stretching.
2. Spend 2-3 seconds reaching the stretched position and hold it for 7-10 seconds. Rest and repeat the move 2 more times, ensuring an equally slow release from the stretched position.
3. Don't stretch so hard that you hurt yourself. Wait 3-4 weeks before checking to see how much your range of motion has improved. Be patient!
Here are some stretching exercises.
Touching socks with fingers.
Feet together, legs straight. Lean forward and touch your toes to your shins, ankles, or feet, depending on how far you can stretch. Gently push your torso down into a position of full hamstring and lower back extension. Hold this position for 10 seconds. Repeat the procedure 3 times.
Stretching the pectoral and deltoid muscles. Stand between fixed supports or in a doorway. Stretch your arms out to the sides and place your palms on the supports or doorway. Slowly lean forward, using your body weight to stretch your pectoral and deltoid muscles. Hold this position for 10 seconds, rest and repeat 3 more times. This will relax the pectoral and deltoid muscles.
Stretching the lower back and hamstrings. Lying on your back, place your feet behind your head. Carefully. walk your feet further behind your head until your toes almost touch the floor. Hold this position for 7-10 seconds, return your legs to the starting position and repeat the technique 3 times.
Alternately touching the toes with your fingers. Spread your feet with your straight legs approximately 1 m wide. Bend forward and grab your left knee, ankle or foot with your right hand. Hold this position for 10 seconds, straighten up slightly and repeat on the other side. Do this exercise 3 times on each side, gradually working your way up to holding the stretched position for 10 seconds.
Side bends.
The right hand is lowered, the left is straightened and raised above the head. Lean to the right as far as possible. Hold this position for 10 seconds, relax and straighten up. Change the position of your hands and repeat the tilt in the other direction. Do both movements 3 times.
Warm up directly during exercises (pull-ups).
Warm-up directly in pull-ups is, depending on the degree of warming up, 1-3 sets of pull-ups using the legs. Moreover, the help must be active enough to be able to do the required number of repetitions without much tension (but with some tension).
In the case of 3 warm-up sets, it is better to reduce the number of repetitions from 15 in the first set to 10 in the second and 6 in the third.
For one warm-up set, the number of repetitions is 10-20.
Calming exercises after training.
Here are some calming exercises to do after your workout.
Relaxation in the pool or sauna—5-8 minutes.
Swimming—about 5 minutes.
Pedaling a stationary bicycle—approximately 5 minutes,
Slow jogging with gradual deceleration and walking—5-10 minutes.
If you feel unusually tired or sore in your muscles, massage them with an athletic rub after a warm, relaxing shower.
Fragment from an interview with Denis Minin.
“Warming up and stretching is the foundation for building the body, because all injuries are due to failure to do it. I stretch every day even when I'm not working out (morning or evening). A good friend of stretching is yoga, even at home. Before training, I usually do a light jog and then stretch for 10 minutes, and after each approach I stretch the muscles that were involved in the exercise. Roughly speaking, I stretch throughout the entire workout, and thanks to this, I noticed that with this approach, the muscles acquire greater relief, and you can forget about various injuries, which is the most important thing during power loads.”
How to correctly form the number of approaches to push-ups?
For many, this becomes a difficult task. However, there is nothing difficult about it. It is enough to understand the principle of operation of our body and muscle fibers. After all, following classic advice without understanding the work process will not give the maximum result.
The ability to feel the body combined with knowledge is an effective combination. Let's try to figure out how to correctly calculate the optimal number of approaches and repetitions for ourselves.
Reps and sets of push-ups - how to count correctly? So, in strength training and fitness, there is a classification of repetitions, depending on the goal of the trainee. Let's look at it in detail:
- To increase strength indicators - with maximum effort 6-8 repetitions;
- To increase muscle volume - with moderate effort, 8-12 repetitions;
- To obtain relief - with light effort, 12-20 repetitions.
How many times should you do push-ups: ready-made push-up patterns
We emphasize once again that you should never chase quantity while neglecting quality. In addition, you don't always need to strive for more repetitions. How many times you need to do push-ups depends on your goals.
So, there are several possible situations:
1. If you want to pump up and increase muscle mass in volume, then move towards increasing weight and complexity. For example, use barbell plates or elevate your feet on a bench. Training scheme: 10-12 repetitions of 3-4 approaches.
2. If you want to lose weight and get ripped, then move towards increasing the number of repetitions. Perform 15-25 repetitions in 5 sets. You can increase the total number of push-ups weekly or move on to more complex modifications.
3. If you want to develop endurance and functional strength, then also move towards increasing the number of repetitions and choose more complex modifications of floor push-ups, including plyometrics.
An example of a ready-made push-up scheme for increasing endurance and losing weight:
An example of a ready-made push-up scheme to increase muscle mass:
Push-up program for beginners
Before you start creating a program, determine your level of physical fitness. If you have difficulty performing 5 push-ups, then you should think about lead-up exercises. In them you can strengthen your arms and target muscles, learn the correct technique and increase your strength.
For beginners, in most cases, lead-up exercises are a necessity. You can read about them in the material on how to learn to do push-ups, as well as learn the correct technique.
Studies have shown that 30 reps of push-ups burn 60-80 calories.
The push-up schedule for beginners is built individually for each person. Taking into account physical fitness and capabilities. Therefore, never rely on templates. Yes, they can and should be taken as a basis, but during the training process it is possible to adjust them up or down.
Do you want to improve your figure and health, without harming your spine and joints? Get my free resources on smart fitness at the gym or at home and learn how to exercise the right way!
They are suitable for both beginners and advanced fitness fans.
Soberly assess your physical capabilities, try to find the “golden” mean:
- On the one hand, overtraining is a bad thing, as it reduces overall tone.
- On the other hand, insufficient load will not allow muscles to form and will not bring the body into the desired tone.
A table for beginners for 30 days will roughly look like this:
Basic mistakes when doing push-ups
Common mistakes when doing push-ups include:
- Incorrect pelvic position
Excessive lowering down or lifting up while moving. This reduces the static load on the press and overstrains the lumbar spine.
The pelvis should be in line with the head and legs.
- Hands are positioned well in front, behind the shoulder line
This greatly facilitates movement and reduces the load on the muscles, overstraining the shoulder joints.
- Hands too wide
Limitation of range of motion.
- Elbows spread straight to the sides
As you bend your arms, point your elbows out to the sides and slightly back. This position of the hands is safe for the shoulder joints.
- Holding your breath or stopping it completely during the entire exercise
Proper breathing when doing push-ups is a smooth inhalation down and a powerful exhalation when moving up. Inhale through the nose, exhale through the mouth.
Holding your breath can cause an increase in blood pressure.
Advantages and disadvantages
Benefits of push-ups
- Multi-joint exercise , which allows you to work several muscle groups without additional weights, with your own weight.
- The exercise can be performed anywhere - the gym or at home, and does not require much time and space.
- There are practically no contraindications to performing the exercise and it can be performed at any age. Only with spinal problems is it necessary to control the deflection of the lower back and keep your back straight so as not to aggravate the problem.
- You can do push-ups with any level of physical fitness , from beginner to experienced athlete, depending on the type of exercise chosen.
Flaws
- The exercise is not suitable for gaining muscle mass, since its complexity will not allow you to get the proper load with a small number of repetitions, with the exception of the option of push-ups with weights.
- At first, not everyone can do push-ups with their own weight on the floor; for this it is necessary to prepare the body and strengthen the muscles with preparatory exercises.
Circular movements of the wrists
Starting position:
Interlace your palms with your fingers.
Exercise:
- Perform circular movements in both directions for 60 seconds.
Warm-up is the most important set of exercises aimed at warming up and mobilizing the body before training. The basis of the warm-up is aerobic exercises performed with increasing intensity. A properly conducted warm-up will be indicated by an increased heart rate, the frequency of which should increase to 100 beats per minute in 10 minutes.
Types of push-ups: how to do push-ups on the floor correctly
There are several types of push-ups of varying degrees of difficulty, each of them can be performed at different stages of training. Follow proper push-up technique.
Classic wide grip chest push-ups
The most popular version of push-ups, which develops the chest muscles in width, its outer part.
- Place your arms wide apart from each other, place your hands parallel to each other.
- Place your feet the width of your pelvis.
- Get into a plank position by tightening your abdominal muscles, keeping your lower back straight in relation to your entire torso.
- Bend your elbows and lower your chest as far as possible to the floor. Elbows “look” to the sides.
- Extend your elbows completely at the top.
Narrow push-ups (grasshopper)
The closer the palms are placed, the more the inner part of the pectoral muscle works, the more the muscles closer to the center work. The narrow position puts a lot of tension on the triceps and is one of the best options for working it out.
- Place your palms under your shoulder joints, your hands parallel to each other.
- Take a plank position, draw in your stomach, continue to breathe continuously.
- Lower your torso to the floor without bending your knees, bring your elbows as close to your torso as possible.
- Push up, fully straighten your elbows at the top without arching your lower back.
Diamond push-ups
The exercise is so named due to the placement of the palms in the shape of a diamond, and it is also called diamond push-ups (from the English Diamond Push up), or diamond push-ups. With the help of a narrow position of the arms, diamond push-ups work the triceps to a greater extent, and the pectorals and deltoids to a lesser extent.
- Place your palms close to each other with your fingers facing inward, forming a cone or diamond.
- Place your thumbs together, palms should be under your chest.
- With your feet hip-width apart, stand in a plank position and keep your spine straight.
- Lower yourself to the lowest point, bending your elbows without moving them away from your body.
- Return to the starting position, fully straightening your arms.
Snake push-ups
- Lower your torso toward the floor, bending your elbows.
- During subsequent push-ups, roll from hand to hand.
- Do an equal number of rolls to the right and left.
Push-ups on fingers
This type of technique requires a strong grip and fingers. It is better to start mastering push-ups on your fingers after mastering the classic version.
- Place your hands wide, without your palms touching the floor, resting on the phalanges of your fingers, placing them wide apart from each other.
- Lower your body until the angle at your elbows reaches a right angle.
- At the top point, fully straighten your arms.
Push-ups: how to do them correctly
Push-ups are the most popular bodyweight exercise. It is used not only in strength training, but also in plyometric exercises, CrossFit, Pilates, callanetics and even yoga. And this versatility of push-ups is easily explained. Push-ups help you engage every muscle group from your neck to your toes, and especially strengthen your pectoral muscles, shoulder girdle, triceps, and abs.
There are many different types of push-ups, but before moving on to more complex modifications of this exercise, let's understand the technique of performing classic push-ups. The correct form of exercise is not only maximum results and high-quality muscle work, but also reduces the risk of injuries and damage during exercise.
Correct technique during classic push-ups:
- The body forms a straight line, the pelvis does not go up and does not bend down.
- The abdominal muscles are tense, but breathing is not held.
- The head is in a neutral position, not looking down, but not lifting up either.
- The palms are strictly under the shoulders and do not go forward.
- Palms face forward, parallel to each other.
- The elbows are turned back 45 degrees, they are not spread out to the side.
- As you exhale, bend your elbows and lower your body parallel to the floor, maintaining a straight line of your body.
- Push-ups are performed with full amplitude, i.e. the body drops as low as possible. Elbows should form a right angle.
It is this technique of classic push-ups that helps to evenly work the muscles of the shoulders, chest and triceps.
Push-ups work several muscle groups at once. This exercise allows you to work all the muscles of the shoulder girdle and the small stabilizing muscles of the shoulder. Also, push-ups from the floor and from the knees develop strength and elasticity of the shoulder muscles, which is especially important since the shoulder joint is extremely unstable and susceptible to displacement and injury.
Push-ups help work the following muscle groups:
- Pectoralis major muscle
- Deltoids (shoulders)
- Triceps
- Serratus anterior muscle
- Abdominal muscles
In addition, during push-ups, the muscles of the legs, buttocks and back are indirectly involved in the work. Push-ups also increase the functional strength necessary to perform regularly performed actions (lifting and moving objects, cleaning the house, holding a child in your arms).
How to replace push-ups?
If you compare the working muscles during push-ups with other exercises, you can draw a parallel with some exercises with weights, for example, bench press, dumbbells or in a machine. In addition, after the muscles get used to push-ups, you can replace them with presses and progress further. But push-ups cannot be completely replaced, since when performing exercises while lying down, the stabilizer muscles do not work, which additionally work during push-ups, keeping the spine straight.
Rules for pull-ups on the horizontal bar
- Be sure to warm up before your workout and stretch after your workout.
- To create the right mood, use music that gives you a surge of energy.
- Do not do any exercise at night, in rain, or frost.
- You cannot do any exercise elements on old, rusty, poorly secured horizontal bars.
- Never perform exercises through pain or with any injuries.
- If you feel sick or pull a muscle while doing exercises, stop immediately.
- If you have weak fingers or your arms are tired of holding the weight, and you haven’t finished doing pull-ups on the horizontal bar, then you will need bands.
- Use gloves. The main role of gloves is to prevent your hands from slipping on the cold and hard metal handles of sports equipment. Leather gloves are best.
- Do not eat before training, and if you feel hungry, it should be a light meal.
Below is a video of the correct pull-up on the horizontal bar.
Let's look at the pull-up technique on the horizontal bar. Your legs should be kept crossed and bent at an angle of 90 degrees, this way you can pull yourself up even on low bars and avoid jerks, which are extremely undesirable. You need to pull yourself up smoothly at a pace that is comfortable for you, using exclusively the strength of your own muscles. Never arch your back when doing pull-ups. Remember to breathe correctly, pull yourself up, exhale, lower yourself - inhale.
It is optimal to perform any exercise 3-4 sets of 12 repetitions. Just don't work too hard. At first, do as much as you can, gradually increasing the number of repetitions.
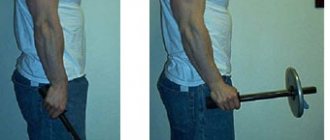
Gradually you need to increase the number of loads in each approach, because... the muscles get used to the load and stop building muscle mass. Or use a different method: try weighted pull-ups. A dumbbell can serve as a weight. If you don't have dumbbells, you can use a backpack with books. Alternatively, make a belt (usually a chain) and hang it on your hips. But remember, the heavier the load, the fewer repetitions you need to do.
In addition to all this, there are two pull-up techniques, for strength and for gaining muscle mass.