- May 8, 2019
- Home workouts
- Vladislav Bolshakov
The handstand is a gymnastic exercise that looks impressive. This element can be performed anywhere, surprising others. In addition, handstands will perfectly strengthen the upper shoulder girdle. This article will discuss the question of how to learn to stand on your hands for a long time.
Principle
To understand how to support yourself in a vertical handstand position, you need to take a closer look at the regular handstand. When a person stands on his feet, his center of gravity, that is, the pelvis, is directly above the feet, which ensures balance. If you move your pelvis forward, your body will also begin to move forward. The situation is similar with moving backwards. Thus, to ensure a level handstand, you should place your center of gravity exactly above your hands. Then the body will not tilt back and forth, and it will be easier to stand.
Most common mistakes
Handstanders constantly share their path to achieving their goal. What is the path without errors? We have identified the most common mistakes when performing handstand training:
- the first mistake is a large distance between the hands, this leads to a shift in the center of gravity and a fall;
- the arms are initially bent. This shouldn't happen! If you don’t keep your arms straight straight away, they won’t support your weight;
- shoulders should be parallel to the back, not the chest;
- Keep your back straight, and do not bend either forward or backward.
Working muscles
It may seem that handstands on the floor do not develop any muscles and do not require much effort, since the main thing is balance. However, even in a standing position, a huge number of muscles are active. What can we say about the shoulder girdle, when the entire weight of the body rests on it.
The handstand actively engages the anterior deltoids (shoulder muscles), latissimus dorsi, trapezius and buttocks. A large number of stabilizing muscles of the abs and lower back are also involved. You will notice that many muscle groups can be developed using handstands.
Execution technique
Although the handstand requires muscle effort, it is still for the most part a technical element, where understanding the technique is very important.
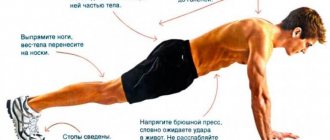
- You should stand up straight, place your feet shoulder-width apart, and lower your arms.
- With your hands on the floor, you should swing your leg, throwing your pelvis exactly above your hands.
- It is necessary to find balance by adjusting the position of the body through the efforts of the fingers. If you lean back, that is, behind your head, then you need to press your fingers into the floor. If the body goes forward to the opposite position, then it is necessary either to make the swing stronger, or to transfer the weight to the heels of the palms.
- The body should be extended in a straight line. This means that the feet, pelvis and hands form an even line, strictly perpendicular to the floor.
Preparation
How to learn to stand on your hands? If the muscles are already sufficiently trained and there is self-confidence, then you can proceed directly to trying to stand up. However, it is best to learn a few build-up exercises that will gradually prepare your muscles and balance for handstands.
- Frog pose. This exercise will perfectly train your muscles and sense of balance. To start, on the floor you need to rest on your hands, located slightly wider than shoulder width and slightly bent at the elbows. Then you need to bring your knees behind your elbows, leaning on them. Due to this, you should lift your legs off the ground, keeping your body weight suspended and controlling the position with your fingers.
- The second stage is headstand. This is the easiest variation of the regular stance, so it's worth trying. You need to place some soft surface under your head and rest your head on the floor. Having placed your hands at a distance of 20-30 cm from your head and from each other, you need to swing your leg and move your pelvis directly above your head. Balance must be achieved through the hands and head. Don't be afraid of falling back, because you can just roll and get down safely to the floor.
- The third stage is the elbow stand. This exercise is already more difficult and scary for many, but there is nothing to be afraid of. Elbows are placed at a distance of 40-50 cm from each other. The forearms are brought together, and the hands rest with the palms on the floor. Just as in the previous exercise, you should swing your leg to bring your pelvis up. Balance is maintained through the efforts of the forearms.
- Now the sense of balance is more developed, and the body is ready for handstands. So the next step is to do a handstand against a wall. This exercise can be called a handstand for beginners, since a person is not yet fully ready for a full-fledged element. You should stand facing the wall and lower your hands to the floor, placing your hands slightly wider than shoulder width. By swinging your leg, you need to stand up and lean against the wall. In the initial stages, you can simply stand, feeling and getting used to this position. Then you can try to lift your legs off the wall and stay in the air for a while, trying to catch balance with your fingers. This is an excellent exercise that will fully train your coordination in an inverted position.
A common mistake in the last exercise is arching the lower back. This may be caused by placing your hands too far from the wall. Ideally, of course, they should be located at a distance of 5-10 cm from the wall. The back should be controlled and not allowed to arch.
Handstands and shoulder health[edit | edit code]
How to learn handstand?
The world may indeed be contradictory and complex, but one thing remains unchanged: the Universe will always strive for balance in order to preserve itself. Your body is no exception, and it too must maintain balance between opposing muscle groups in order to function properly. Doing handstands will help you achieve this balance.
Seriously though, if you're doing pull-ups all the time but don't include the overhead press in your routine, you'll undoubtedly end up with a host of shoulder problems, such as limited range of motion, poor posture, ligament strain, and worse.
Yes, to keep your joints healthy, you need to do certain overhead press exercises. The most common way is to work with weights. In this case, you will have to go to the gym or purchase a set of dumbbells, barbells or weights. The alternative, of course, is to perform handstands, which not only develop shoulder strength and endurance, but also actively stretch the latissimus dorsi muscles. Handstands also improve the functioning of the nervous system and body coordination. In addition, the inverted position has a positive effect on blood circulation.
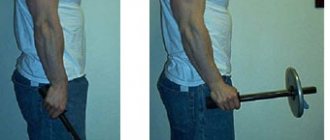
Shoulder rotations[edit | edit code]
Before you start practicing handstands, it is recommended to prepare your shoulders by performing a lead-in exercise—rotations. Although this exercise is said to be a common cause of shoulder dislocation, doing it should actually strengthen your shoulder joints and reduce the risk of shoulder dislocations. This is the only exercise for which it is recommended to use some other equipment other than the horizontal bar. A rubber band works best.
Hold it in your hands in front of you at a distance slightly wider than your hips. Stretch your arms out to the sides to stretch the band. From this position, raise your arms above your head and place them behind your back.
To do this you need to stretch the band as wide as possible, so make sure your arms are flexible enough. In this case, just as when doing pull-ups, do not squeeze your shoulders.
Shoulder rotations
- This is actually a great warm-up before an upper body workout. I highly recommend that you do them as part of your fitness routine. If you don't have a rubber band on hand, you can use a stick or any other long, lightweight object. Another good exercise for those who don't want to use additional equipment is the back swing.
Handstand with emphasis on the wall[edit | edit code]
To learn an unsupported handstand, you need to practice several elements at the same time. To start, try pushing yourself into a handstand against a wall.
Start by facing the wall, then extend both arms above your head and take a small step forward. From this position, place your hands firmly on the ground at a distance of about 10 centimeters from the wall, fixing your elbows, and push up first with one leg, then with the other. If you can get into a stance, try to stay there for a few seconds before lowering yourself down. However, you shouldn’t tempt fate right away; it’s better to move on to long handstands gradually. You should aim to eventually begin to hold your body in a handstand for as long as possible without your feet touching the ground. You should learn to stand on your hands against a wall for at least one minute before you begin practicing handstands without support.
If you don't have the strength or confidence to jump at the same time as the push, try other variations and then return to the push when you feel ready.
Toad stance[edit | edit code]
Known in yoga as bakasana, toad pose will give you a sense of balance on your arms and counteract the instability of being upright. To get into a toad stance, squat down and place your palms on the floor with your elbows slightly bent. Then bring your knees to your armpits and rest your shins on the backs of your arms (triceps). As you put your weight on your arms and lift your feet off the ground, try to look to the sides rather than down. At first, you can bend your elbows in a way that is comfortable for you. Try making a small support for your feet with your hands. Over time, you will be able to straighten your arms. Once you have achieved this, you will be ready to perform a free handstand.
Walking on a wall in a handstand[edit | edit code]
Get into a push-up starting position using a wall for support. Now begin to slowly walk up the wall with your feet, gradually taking steps towards it with your hands. First, try lifting your legs so that your hips are higher than your shoulders, as in an inverted corner stance. Over time, you will be able to achieve a completely vertical position by walking upside down on the wall and approaching it with your hands. Once you succeed, getting into a handstand from a push will not be difficult for you.
Separation from the wall[edit | edit code]
After weeks or months of basic training, you should finally be ready to move on to the next stage in your attempts to perform a free handstand. This can be a little scary because if you fall, you won't have anything to grab onto. You need to take the plunge—literally jump off a cliff, trusting that your body will know what to do if you fall over. If you are very nervous, ask someone to back you up. It would also be a good idea to train on a soft surface such as grass or rubber.
The free handstand can be a challenging exercise, but once you can hold it for a long time, the hardest part is maintaining your balance. It takes a lot of time to learn to find the sweet spot between being unbalanced forward (tipping over) and being unbalanced backward (falling back on your feet).
Unlike your feet, which were designed to stand on, your hands don't have heels, so when you're trying to balance, it's best to put a little more weight on your fingers than on the pads of your palms. If you lose your balance and fall forward, you can maintain it by pressing your fingers into the ground. If you lose your balance, falling backwards onto your feet, there is little you can do to keep your balance and avoid falling.
Landing[edit | edit code]
Because the fear of falling can make it difficult to practice handstands without support, it is important to learn how to land safely if you lose your balance. The two easiest ways to do this are to land on your foot, as in a wallstand, or to perform a pirouette, which is really not as beautiful as the word itself.
If you feel off-balance toward the front of your body in handstand (backward imbalance), then you should naturally land on your feet. Just remember to land softly and keep your legs straight.
If you feel off-balance toward the back of your body (forward imbalance) in a handstand, the smartest thing to do is to lift one hand off the floor, take a small step forward with it, and sharply rotate your hips. Your body will need to land on your toes. This should happen naturally.
A Tale of Two Handstands[edit | edit code]
In modern gymnastics, the handstand must be perfectly straight. For this reason, many will say that bending the body in this case is bad form. However, from experience, bending your back a little is helpful while you learn to balance. Over time, you will be able to gradually straighten your legs, resting your weight on the floor and squeezing your abdominals, lower back, and buttocks to create a nice, straight line from your head to your toes (or from your palms to your toes, in our case). While a perfectly straight handstand may, in theory, require less effort in terms of muscle tension, it is more difficult to balance in this position, especially for people with limited shoulder mobility. Your ultimate goal should be to achieve a fully straight handstand, but until then, try to maintain your balance whenever possible.
Transitioning from a wall-supported handstand to a non-supported handstand is a difficult process.
Press with transition to handstand[edit | edit code]
Press with transition to handstand
- This is a much more difficult way to get into a handstand position without support. There are several ways to accomplish this.
The simplest variation is to try to push your body up from the toad stance, straightening your legs and simultaneously performing a press with your shoulders and arms.
You can also get into a handstand from a standing position—bend over, place your palms on the ground, and shift your weight forward on your palms. Engage your core muscles as you lift your legs. This will take a lot of practice and flexibility, so don't give up! This exercise can be performed from a normal standing position or in a wide-legged position. Engage your core muscles as you lift your legs.
Handstands on the bar[edit | edit code]
It's best to learn how to do a handstand on the ground first, but once you gain confidence, it can also be done on a bar or other object. Performing a handstand on a straight bar or parallel bars requires tremendous control as well as grip strength. Straight bars and parallel bars are equally good choices for training this movement, although each method is challenging in its own way. Before climbing onto a high bar, you need to learn how to safely exit the bar and land on your feet without injury.
If you're going to do a handstand on a high bar, you'll have to climb onto it first, doing a muscle-up or an inversion. From this position you will need to do a push-up into a handstand as described above. Just like with power-ups or other advanced movements, the fear factor for these exercises remains high. And for good reason - you perform them at your own peril and risk!
One-arm stand[edit | edit code]
The most difficult exercise among handstands is the one-arm stand. Even just holding this position for even a second takes a lot of practice. You should only start practicing this movement after you have managed to hold the two-arm variation for a full minute.
Start by getting into a standard two-handed stance. From this position, slowly shift your weight onto one arm while stretching your legs to create balance (hip mobility plays a big role in this, so be sure to practice placing your feet on the ground). First, try quickly touching your hand to your shoulder before returning it to the ground. Finally, you will be able to stand on one hand a little longer. You may find it helpful to move your free arm away from your body for balance. Advanced gymnasts can straighten their body while holding it on one arm.
Handstand with one leg swinging back and the other leg pushing forward[edit | edit code]
If you want to jump into a handstand, you need to keep your arms straight at all times. I've seen more than a few beginners fall on their heads the first time they try to do a handstand, all because they didn't fully straighten their arms. There is more strength in the arms when they are straight, and this is especially true in this case.
Start working on getting into a jerking stance next to the wall, standing in such a way that you learn to arch your back a little. Most likely, at first it will be easier. Over time, try to keep your back straight and move your legs away from the wall. Some will need more time for this, others less. With enough effort you will learn this, but don't expect to do it in one day.
Handstand push-ups[edit | edit code]
In addition to the handstand, it is very important to learn how to do push-ups in this position (as well as master all the variations of this exercise). After all, you want to train your muscles through the entire range of motion!
Pike push-ups[edit | edit code]
If you don't yet have the strength to do a full handstand pushup, pike pushups are a great way to get into proper form. This type of push-up allows you to practice movements without requiring you to bear your entire body weight.
Rest your toes on a bench or step and get into the starting position for push-ups. Next, walk your arms toward the bench while lifting your hips above your shoulders (this position is very similar to the inverted corner stance we talked about earlier). Be sure to keep your back straight while stretching your hamstrings, although you may need to bend your knees slightly to keep your hips over your shoulders. Lower yourself down until your head touches the ground and then push up for one rep.
Handstand push-ups against a wall[edit | edit code]
Once you can do 10 pike push-ups in a row without too much trouble, you'll be ready for full wall-mounted handstand push-ups. Stand in a handstand with your back slightly arched. Engage your core muscles and, as you lower yourself down, tense your core muscles and then push yourself up. Be sure to touch your head to the ground with each repetition to ensure full range of motion. You can also try touching the floor with your nose rather than the top of your head to help you go even lower.
Handstand push-ups without support[edit | edit code]
Handstand without support
- this in itself is a complex movement that is not easy to master, and if you add push-ups to this, the exercise will go to a completely different level of complexity!
Handstand push-ups require tremendous strength, balance, and overall body coordination, so before you try them, I suggest you first learn to do at least 10 handstand push-ups against a wall and stand on the wall. hands without support for at least one minute.
When performing handstands, I have often noticed that it is helpful to look at a point between the hands. However, for two-handed push-ups, I think it is better to look a few centimeters beyond the hands. Since the balance point constantly shifts throughout the range of motion, I recommend performing low and middle positions as lead-in exercises. Handstand push-ups without support on the horizontal bar are a truly breathtaking sight!
Handstand dips[edit | edit code]
If you want to increase your range of motion while doing handstand push-ups, there are several options for you. You can work on small bars or place two strong objects next to each other so that there is enough room to stick your head between them. Of course, you can also try regular parallel bars if you're brave enough. Any method that allows you to lower your head below hand level will make handstand push-ups even more difficult.
One-arm push-ups[edit | edit code]
They are often talked about, but rarely implemented. The one-arm push-up is the holy grail of bodyweight strength training.
Theoretically, one-arm push-ups are the most difficult exercise in calisthenics. However, to my knowledge, there has yet to be any evidence of a complete, clean repetition of this exercise. I have no doubt that someone will one day finally accomplish it (and record it on video), but for now, all we can do is train hard and cherish this dream in our hearts.
Author: Al Kavadlo
Fear of falling
Many who ask how to learn to stand on their hands are constrained by the fear of falling, because this is a rather dangerous element, as it seems from the outside. But if you competently learn how to get out of a fall, then no fear will arise on the way to a full handstand.
There are several ways you can escape from a fall. The most effective is to move forward with a turn. This maneuver is performed as follows: with the body bowed back, behind the head, during a handstand, you need to turn the body 90 degrees and land on your feet, removing any hand from the floor. This method is the least dangerous and most effective.
The second option is to take a step forward. When the body begins to move back in the handstand, you should move your hand forward, and then the other, if necessary. This way the center of gravity will again be above the hands and you will be able to avoid falling. Although this method seems more convenient, it is not very effective in terms of learning. If you constantly step forward when falling, the body and brain will get used to this movement, and in case of the slightest deviation, the hand itself will move forward. And the goal is to learn to align the body even if it deviates from a straight line, while standing still.
Bridge
An excellent complex gymnastic exercise to learn how to stand on your hands and to develop flexibility and strengthen your arms, shoulders, and back. Start with a regular bridge from the floor (watch the video tutorial), then learn how to do reverse push-ups from the bridge as the starting position. The next step is to get into the bridge from a standing position, using your sense of balance. Carefully! Place something soft on the floor at this moment.
Adviсe
The question of how to learn to stand on your hands has been considered. Now I should give some advice to beginners:
- It is always necessary to warm up your entire body before practicing handstands, especially your hands. After all, during a handstand, the entire weight of the body rests on the wrist joints, so they experience a lot of stress. If your wrists hurt the next day, you should not train the stance, but rather give it a day or two to recover.
- The leg swing should be done with the goal of throwing the pelvis over the head, and not moving the legs beyond the line of the body. That is, you don’t need to swing too hard to get into a stance. You should push off from the floor enough so that the center of gravity is exactly above your hands. The legs should also be in line with the other two points.
- You need to seek the help of a partner or film yourself to understand what the mistake is. It often happens that if you look at yourself from the outside, you can easily correct a mistake and quickly learn an element.
- It is necessary to immediately correct the deflection in the lower back if it occurs. After all, the so-called “crescent” stance does not look very impressive, and is also dangerous. It is better to spend more time correcting your body position than doing a handstand with an uneven back.
- Don't be lazy and practice more. To achieve a goal, you need to work hard at it. The same goes for the straight armstand. The more attempts there are, the faster the brain will understand what it needs to do and how to control the muscles in this element.
Preparatory stage
Before doing a handstand, you don’t need to work out in the gym for days and have huge muscles, however, you should evaluate your physical fitness. There are several criteria that allow you to give an objective assessment of your body and understand the level of readiness for such a load:
- Strong shoulders . If you can do push-ups or pull-ups on the parallel bars (horizontal bar) at least 10 times, it means that your shoulder muscles are developed at the proper level.
- Flexible wrists . If your wrists are not flexible and mobile enough, you can get injured while learning. Pre-exercise for 3-4 days, focusing on stretching your joints.
- Core muscles . The stronger the core muscles, the easier it is to maintain balance. To check the readiness of a given muscle group, perform a simple test. Stand straight, tilt your body forward so that it is parallel to the floor surface. Raise one leg and both arms so that one continuous line is created. Stay there for half a minute. If you were unable to withstand this time, work on strengthening your core muscles.
Before you learn to stand and walk on your hands, it is important to know a few simple rules. The most important condition for training is warming up. Before training, you need to warm up the muscles and joints in the shoulders and hands. To protect these areas from damage and discomfort, use wristbands or elastic bandages.
Very often people are interested in how long it takes to learn a handstand at home? It is important to understand that no one can master such a complex exercise in 5 minutes. There are different teaching methods and technologies, some allow you to stand on your hands in 1 day. But fast is not always high quality and easy. A smooth and calm technique is much more effective. Train a little every day, once you get rid of fear and strengthen your muscles enough, everything will work out by itself.