Articles > Share
Share
Tweet
Cool
Many people do not have access to a gym, but this does not stop them from building a beautiful body. They use exercises that do not require special equipment. They can be done anywhere. One of these exercises is push-ups.
This banal movement can work wonders, of course, if done correctly. But how many push-ups do you need to do to get results? I propose to look into this issue together.
General Tips
If you are looking for life hacks on how to quickly learn to do push-ups, then we hasten to disappoint you - they do not exist. The speed at which you move from one step to another is different for everyone.
It is important to be able to listen to your body.
- Try to do push-ups not once every couple of weeks or when the desire arises, but regularly. Decide why you need to do push-ups (lose weight, build muscle, or keep yourself in good shape) and set a clear goal for yourself.
- Improve your technique, rather than strive to do 100 push-ups. Firstly, you will quickly run out of steam, and secondly, it is better to do 5 “real” and high-quality push-ups with a straight body and chest touching the floor than 10-15 “crash” ones.
- Praise yourself every time you manage to do more push-ups in one approach. This is already a good achievement, you are not a professional athlete preparing for competitions.
- During the exercise, not only the arms, but also other parts of the body should work. The point of push-ups is to subject the body to a complex load.
- Try doing push-ups by varying the distance between your hands. If they are spaced shoulder-width apart, the triceps work more actively, and when this interval is a little larger, the main load goes to the pectoral muscles.
- Don't relax your butt muscles. This is necessary to ensure that the body is positioned straight and the back does not bend.
- Suck your stomach in.
- Inhale as you go down and come up as you exhale.
- Try not to lift the back of your body up.
- When you start, it’s better to spread your feet a little; if they are close together, it becomes harder to do push-ups.
- The slower you perform the exercise, the greater the load on the muscles.
- Beginners usually cannot perform the exercise with full amplitude, that is, touch the chest to the floor or other surface. There's nothing wrong with that. Since you are not a professional athlete participating in the Olympic Games, it is quite acceptable to train your arms by bending them slightly.
How to achieve results
An untrained person can do no more than 30-40 push-ups in one approach.
At the same time, it is unlikely that you will be able to do as much in the second approach. If you decide to increase the number to 100 or more times, you will have to work hard for more than one month, because you cannot sharply increase push-ups. It is most productive to do sets, that is, do 3-4 sets of exercises. In particular, the first approach can be done 20 times, the second and third - 25 repetitions, and the fourth - again 20 or 15 times. Selecting the right number of push-ups will help you avoid overloading yourself. You can increase the number of push-ups done per approach if the previous standard already seems easy.
To do 100 or more push-ups at a time will require a fair amount of practice. As a rule, to achieve such a result it will take at least 2-3 months of intensive training. You can speed up your results by adding training on horizontal bars and uneven bars.
Pull-ups strengthen your biceps and grip, while dips increase the load on your triceps and shoulder ligaments. By changing the load on different muscle groups, you can quickly bring them to a productive tone.
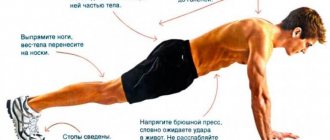
How to do push-ups correctly
Visually, this exercise is easy to perform: bend your arms, keep your body parallel to the floor and force yourself back. In practice, learning this is a little more difficult: for a beginner, a push-up program is unlikely to include more than 2 elements. Until the basics are mastered - that is, “how to do push-ups”, and not “how to learn more exercises”, and the goals become clear, there is no point in expanding it.
Doing push-ups correctly means:
- Do not “turn off” the elbow joint at the top point.
- Learn to keep a straight line from your heels to your neck.
- Maintain tension in your abs and back at all times.
- Touch the floor at the lowest point with your chest.
Benefits of push-ups
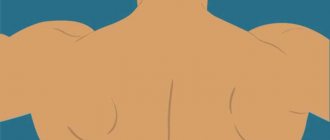
They relate to basic movements and affect not just one muscle, but several at once. In our case, the pectoral muscles, triceps, deltoids, dorsal and leg muscles, abdominals, biceps and a number of others are tensed. First of all, the first two from the list are loaded - chest and triceps.
The above list suggests that a workout consisting of push-ups alone will help to more or less efficiently work out the whole body.
The basic nature indicates a powerful effect not only on the muscles, but also on other systems of the body, primarily on the cardiovascular, respiratory, and osseous-ligamentous apparatus.
So, what are the benefits of push-ups:
- many muscles are loaded at the same time;
- increase in muscle mass and strength;
- the cardiovascular system is actively working;
- the lungs are intensively ventilated, the blood is supplied with oxygen;
- endurance increases;
- coordination of movements improves;
- bones, joints, ligaments and tendons are strengthened;
- metabolism accelerates, which allows you to normalize weight;
- improves posture and muscle tone;
- men acquire a powerful torso, women - beautiful breasts.
Types of push-ups
The exercise can be varied up to a couple of dozen variations, which allows it to be used in morning exercises for weight loss, in training special forces soldiers, and as crossfit at home.
Classic version: emphasis - lying down, legs - together, palms - on the floor shoulder-width apart. Correct technique assumes that the back does not bend either up or down; the abs and legs are tense; at the lower point the chest almost touches the floor, at the upper point the elbows are not fully straightened so as not to injure the joints.
The wider we spread our arms, the stronger the emphasis on the outer edges of the pectoral muscles, the narrower the emphasis on the inner ones.
By directing your elbows back during push-ups, the triceps are more heavily loaded, and the chest is loaded to the sides.
When doing push-ups with your hands above your legs, the lower chest is loaded more heavily, and below the legs - the upper.
Explosive strength can be trained with push-ups and jumping jacks.
Special attention should be paid to performing exercises with weights, for example, with a heavy backpack or with a girl sitting on her back (if you can adjust the training schedule to the girl’s daily routine).
How to diversify the training process
As soon as the muscles adapt to the load, there will automatically be a desire not only to increase the number of times, but also to try complex types of push-ups from the floor:
- Wide stance of the arms develops the pectoral muscles;
- Narrow push-ups target the triceps and anterior deltoids. A similar load is given by the so-called diamond push-ups or “diamond” push-ups, when the hands are positioned so that the palms form a diamond;
- Push-ups with clap give an explosive load to the pectoral muscles, when you need to get up to the starting position, smoothly lower yourself to the floor, and then sharply push yourself up, lift your hands off the floor, clap your hands under your chest and return to the starting position.
Once your arm muscles are stronger, you can move on to one-arm push-ups, which pump up your chest and triceps. Finger push-ups strengthen bones and help develop hand strength.
Deep push-ups between two stands 10-15 cm high will increase the range of motion and better work out the muscles. Weighted push-ups significantly increase the load. As a last resort, you can wear a heavy backpack.
More complex variations should be diluted with classic push-ups, which evenly load the chest, shoulders and triceps. It should be taken into account that at least three approaches should be allocated for each push-up option, and the number of repetitions is determined similarly to the classic version. To strengthen different parts of the pectoral muscles, you should pay attention to push-ups in different planes. For example, push-ups from a support with emphasis on the edge of a sofa, chair or table help to work out the lower chest.
When doing push-ups, when the emphasis is placed on the floor and the legs are higher than the body, the upper chest experiences a strong load. This kind of training will make the muscles stronger, which will have a beneficial effect on the result. Not only the quality of training plays a big role, but also the recovery period. Rest after each lesson is required. You cannot start doing the maximum number of push-ups without a break.
An unusual load exhausts the body, and instead of the desired result, chronic fatigue is obtained.
Do not exercise in high temperatures. It is better to focus all your efforts on treatment and start training when the body gets stronger after the illness. And if you feel severe muscle pain after training, you should increase your rest time. Regular exercise and careful attention to your body will not only increase the number of push-ups, but also improve your health.
Tips for girls
To be proud of a beautiful body and excellent health, various physical exercises will always come to the aid of every girl, in particular push-ups, which can be called a mandatory part of any full-fledged workout.
The ability to do push-ups benefits the body and is quite accessible and useful to everyone. Push-ups are beneficial for the muscles of the back, arms and abs. Push-ups also help to get rid of excess weight; doing them strengthens the heart and speeds up metabolic processes in the body.
It is perhaps immediately difficult for every girl to learn how to do push-ups correctly, because the female shoulder girdle and arm muscles are less developed than those of the male half. But in most cases, the desire to master this exercise among girls is much stronger, because a strong and pumped up pectoral muscle noticeably tightens a large breast, and also, due to the pumped up muscles, visually enlarges a small one.
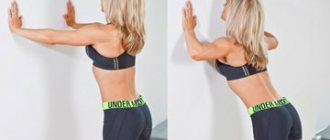
You shouldn’t immediately set yourself the goal of achieving world records. The main thing in such activities is regularity and persistence. Push-ups against a simple wall will help you learn how to do this exercise from scratch. At first glance, such exercises have zero positive effect, but this is not so. According to experts, this not strong, but effective load gradually strengthens the chest and arms, and also engages the muscles of the back, abdomen and neck.
To perform this push-up, you need to learn how to place your legs and arms correctly. Your arms should be extended at shoulder level and rested against the wall. The legs also need to be spread and retreated from the wall by 20-25 centimeters.
You can increase the load and step back from the wall a little further. The main thing is to prevent your legs from slipping, and when performing push-ups, you should keep your back and legs straight. It is necessary to repeat 12-15 push-ups in 3-4 sets.
The next level of training is to learn how to do push-ups with support in the form of a bench or chair. The technique is as follows: lie on the floor, put your hands on the bench, placing them slightly wider than your shoulders. Next, you should bend your elbows and tilt to the edge of the support. After exhaling the air, slowly straighten your arms and try to squeeze your body upward as much as possible. An effective feature of this push-up is that the maximum load falls on the legs and lower chest muscles.
The back and legs should form an almost right angle without bending. You should start this type of push-up with 12-14 repetitions of 3-4 sets. The break between approaches can be from 2 to 5 minutes, depending on fatigue and well-being.
The next level of mastering the load is to learn how to do push-ups from your knees. This type of push-up is most similar to the standard method of performing it from the floor, but its implementation reduces the load on the arms and shoulders by almost 2 times. Technique: do push-ups while lying down.
If you have mastered and correctly performed all the previous types of push-ups, beginners can try to perform the standard classic type - push-ups from the floor. For girls who want to use all the pectoral muscles, it is better to place your hands shoulder-width apart or slightly wider. If it is more important for a girl to strengthen her triceps, then it is better to perform push-ups with a narrow arm position (arms are placed narrower than shoulder width).
You should perform an emphasis while lying on straightened arms. Next, you need to bend your elbows until there is no space left between the floor and chest
At the same time, it is important to look forward. Then exhale and take the original position
You should also remember some features of this push-up for girls:
- You can ease the load if you lean on your knees while doing the exercise;
- in order to maintain the achieved results and maintain the tone of the pectoral muscles, you should perform this classic push-up at least 2 times a week, 12-14 times in several approaches;
- Before you start doing push-ups, you should do a light warm-up or run a little.
Push Up Guide
To make learning easier, I will divide everything into several simple steps. Each stage is a huge step towards the result. Using this scheme, anyone can learn to do push-ups in the shortest possible time.
The principle of push-ups for beginners is a gradual transition from simplified versions of the exercise to the classic one.
We get up from our knees
So, you should get into the starting position - take a lying position.
Spread your legs slightly apart, and start by placing your hands shoulder-width apart. Turn your palms with your fingers forward. And here it is, cheating - add your knees as a fulcrum (this is called push-ups from the knees).
If you can easily stand on your knees for 1 minute without bending your body, continue further. If not, practice until standing seems easy.
From the kneeling position you can already begin to do push-ups. Try to gently bend your arms and lower your chest towards the floor. Make sure your body is level. It worked, didn’t you fall? Then straighten your arms.
Learn to do five knee push-ups at a time. After this, you can try to straighten your legs and do one full push-up while lying down. It turned out great! It didn’t work out - we continue to train from the knees up to 10 times. We learned to do it 10 times - we repeat the attempt to straighten the legs.
By the way, this is exactly the version of the exercise that is often meant when talking about push-ups for girls. It is also used in group training, when you need to give a load that everyone without exception can handle.
To learn how to do push-ups in the classic style, you can first move to support on one knee, straightening the other leg. But doing the exercise this way is not very convenient.
Knee push-ups are one of the options for learning how to do push-ups from scratch.
Hands on support
There is another way in which you make the exercise easier for yourself by placing your hands on a support. The gist is this:
- Find a stable support 50–70 cm high. This could be a box, a cabinet, or a step platform on stands. The support must be strong.
- Place your hands on it as if it were the floor. Place your hands slightly wider than your shoulders.
- Lower yourself down, almost touching the support with your chest. Try not to bend your body either up or down.
Do push-ups like this until you can do it easily. Then look for lower support. Gradually you will move to the horizontal version of push-ups.
There really is a difference in the severity of the exercise. The higher the fulcrum for the hands, the less weight you have to lift. And the easier it is for you to keep your body straight - since gravity no longer affects you as much as in a horizontal position. Thus, learning to do push-ups is not difficult.
And, the easiest way for those who have never exercised is wall push-ups. To perform them, you need to stand facing a wall at a distance of about a meter. Lean your body forward and rest your hands on the wall, keeping your back straight. This is the starting position from which you will do push-ups.
Having mastered wall push-ups, move on to the “on your knees” or “hands on a support” option.
How to quickly learn to do push-ups and is it possible to somehow speed up the process? The answer to this question is ambiguous. It all depends on your age, muscle condition, discipline and regularity of training. In other words, the speed of achieving results varies from person to person. Therefore, do not look at others - be consistent and everything will work out.
Consolidation of results
Once you master the first repetitions, you can gradually progress. Your task is to do 10-30 push-ups per set. For girls, 10 is enough.
Break your workout into sets. Do two to three sets of 10 to 30 reps each.
By the way, if you want to gain weight, push-ups will suit you only at the very beginning. For best results, get a gym membership.
Many have already learned how to do push-ups using these methods. Starting with one time, they reached 40, 50 or more repetitions.
Features of a child's learning
To master the exercise, a child will need less time than an adult. But this is provided that you work with it competently and clearly.
If you are wondering how to teach a child to do push-ups, consider his psychology. The peculiarities of children's perception are as follows: the child focuses only on what is interesting to him. If you present the whole process to him as a game, you may have a much better chance of teaching your child push-ups.
You can start this process from the age of 3-4, showing everything by your own example. Children often copy their parents. The fact that they want to be like mom and dad is already a known fact. Show them how to do push-ups, and the children will repeat after you. Your task is to correct their movements in the form of a game.
The Complete Guide to Performing the Perfect Push-Up
First: Choose one of the three push-up variations below. Keep in mind that you won’t be able to choose the easiest one. Each option is complicated in its own way. (and forget about the concept of “female push-ups”). Regardless of the exercise option you choose, use a camera (thank God, every smartphone today has a good camera) and record a video of yourself doing this exercise. This will help you see mistakes: perhaps you are holding your hips too high or, conversely, too low. If you are working out with a partner, then ask him to evaluate the quality of your push-ups
Be careful: this option is only suitable if your friend understands how to do it correctly
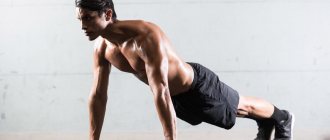
Standard push-ups
Classic push-ups are aimed at increasing strength and endurance
But before you rush to increase strength, pay attention to the positioning of your hands, as the main guarantee of the correctness of this exercise. The way you place your palms will affect the position of your elbows and shoulders.
Hands should be at shoulder level or slightly wider. Fingers should be pointing forward. The palms should be directed straight forward. If you place your hands too high, the pressure on your shoulders will be too high because your elbows are too far out to the side. This will negate the effectiveness of push-ups.
Correct: Elbows can be slightly spread to the side, about 45 degrees (as in the picture above)
Incorrect: Drop your hips during the downward movement and use them to move upward more easily. Excessively strain the muscles of the buttocks and abs. Twist your hips, incorrectly distribute the load on the spine so that there is a straight line from the top to the heels. “You don't want your hips to sag during the exercise, putting too much pressure on your lower back in the wrong position,” notes Theodore.
Narrow triceps push-ups for girls
Are the backs of your arms lacking elasticity? In order to work your triceps in more detail during push-ups, keep your elbows closer to your body. Theodore also notes that when performing this exercise, the abdominal muscles also work stronger. Try repeating the Chaturanga pose (yoga pose). During the downward movement, the upper body should move forward slightly. And at the lowest point, your arms should be bent 90 degrees.
Correct: As you lower down, move your shoulders behind your wrists (forward). Hands should be close to the ribs (thoracic region), forearms should be perpendicular to the floor.
Incorrect: Press your shoulders to your ears. This will negatively affect your posture and cause your elbows to extend too far behind your wrists. Instead of trying to “hide” your ears, squeeze your shoulder blades together and try to roll your shoulders back and down. Doing this exercise correctly will ensure correct posture.
Knee push-ups
Many people are familiar with this situation. At first everything goes quite easily. But by the middle of the second set, your thighs begin to tremble and you try to complete the exercise as quickly as possible before falling to the floor.
Carefully! It is better to choose a lighter version of the exercise, otherwise it will negatively affect your posture and general physical condition. You don't have to be a push-up monster—you'll get good results and, most importantly, avoid injury by simply maintaining proper posture while doing the exercises
For those who find it difficult to get up with standard push-ups, Theodore recommends placing your hands on a bench or other elevation. Such inclined push-ups use the muscular corset more effectively. Are there any shops nearby? Then get on your knees. But don't forget to watch the position of your hands. The position of the hands can be as in a standard push-up, or you can press the elbows closer to the body to work the triceps in detail. You decide.
Correct: Lower your shins to the floor, which will reduce the stress on your knees.
Incorrect: Raise your buttocks too much. This is not a dance floor - your pride should not be ostentatiously abandoned. Action plan: use your abdominal muscles as much as possible.
https://dailyburn.com/life/fitness/perfect-push-ups/
How to learn to do push-ups from scratch - ready-made plan
It's okay if you've never done push-ups before or had a long break from fitness and have lost this skill. Anyone can learn to do push-ups, regardless of gender or age! Of course, you'll need regular practice, but learning how to do push-ups is not as difficult as, say, doing pull-ups.
The most important thing to remember if you want to learn how to do push-ups efficiently and effectively: you must always follow the correct technique from the very first repetition of the exercise. Even if you start with simple exercise variations, remember proper form and technique
In order to start doing push-ups from scratch, we offer you a step-by-step program for beginners. Thanks to this scheme, everyone can learn push-ups!
A ready-made diagram of how to learn to do push-ups for beginners
In order to learn how to do push-ups, you will need to master 3 levels of push-ups. You need to exercise daily, you need to perform 3-4 approaches with the maximum number of repetitions in each approach. Perhaps your first attempts will not allow you to do more than 5-10 push-ups, but every day you will progress.
If you feel like you haven't made the progress you want at the end of the week, then continue doing the same push-up modification for another week. It is better to move to the next level of difficulty after you can do 30-40 push-ups without interruption. Don't forget about the correct push-up technique!
Week 1: Wall push-ups
Wall push-ups are an exercise that everyone can do. These vertical push-ups are a great introductory exercise that will help you master push-ups later on.
Week 2: Knee push-ups
Next level – knee push-ups
Please note that even when doing push-ups from the knees, the body should maintain a straight line, the pelvis should not go up
Week 3: Push-ups
After you have mastered push-ups from your knees, you can move on to push-ups from the bench.
Attention, there is a nuance here. The higher the bench, the easier it will be for you to do push-ups.
Therefore, you can change the height of the surface, thereby slowly preparing yourself for push-ups from the floor.
Week 4: Push-ups
After three weeks of regular push-ups, your body will be ready for push-ups. Remember that it is better to do fewer repetitions, but with full amplitude (elbows should bend 90 degrees).
You can continue to progress in push-ups by choosing the option with your feet resting on the bench. There are also various more complex modifications of the exercises, which will be discussed below.
How many times should you do push-ups: ready-made push-up patterns
We emphasize once again that you should never chase quantity while neglecting quality. In addition, you don't always need to strive for more repetitions. How many times you need to do push-ups depends on your goals.
So, there are several possible situations:
1. If you want to pump up and increase muscle mass in volume, then move towards increasing weight and complexity. For example, use barbell plates or elevate your feet on a bench. Training scheme: 10-12 repetitions of 3-4 approaches.
2. If you want to lose weight and get ripped, then move towards increasing the number of repetitions. Perform 15-25 repetitions in 5 sets. You can increase the total number of push-ups weekly or move on to more complex modifications.
3. If you want to develop endurance and functional strength, then also move towards increasing the number of repetitions and choose more complex modifications of floor push-ups, including plyometrics.
An example of a ready-made push-up scheme for increasing endurance and losing weight:
An example of a ready-made push-up scheme to increase muscle mass:
How to quickly learn to do push-ups
Two words: practice and discipline. If you want to master something, you have to try to do it. If you want to learn how to fight, fight; draw - draw; do push-ups - do push-ups. There are no exceptions. In addition, it is necessary to do this systematically. Skipping workouts is the last thing you should do if you really want to learn.
Can't do a single rep? No problem. Start doing push-ups from your knees, doing partial reps. Another option for beginners to do push-ups is to place your legs up to your waist on a bed or sofa. Performing 30-50 repetitions in 5-6 approaches every day, in a month you will be able to do your first full push-ups.
Methods on how to learn to do more push-ups.
There are very different methods, but their essence boils down to the fact that over a certain period you need to do several approaches, doing push-ups a different number of times. Actually, the only difference is in the numbers and the speed of their growth.
Push-up training plan No. 1
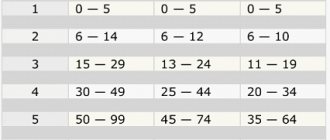
The course lasts five weeks. Found it in an old newsletter. The course was tested on 60 subjects (they did not learn from scratch), the increase was 15-30 push-ups more than before taking the course. You need to exercise three times a week. First you need to do push-ups as many times as possible. This is your maximum, it counts as one hundred percent. The numbers below are percentages of your maximum. Each number is one approach. Those. if you did 30 push-ups, then 20 percent would be six push-ups. Rest between sets – 1.2 minutes.
Week one, preparatory.1. workout: 20, 20, 20, 20, 20 (five sets of 20 push-ups). Plus two sets of chair push-ups (we sit on a chair, then push our legs forward, and put our hands on the edge of the seat) 15 times each. 2 workout: 25, 25, 25, 25, 253 workout: 30, 35, 40, 35, 20
Week two
1: 40, 45, 45, 40. Plus chair push-ups, two sets of 20 reps. 2: 45, 45, 50, 453: 50, 55, 60, 55
Week three
1: 50, 50, 50, 50. Plus chair push-ups, one set of 20 reps. 2: 45, 55, 65, 603: 60, 65, 75, 65. Plus one set of chair push-ups 20 reps.
Week four1: 50, 70, 80, 602::20, 100, 30, 203::50, 60, 70, 60
Last week of the course1: 100, 50, 40, 20, 102: 30, 30, 30, 30, 20. Plus three sets of chair push-ups 10, 20 and 25 times.3: We do as many push-ups as we can. Let's compare the results.
What can you say about this technique? You can actually learn how to do more push-ups with it, but I’m not sure that it’s intended for those who want to learn how to do push-ups from scratch.
Method No. 2: Scheme for increasing push-ups in 15 weeks
Another common pattern for those who want to learn how to do more push-ups. By the way, some strange people even sell it to everyone for a hundred rubles. Here it is:
Push Up Increase in 15 Weeks
Method No. 3: do more or the same amount of push-ups every day.
Friends told about her. Moreover, a long time ago, one of those who was especially fond of martial arts
He said that this technique is applied to some troops, which, however, is not important. The bottom line is this: on the first day, with breaks of half an hour, we do four sets of push-ups, maximum, as many as we can in each
We write the result in a notebook. The next day, in each approach, you need to do as many push-ups as you did in a similar approach yesterday, or more. And the nose bleeds - we keep the bar. In my personal opinion, if without fanaticism, then this is a completely valid method of learning how to do more push-ups. Personally, for me it turned into a kind of competition with one person, but more on that in the next post.
And now you can go to
the Home page
or look at other interesting posts from the section
In a healthy body...
.
How to do grasshopper push-ups
This name is slang and hides a special technique for positioning the arms, in which the area from the shoulder down to the elbow should create a line parallel to the floor when the body goes down. You can learn how to do grasshopper push-ups at any stage of mastering this type of physical activity, but before attempting the exercise, it is recommended to watch a detailed video that will explain the intricacies of this technique.
General scheme:
- Take an emphasis lying on your hands.
- Palms along the body, elbows near the body.
- Begin to bend your arms at the elbow joint.
- Stop when your forearm is parallel to the floor.