A big hello to all visitors to my blog Fitkiss.club. My name is Vitakha Okhrimenko, and today you and I will analyze all possible types of squats with a barbell in order to make your training more effective and interesting.
We will look at each individual type of squats, study the subtleties and features of each type, and after reading this publication you will know better than others how to squat correctly! So we take our seats according to the tickets we purchased, take a notebook and pen for taking notes, and off we go. And before studying different types of squats, I advise you to familiarize yourself with how to build a workout in the gym.
Classic squat in bodybuilding
Perhaps the most popular, most productive and generally clearest type of squats. We discussed the technique, mistakes and nuances in detail in the article on barbell squats. I won’t repeat myself, read it, everything is described in detail. Today we’ll go over the exercise briefly.
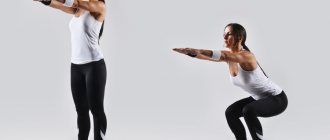
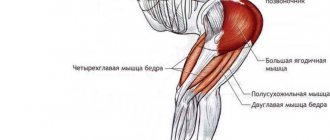
The classic squat in the understanding of bodybuilding is a squat with a barbell on the trapezium and placing your feet shoulder-width apart. This position is universal, the load is distributed between the quadriceps, hamstrings and buttocks (front of the legs, back of the legs and butt).
All muscles of the lower extremities are involved in the work. The result is evenly developed legs + strength, and not only the strength of the legs, but the strength of the athlete’s entire body. Because squats load the whole body, it would not be superfluous to call this exercise the MOST-MOST in bodybuilding . If you told me I could only do one exercise, it would definitely be the squat.
This version of squats is perfect for both girls and boys.
Classic squat technique
The bar can rest either on racks or in a power frame. If your gym has a power rack, forget about racks and do squats only in a power rack, with clamps and with the help of a spotter. By the way, you can read about insurance in bodybuilding here. It will not be superfluous to use an athletic belt to protect your lower back and elastic bandages to protect your knees from injury.
So, we adjusted the position of the bar to your height (the line of the bar should be slightly below shoulder level). We crawl under the bar, place the bar on the lower part of the trapezius muscle, and then select the position yourself, as is convenient for you. It wouldn’t hurt to wrap the bar with a towel, because if you’re not used to it, even a light barbell can put very unpleasant pressure on the trapezoid. Before straightening up with the barbell, you need to bend at the lower back and bring your shoulder blades together.
The starting position is certain. With the strength of our legs, with a straight back, we straighten up to our full height. Full height does not mean straightening your knees to the fullest; on the contrary, you should not fully straighten your legs, this is dangerous. I take two small steps back so as not to cling to the racks during squats. The back is tense, the shoulder blades are pulled together, the elbows are pulled back - voila, this is the starting position.
Let's start with the first repetition. A very important point of any exercise, and squats, as a very heavy exercise, this applies first of all - proper breathing during execution. The downward movement occurs with inhalation, exhalation follows after passing through 2/3 of the positive phase (upward movement).
I want to repeat it five times - breathing is very important. Without proper breathing, you will not be able to do the exercise correctly.
We sorted this out and moved on. Slowly, under control, we lower ourselves down. ON THE BREATH! When the hips reach parallel to the floor, we rise up sharply and strongly, without pauses, solely due to the effort of the legs. You shouldn’t squat below parallel, that’s for lifters (I’m talking about powerlifters, not the guys who repair elevators
), we don't need this. The most common mistake with the negative part (downward movement) is pushing the knees beyond the toes.
The lower back is arched throughout the entire approach. If you round your lower back, and even without using an athletic belt, I guarantee an injury on the second approach at most, provided you have at least the slightest decent weight.
During the negative phase of the butt (if we are talking about men, then the ass
) is pulled back slightly, this allows the body to tilt slightly forward, which will certainly maintain your balance. Attention to the picture:
The gaze is directed ahead. Neither up nor down, straight ahead, slightly above the horizon. Ideal when you squat in front of the mirror and look into your eyes. Joke. You just look at yourself and with a peripheral glance you see all the inaccuracies in the technique (distortions, kinks, etc.).
And lastly, don’t lift your heels off the floor. Throughout the entire exercise, the sole is firmly pressed with the entire foot to the floor. If the stretch does not allow you to squat like that, place some small plates or any other padding under your heels (a piece of rubber, a wooden pad, or whatever else you find in your gym).
Classic squats video:
Execution technique
- You need to stand with your front side facing the bar. You need to take a position so that the bar can be easily moved to the trapezius muscles.
- The bar is taken with an overhand grip, the grip should be slightly wider than shoulder width. After this, you should straighten up.
- Take the starting position in which you need to take a small step back. Feet should be positioned shoulder-width apart, toes pointing to the sides. The back and legs must be straight. The weight of the instrument must be positioned so that it can be felt on both legs.
- While inhaling, hold your breath and slowly sit down. In this case, the knees must be pushed forward, the buttocks move back and fall down. The body should be tilted at forty-five degrees.
- You can't slouch while squatting.
- The gaze should look forward, and not at the feet or to the side, the heels should be attached to the floor without leaving it.
- As soon as the hips are in the desired position at the end point, you need to inhale again and tense your buttocks in order to return to the starting position.
- You can exhale during the hardest part of the way up. You need to exhale until the starting position is reached.
You can get acquainted with a more accurate technique using the video.
Front Squats
Front squats are practically a rare exercise, because they are often simply neglected, underestimating their role in the structure of the leg muscles. Although in fact, front squats are important for pumping the buttocks and hamstrings. Due to the fact that the bar rests on the front delts, the position of the back should be perfectly level. The weight of the apparatus is significantly less than when performing classic squats, however, due to the unusual position, difficulties with balance increase and the exercise remains a rather difficult and dangerous task for the back and knee joints.
Front squat technique
Just like the classics, this exercise is best done in a power rack. The bar lies on the supports, you step under it so that the bar is placed in front of your shoulders. Feet shoulder width apart. The barbell is supported with your hands either with a bend in your hands or with crossed arms. Above is a drawing with broken hands, below with crossed arms:
Using the strength of our legs, we remove the barbell from the supports and step back. That's it, you're in the starting position. Start squatting slowly and as confidently as possible until you reach parallelism with the floor. The squat is done while inhaling. After reaching the bottom point, a positive phase follows - straightening with the barbell due to the force of the legs. And here it becomes even more difficult to maintain balance.
The exercise is done with a straight back, without moving the butt back . If the pelvis is pulled back, as is usually done with classic squats, the load is redistributed and keeping oneself in balance becomes an almost impossible mission.
Front squats involve pulling your pelvis and abdomen forward and your shoulders slightly back. The back occupies an almost vertical position. There is no need to twist your wrists too much , it is ideal that the elbows are pointed up in front, and the wrists only slightly support the projectile, which rests on the front delts.
Attention! Front squats are by no means easy, and if you really want to do the exercise, then you need to take it seriously. It is very important to pay enough attention to the correct technique; slouching when performing front squats means deliberately harming your spine. Front squats are not performed with heavy weights. And I ask you very much - watch your balance.
Front squats video:
Squat with a barbell in weightlifting
First, you need to figure out how and why do weightlifters do this exercise in the first place? First of all, weightlifters do squats to increase leg strength. In weightlifting, squats are auxiliary exercises for the snatch and clean and jerk. The snatch and clean are performed by weightlifters in a deep squat.
It is fundamentally important what is in the deep! Because the deeper the squat, the more weight the athlete can lift. This fact explains why weightlifters practice such deep squats (in fact, as deep as possible).
Secondly, weightlifters train not just strength, but speed, so-called “explosive” strength. “Explosive” force is especially important during detonation. And there is no need to sit too long in a squat with a barbell overhead (in the snatch) or on the chest (in the clean and jerk). Therefore, weightlifters perform squats in a high-speed, explosive mode with medium weights.
The third fact concerns the use of special equipment when squats. During weightlifting competitions, only knee pads or soft bandages are allowed. Accordingly, during training, weightlifters use only this equipment (and then only during “training” or in case of injury). But soft bandages and knee pads do not change the squatting technique in any way.
Finally, during a typical workout, weightlifters squat at 70-80% of their maximum. Penetrations are performed quite rarely. And even 100% load in a squat is not the actual maximum for a weightlifter, because... the squat technique was worked out only for weights of 70-80% of the maximum and was not designed to implement a one-time maximum effort. As you can see, the lack of need for squats with maximum weights also leaves an imprint on the technique of squats in weightlifting.
Features of squat technique in weightlifting
- Since squats are practiced with a straight, vertical back, the barbell is placed on top of the trapezoid, which allows you to keep your back arched and straight
- Feet are placed shoulder-width apart, toes slightly turned out. This is the most comfortable and natural position, which is used in the “straddle” for snatching and clean-ups.
- The squat is performed deeply, in the “release” position, i.e. at the bottom point there is a kind of repulsion from the shin. The pace of the exercise is medium or high. “Rebound” makes squatting somewhat easier and allows you to work out high speed, and therefore “explosive” strength. This significantly increases the load on the knees, but a weight of 70-80% of the maximum is not yet traumatic.
And the last feature: during squats (both snatch and jerk), the line of the athlete’s center of gravity passes through the middle of the foot.
Sumo Squat
In general, the sumo squat is more typical for lifters (okay, let there be dudes from the elevator
), because, unlike classic squats, with Sumo squats you can take a huge weight. But in our beloved bodybuilding, sumo has its own role, and especially among the representatives of the fair half of our planet.
The thing is that sumo squats take part of the load from the quadriceps and give it to the buttocks and inner thighs . Of course, girls are interested in both a beautiful butt and slender legs. That's why it's interesting. So sumo-style squats are perfect for both real men and as a type of squats for girls.
Sumo squat technique
I won’t repeat myself over and over again about the racks and insurance, it’s all described above, I’ll start right away from the zero position. The only thing I want to note is that when doing Sumo squats, the bar lies slightly lower on the back than in the classic version. Although it is convenient for everyone, here everyone adapts to themselves.
An important feature of the sumo-style squat technique is the position of the legs - they are spaced 15 centimeters wider than the shoulders, while the toes are turned away from each other.
The main trick of the exercise: when squatting, we try to sit on a chair located behind us. That is, the pelvis stretches backward. The knees, as in the classics, should not go beyond the line of the socks. At the lowest point, the body tilt is approximately 45 degrees, and the main load lies on the heels.
The most common mistake in this exercise is when the knees bend inward . This is again a risk of injury.
Throughout the entire exercise, the legs are bent in one plane, which is initially set by the angle of rotation of the feet. You don’t need to get acquainted with this exercise right away with a barbell on your shoulders. Place a low bench behind you, put some light stick on your shoulders (a gymnastics stick will do just fine), and study the technique in front of the mirror. Move the bench back until you understand that it is simply impossible to move the fifth point further. Do a few approaches in this position, and then move on to the barbell at your next workout.
Sumo squats put a lot of stress on the lower back, increasing the risk of injury. Therefore, if you decide to do sumo, be sure to add hyperextension to your program.
Sumo squats video:
Half squats, also known as partial squats
Half squats are the same classic squats, only with critical, record weights . The weight used in a half squat is 20–30 percent more than the weight of the apparatus in a classic squat. The purpose of the exercise is not so much to increase the strength of muscles and ligaments, but to prepare the central nervous system for heavy weights.
Doing parallel squats with critical weights is not only difficult, but also dangerous . Here half squats help out, the nervous system receives something like preparation for new, yet insurmountable heights.
Although in half squats the load on the lower back is less than when performing classics or, especially Sumo, record weights still carry a high danger, so the importance of safety in this squat cannot be overestimated. An athletic belt, bandages on the knees, help from a spotter, a power rack - all these requirements are practically mandatory. It's better to be overdressed than to be underdressed
.
Half squat technique
I won’t repeat myself ten times, because the half-squat technique is identical to the classic squat technique, with two clarifications: the legs are placed slightly wider than the shoulders, and the amplitude of the downward movement is only 2/3 of the amplitude in comparison with the classic one. Half squats will not work as a separate exercise; they kind of complement the training program, allowing you to reach new pedestals.
It happens when green beginners are afraid to squat deeply and start training their legs from half-squats with weights that are too heavy for themselves. This is definitely wrong! Half squats help experienced athletes move further, step onto a new level. For beginners, it’s better to start with classic squats with light weights.
Many athletes look with disgust at an athlete who does a partial squat. And they often say clever things: “take less weight and do it right. Is this a squat?” Don’t be upset and have pity on such an athlete, he simply doesn’t know enough theoretical information. And don’t look at how cool and healthy he is - most likely pharmacology has made him a monster on the outside and a goner on the inside.
Squats at the upper amplitude are an effective technique for training the nervous system. But, I repeat, this exercise is suitable for experienced athletes, and can cause new stress for trained muscles.
Half squats with a barbell video:
Plie squats
Honestly, I put my hand on my heart and say: I have never seen a man doing a plie squat. So, dear girls, here is information just for you. It is possible to say with a high degree of probability: Plie squats are more likely a type of squats for women.
In any gym where there is a leg abduction machine, there are always a bunch of girls rubbing around it. And not surprisingly, the adductor/abductor muscles have a very good effect on the slimness of women’s legs. Of course, it’s convenient to develop these muscles in the simulator; you sit and move your legs together. Beauty. Only if we talk about efficiency, this machine here is more than inferior to plie squats.
So, girls, don’t stand in line at the gym, pick up a dumbbell and let’s go get slender legs as efficiently as possible. In addition to the above, it is worth noting the fat + plie of squats in comparison with working in a machine: in addition to the adductor/abductor muscles, this exercise works great on the buttocks, and what advantage does a woman with a beautiful ass and slender legs have over a woman with only beautiful legs, in my opinion? not worth it.
Plie squat technique
In the starting position, you need to stand straight, with a dumbbell in outstretched arms. You hold the dumbbell by the plate, as in the picture.
The stance of the feet is wider than shoulder width, the knees are slightly bent, the feet are spread outward. The dumbbell rests between your legs. The downward movement is done with a perfectly straight back, until the thighs are parallel to the floor. At the bottom point, you should feel a stretch in the adductor/abductor muscles, after which, pushing off the floor with your heel, return to the starting position. As you inhale we go down, as we exhale we rise up.
Please pay attention to the position of the knees: in no case during the squat do they move towards each other; on the contrary, they spread apart. The exercise is done smoothly, jerks and sharp jolts are inappropriate here. The knees, as in other types of squats, do not extend beyond the level of the toes.
A technically correct exercise causes a burning sensation in the inner thighs, quadriceps and gluteal muscles.
Plie squats video:
Smith machine squats
I have often come across versions that squats in the Smith machine can replace classic squats with an increase in the level of safety and without loss of quality. I once fell for such a theory, and for a good three months I did squats only in Smith. And now I’m ready to argue until I foam at the mouth with any smart guy who tries to impose such an idea on me again.
Smith squats can diversify and complement classic squats, but cannot replace them. Yes, squatting in a Smith machine is indeed more comfortable, safer and easier. But the quality suffers from this!
The fact is that when squatting with free weights, i.e. with a barbell on the shoulders, in addition to the target muscles, we also develop the so-called auxiliary muscles - stabilizers. Which, in addition to helping to maintain balance and add strength, also provide some visual practicality. Without the work of stabilizer muscles, the target muscle will not receive sufficient load , and accordingly, its development will be inferior. As a result, we lose both in strength indicators and in visual progress.
It’s a different matter when it comes to supplementing the classics with squats in the Smith machine. The exercise machine is great for concentrated work on lagging areas of the legs, or to fully “score” the legs after other exercises. And squatting in Smith is really more convenient and easier. Indeed, due to the fact that the bar moves strictly up or down, without any deviations, problems with balance disappear altogether. In addition to this, it becomes possible to move your legs forward, removing some of the load from the lumbar region. Plus, such a squat (with feet in front) allows you to work the lower part of the quadriceps, the one closer to the knee, in isolation.
Smith machine squat technique
The main distinctive point of working in Smith is this: in the upper position, the barbell rises slightly due to the force of the legs, after which it is rotated with the hands so that the hooks do not interfere with you doing the exercise. The amplitude of movement is strictly vertical, which has a number of pros and cons, which are described above.
Breathing is the same as everywhere else: inhale when lowering, exhale when rising. The gaze is slightly above the horizon line, the back is straight. In short, everything is the same as everywhere else, only recorded.
You can do different variations of squats at Smith. Classic, with feet shoulder-width apart, Sumo, with feet wide, squats with feet extended forward to work the quadriceps, scissor squats.
Girls prefer squats on the Smith machine, and I have no right to condemn this. After all, the machine allows you to do the necessary exercises with increased comfort, and the fact that the quality of the girls’ work out suffers as a result is of little concern. I would still recommend that everyone who does not have serious problems with the spine pay more attention to the classic options with free weights, only occasionally diversifying them with a Smith machine.
Squats in Smith video:
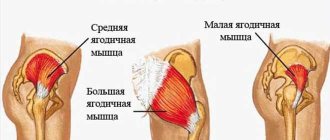
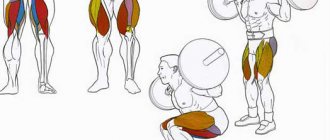
What muscles are involved?
The load is divided between three muscle groups, namely:
- Gluteal muscles;
- Hamstrings;
- Quadriceps femoris.
The core stabilizer muscles are also used to keep the body in the correct position.
You can do the exercise either with a free barbell or in a Smith machine. If you perform in a Smith machine, you will be able to better concentrate on proper technique, since this way you almost completely turn off the core stabilizer muscles.
The emphasis of the main load can be transferred either to the front or back surface of the legs. The farther back you move your leg, the more work your gluteal muscles do, as well as your hamstrings. If you move your leg far away, the quadriceps take on the load.
Scissor squats, due to their technique, place very strong pressure on the knee joints. Even with the correct technique, the load is still noticeable. Therefore, this exercise is not recommended for those people who have any knee problems or injuries.
In addition, the fact that you are holding the barbell on your shoulders creates some stress on the spine. Listen carefully to your feelings while doing it, and don’t force yourself to do the exercise.
Scissor squats
An excellent exercise for alternately working the quadriceps and gluteal muscles. Scissor squats and lunges are two very similar exercises that are often confused due to their similarities. Now I’ll explain what we’re talking about and what the difference is.
The exercises (both) require good coordination to perform. It is not recommended to master the exercise with a free-floating barbell; it is better to start by picking up dumbbells for lunges, or working in Smith for scissor squats. In principle, both exercises involve the use of both dumbbells and a barbell, but it is unlikely that it will be convenient to walk around the gym with a barbell.
Scissor squats and lunges have one significant difference: lunges are done with a step forward with a series of legs after each repetition, scissor squats take into account moving the leg back a certain number of times for each leg . Unclear? Everything will be now!
In the gym, you can often see someone starting to walk around the room with dumbbells in their hands, alternately putting their right and left legs forward, while touching the floor with the knee of their back leg. Have you seen it? So these were the attacks. And scissor squats have essentially the same technique, the only difference being that you don’t need to wander around the gym. Scissor squats involve standing in one place, alternately abducting the back leg and then returning it to the starting position. Let's analyze the scissor squat as a more energy-efficient process with the same result.
Scissor squat technique
Stand up straight, the barbell is located on your shoulders, your feet are approximately shoulder-width apart. Take a step back with one foot, touching your knee to the floor. The emphasis is on the foot of the leg in front and the toe of the leg behind. Then, pushing off with the heel of the front leg and the toe of the back leg, we simultaneously return to the starting position. We do the required number of times, after which we change legs and do the same number for the second leg.
It is recommended that after working one leg, return the barbell to the supports, take a break, and after catching your breath, perform the required amount for the second leg. Scissors will not work as a separate exercise, but they will be a great addition to working out the muscles on leg day.
Scissor squats video:
With a vulture on the chest
The load in this training mostly goes to the quadriceps.
- Take a starting position where your feet should be shoulder-width apart. The barbell is placed on the chest, correctly if it is its upper part. The grip should be from above, your arms can be crossed.
- Take a deep breath and do a squat, while your back should be straight, there should be no bending.
- Exhale, inhale again and rise to the starting position, exhaling slowly in the most difficult areas.
Hack squats
Hak squats are done in a Hak machine, although there is also a version of this exercise with a barbell. I once tried to do hack squats with a barbell, and to be honest, the exercise is uncomfortable and impractical. Just in case, I’m posting an image of a hack squat with a barbell, but in this article I will analyze in detail only the type of squat in a machine.
Squats in the Gak-simulator
The hack squat in the machine has a fat +. Unlike classic squats with a barbell, there is no risk of “breaking” the back, although the load on the spine remains to a small extent.
Some opinions suggest replacing squats with free weights with hack squats, due to the greater safety of this exercise . At the same time, as I already said in the description of squats in the Smith machine, this approach turns off the stabilizer muscles from the work, which is not good. It would be ideal to supplement your program with hack squats, alternating them with the classic version or supplementing it.
Hack squat technique
We lie down with our backs on the support platform. The shoulders fit comfortably under the supports. The back is flat, tightly pressed into the platform, with a slight arch in the lumbar region. The head is straight. The feet are placed on the foot platform approximately shoulder-width apart, slightly in front of the body. The position is half recumbent.
Caution : If you place your feet too close to the bottom edge of the support platform, the squat will become much heavier, and instead of a strong concentrated movement, you may end up with a sharp jerking movement. And this threatens to tear your back off the supporting platform, which can lead to injury. In short, you don’t have to do this!
Using the strength of our legs, we lift the weight and free ourselves from the locks. That's it, the weight is now on your shoulders. As you inhale, lower yourself down until your thighs are parallel to the platform or slightly lower, after which, with a strong, quick movement as you exhale, return your body to its original position. Exhalation, as in other exercises, occurs after passing the “dead” point.
There is no need to pause at the bottom point, pushing off immediately after reaching the lower limit of the amplitude. The hack squat is a good exercise, but I should note that the hamstrings and buttock muscles are less loaded than when performing classic squats with free weights. The main target muscle of the exercise is the quadriceps. Although, due to different positioning of the legs, the load can be slightly shifted. Wide stance of the legs involves shifting the load to the inner thigh. And placing your feet closer to the upper edge of the platform shifts part of the load onto the gluteal muscles. Plus, the lower you sit, the harder your buttocks will work.
Hack squat video:
There are also sissy squats and squats with a trap bar. However, these exercises are so unpopular that I honestly have never even seen anyone do them. So I think the described varieties of squats are more than enough, why clog up your hard drive.
Powerlifting barbell squat
Unlike weightlifting and bodybuilding, in powerlifting the squat with a barbell is not an auxiliary exercise, but a main, competitive exercise. This leads to the main task: the athlete must lift the maximum possible weight! It doesn’t matter at what speed or in what position the barbell will be on the shoulders. It is important to squat with the heaviest weight possible (within competition rules, of course). Based on this, let's analyze the technique of squats in powerlifting.
Probably everyone understands that in order to overcome the greatest weight (in any exercise, not just squats!) it is necessary to engage the greatest number of muscles (in bodybuilding this is called cheating). This method is quite suitable for powerlifting. Of course, this is not “cheating” in the sense that bodybuilders mean it, but it is a very close concept.
To squat with maximum weight, you need to “connect” not only the leg muscles, but also other muscles of the body. This refers, first of all, to the back muscles, which are in no way inferior in strength to the thigh muscles. Additionally, in regular squats, such as in weightlifting and bodybuilding, the load tends to fall on the quadriceps and gluteal muscles, and the rest are only partially worked. This should change. How to actually “connect” the maximum possible number of muscles will be discussed a little later, but now let’s touch on another, no less important aspect of squats.
Let's turn to physics, or more precisely to mechanics:
A = mg h,
where h = h2 – h1. Remember this formula? Well, of course! This is the work spent on lifting a body with mass m from level h to height h. In powerlifting, the above relationship describes how an athlete gets up from a squat position with a barbell. A is the work that his body performs. When we want to lift the maximum weight, we perform the maximum possible work - Amax. This is the work we can do right now. Maybe someday later (after training!) we will be able to do more work, but for now this is the absolute maximum for us! We simply can’t do more! Let us assume that Amax = const = mg h. In addition, it is known that g approx. = 9.8 m/s2. Next we can get that mg = const/ h. That is, the mass that we can lift is inversely proportional to the height of the lift. This means that if we want to lift the greatest weight, then we need to reduce the height difference in the exercise. This means that to overcome maximum weight, you should not squat deeply! Half squat or even better quarter squat! Then the weight overcome in squats will become huge!
But in competitions, the exercise is performed in compliance with a certain squat depth. This means that you need to look for other ways to reduce (or shorten) the amplitude of movement. The special selection of technical techniques for solving this problem will be discussed below, but now let’s analyze the depth of the squat in powerlifting.
The depth of the squat is a stumbling block when performing the exercise. This is a key point in the barbell squat, as everyone knows that the lower the squat, the less weight you can lift. Therefore, in this matter, judging at competitions is quite tough.
The depth of the squat is determined by the ratio of the rotation points of the knee and hip joint, or the ratio of the highest points of the knee joint. In both cases, the point on the thigh should be lower than the point on the knee. To achieve the required squat depth, you can, for example, do the following: a) squat like weightlifters do. In this case, the depth of the sedation is usually sufficient. But there are several disadvantages here: - in this technique, as mentioned above, only the thigh muscles are involved (and not all of them) and partially the back. This means that the weight being overcome is less than the maximum possible; — a large load is created on the knee joints, which is fraught with injuries when carrying heavy weights; — the length of the trajectory of the barbell delta h is maximum, which means you should not expect an outstanding result; - the depth of the squat is limited by the volume of the thigh and lower leg (usually it is difficult, and sometimes impossible, for super heavyweights to achieve the required depth of the squat due to too massive muscles).
What are the advantages? There is only one plus: a natural and simple technique, the easiest to learn. As you can see, there are many more minuses than pluses. You should look for something more effective!
To be fair, it should be noted that some athletes squat in a weightlifting style and achieve very high results. This is due, first of all, to individual characteristics and a number of other factors.
What can you really do to achieve maximum results? First, you should change your foot position to a wider one. It is practically very difficult to define unambiguously what “wider” means. Typically, foot placement is determined through trial and error. There is no single criterion here. From experience, I can recommend the following method (maybe not the best!). Or rather, this is not even a way to determine the width of the legs, but a criterion for the correct placement. It is as follows. If you look at the squatting athlete from the front, then in the bottom position of the squat the shin should be perpendicular to the floor. At the same time, several advantages are realized: — during squats, the legs do not slide on the platform, which is very important in competitions; — the risk of injury is reduced (the load on the knees is directed vertically downward, which corresponds to natural loading); — the efficiency of squats increases, the force directed vertically downward is the most powerful, since there are no lateral components of the main load vector.
For clarity of the analysis, we introduce the vector |B|=|AJ - a force that acts in the horizontal direction, squeezing (or spreading) the knees. Thus, the main force is decomposed into horizontal and vertical components, which reduces its “effective” value!
Let's see what we have achieved with a wider stance of the legs: 1. In addition to the quadriceps femoris, we have included the biceps femoris and long adductor femoris, as well as some smaller muscles. 2. The amplitude of movement delta h^ becomes somewhat smaller than delta h. First of all, we increased the efficiency of the squat itself, since we met the conditions for increasing the efficiency of movement.
However, you should avoid placing your legs too wide, as this, firstly, can lead to injuries to the knees and groin, and secondly, it is fraught with errors in execution (the shin is not perpendicular to the floor!). If you decide to squat with a very wide stance (due to personal physiological characteristics or just because it’s convenient for you), then you need to turn your toes so that during squats the line of movement of the knee joint coincides with the line of placing your feet - this will avoid many troubles (or at least reduce them to a minimum).
Now let's look at the position of the barbell on the shoulders. For clarity of the analysis, we introduce the vector |B|=|Ax| - a force that acts in the horizontal direction, squeezing (or spreading) the knees. Thus, the main force is decomposed into horizontal and vertical components, which reduces its “effective” value! (see Fig. 3).
So, we sorted out the placement of the legs! Now let's look at the position of the barbell on the shoulders. As mentioned above, in weightlifting it is placed on the top of the trapezius above the spine of the scapula, which allows you to keep your back straight and vertical. However, this position of the bar eliminates the powerful back muscles from working, since they are only slightly loaded. Therefore, it is necessary to tilt your back a little forward, shifting part of the load onto it.
The barbell can roll down onto your neck, which is completely unpleasant. To avoid this problem, the bar should be placed just below the trapezoid. The most convenient place is the back of the delta and the middle of the trapezius. Here the bar will not put pressure on the neck and scapula axis and will not slide down. But at this point the bar can no longer lie without support, as at the top of the trapezoid. It must be firmly fixed with your hands. This is somewhat inconvenient, because... the load on the joints of the wrist and elbows increases, but there is no other way out. This inconvenience goes away after some training and getting used to this position.
In addition, this position has one more advantage: the load on the back muscles is reduced by reducing the torque (or otherwise, the length of the “arm”) of the barbell, since l2 < l1. For a powerlifter, this means that you can transfer most of the weight of the barbell from your legs to your back.
So, we have achieved a reduction in the range of motion and connected the largest number of muscles to lifting the barbell. What else is left? Well, of course, just the smallest thing, namely: achieving the required depth of gray hair! How can this be achieved without violating the previously formulated conditions? Very simple! By shifting the line from the center of gravity, from the center of the foot to the heel.
As can be seen in the figure, there is not only a shift in the center of gravity. All the technical innovations described above are already used here:
- The bar lies below the spine of the scapula, i.e. actually on the back surface of the deltoid muscle.
- The back is slightly tilted forward.
- The feet are placed wider than the shoulders, which makes the stance stable.
- The line from the athlete's center of gravity is shifted from the middle of the foot to the heel.
What advantages does this position provide? There are several of them:
a) as can be seen from the figure, the height of the athlete’s knee (a) - h1 is less than that of the athlete (b) - h2 (h1 < h2). It would seem, what's the difference? But remember the rule: “the rotation point of the hip joint A must be lower than the rotation point of the knee joint B.” This means that the higher knee B, the higher point A can be. This means that the athlete can squat h' higher without violating the rules of the competition! This means it is possible to reduce the amplitude of movement by an amount h! What the actual value of h will be depends on the individual physiological characteristics of the athlete (length of the lower leg and thigh). b) pay attention to the angle formed by the lower leg and thigh - a. It is easy to notice and prove that the angle a2 < a1. What does this mean practically? This means that athlete (a) has a greater load on the knee joint than athlete (b). Therefore, the maximum force of athlete (a) is less than that of athlete (b), and the likelihood of knee injury will be greater. c) the stability of the athlete (b) is slightly lower than that of the athlete (a), but the emphasis is more powerful. This is explained by the fact that for the 2nd athlete the vector of the main effort does not have a horizontal component (see description above!). So, by simply shifting the athlete’s center of gravity, a significant optimization of the squatting process is achieved. This suggests that in technical execution everything is not so simple and there are no small details here! Every little thing is plus or minus a few kilograms.
The final aspect of the powerlifting squat technique concerns tempo. Let's remember physics again, Newton's second law: F=ma. That is, the greater the acceleration, and therefore the speed, the greater the force that must be applied to move a body of mass m. In practice, this means that the movement when performing a squat should be smooth, without sudden acceleration. Therefore, the speed of lifting the bar should not be high.
We emphasize that, unlike weightlifting, the pace of the exercise is chosen to be low. Of course, the slower the pace, the more the athlete is under load and the more energy he expends. Here it is also necessary to look for a “golden mean”.
Squat technique in powerlifting
- The bar is located on the back surface of the deltoid muscle, below the spine of the scapula, but not too low so that it does not slide down. The hands hold the barbell firmly in place.
- The position of the legs is wider than the shoulders, toes turned out. The specific placement of the legs can only be determined by trial.
- The projection of the center of gravity passes through the athlete's heel.
- The athlete's shin is positioned strictly perpendicular to the floor.
- The back is tilted forward enough to ensure a stable position for the athlete.
- During squats, the vector of the direction of movement of the knees coincides with the direction of the foot.
Once again, this is an ideal technique. Like any ideal, it is difficult (or completely impossible) to master. But you need to strive for this!
3832 5