Women's fitness for beautiful hands: rules and set of exercises
Hands, despite the fact that they perform a huge number of movements throughout the day, are very often a weak point in women. This can be explained by the fact that the muscles of the upper limbs, adapted to everyday stress, stop developing, lose their elasticity and become flabby. To avoid this, it is necessary to regularly apply progressive physical stress to the muscles of the arms, performing effective exercises with weights.
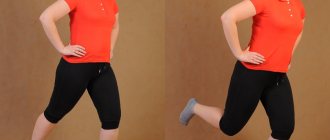
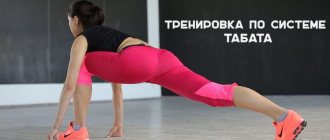
Leg weight training program
The total duration of the workout is 25 minutes.
| 1 | Exercise #1 – maximum number of times within 1 minute. |
| 2 | Exercises #2-6 make up 1 round. Each of them is performed for 45 seconds (maximum number of repetitions). Do 3 such circles in a row for your right leg, without resting. |
| 3 | 1 minute rest |
| 4 | Do 3 rounds of exercises #2-6 for your left leg. |
| 5 | Perform exercise #1 as many times as possible within 1 minute. |
For training, you will need weights weighing from 0.5 kg and a timer (for example, this one for IPhone and Android). If there is no timer, then do 10-15 repetitions for exercises #2-6 and 15-20 repetitions for exercise #1.
Muscle groups worked during fitness training for the arms
For the harmonious development of arm muscles, it is necessary to pay attention to all muscle groups of the upper extremities during fitness training:
- triceps muscles, due to the work of which the arms are extended. Triceps are the largest muscle group located in the upper limbs. As a percentage, it makes up approximately 70% of the total volume of muscles in the arms. For this reason, in order to train the triceps, you need to pay a lot of attention to the triceps muscles during fitness classes, carried out at least 2-3 times a week, using intense load for this;
- biceps muscles - biceps, which are located on the front surface of the shoulders and work together with the triceps when a person performs flexion and extension movements. In order to qualitatively strengthen and develop this muscle group during fitness training, it is necessary to use an integrated approach, which involves proportional training of both biceps and triceps;
- muscles of the forearms, the main function of which is to hold objects. This is the smallest muscle group of the arms, but it also needs high-quality development with the help of physical exercises, because the stronger these muscles are, the stronger a person’s grip;
- The shoulder muscles, which are adductors, are responsible for stabilizing the limbs and are involved in movements with full extension of the elbow joints.
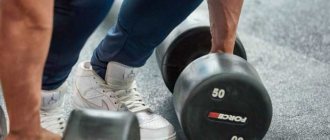
Prices for weights for arms and legs
Prices for bulk weights for arms and legs start from 200-300 rubles per pair weighing 0.5 kg - Atemi, Bradex
.
Models Torneo, Kettler, Light Weights
are a little more expensive - 300-400 rubles per pair of 0.5 kg. The greater the weight of the weights, the higher the price.
Weights with metal plates are more expensive than bulk ones, but they are universal. Due to the fact that the plates are removed, you can change the total load, ensure a progression of loads and use them with the whole family. Instead of 2-3 sets of bulk cuffs of different weights, you can buy one pair of weights with plates with a total weight of 2, 4 or even 8 kilograms (the weight of each cuff). The price for such weights for arms and legs starts from 1000-1500 rubles (0.5-1 kg) and reaches 3000-6000 rubles (4-8 kg).
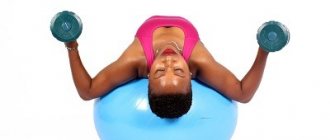
A set of exercises for the upper limbs
When conducting fitness classes, to form strong and sculpted arm muscles, it is necessary to use weights, for example, a barbell, dumbbells, kettlebell or other convenient and heavy object that can serve as a sports equipment at home. Having prepared the required assortment of weights, you can begin to perform the following set of exercises:
Stand up straight, with your feet shoulder-width apart, and grab the barbell with a reverse grip, fixing the barbell on your outstretched arms at hip level. Inhale and, as you exhale, bend the upper limbs at the elbow joints, bringing the projectile to the upper part of the chest. Fix the projectile at your chest for 1-2 seconds and smoothly lower it down, but without fully extending your elbows. Repeat in 3-4 sets of 10-12 times each. When performing the exercise, do not move your elbows or bend your wrists. To vary the load on the biceps, you can perform these lifts at partial range or use a curved barbell.
Standing straight, take a weight in each hand, with your wrists pointing outward. From this initial position, it is necessary to bend the upper limbs and bring the projectiles to the shoulders. At the point of maximum proximity of the dumbbells to the torso, pause for 1-2 seconds and smoothly lower the dumbbells, returning to the starting position, but without fully extending the elbow joints. Repeat this element of fitness training up to 12 times in each of 3-4 approaches, using adequate working weight.
Stand near the machine and grab its handle, having previously set the required working weight in the block. Inhale and, while exhaling, straighten your upper limbs, moving the handle of the exercise machine down. Stay in the lower position for a second and smoothly, avoiding jerks and movements by inertia, return to the starting position in the exercise. The recommended number of repetitions of extensions in the triceps machine is 3-4 sets of 10-12 times each.
Stand up straight, take a weight in each hand (or a kettlebell in both) and, as you exhale, slowly raise your upper limbs in front of your chest to a level at which the weight is parallel to your shoulders. Smoothly lower your upper limbs, returning to the starting position. This exercise, aimed at working the muscles of the forearms, should be repeated 10-12 times in each of 3-4 approaches. The weight of the weights should not be an obstacle to technically correct lifting, so it is better to choose lighter weights than to perform this element of fitness training incorrectly due to heavy equipment.
source
Exercises for lifting arms with an expander
The expander is designed for regular exercise at home. It does not take up much space, you can take it with you even on vacation.
However, it is capable of quite effectively working out various muscle groups and replacing other weighting agents.
Curling arms with an expander
Secure the expander to the floor by stepping on it with both feet. Taking the ends of the expander in your hands, you should make sure that the tapes do not sag and have good tension.
Next, you need to bend your elbows and pull the handles of the expander towards your shoulders. Exhale and begin lowering your arms down. The elbows are pressed to the torso all the time, the arms are extended without jerking.
Do 15 times, 4 approaches in total.
Arm row with an espader
Stand with your feet on the tape, bend your torso forward. The ends of the tape should be tightly stretched.
Raise your arms, bending them at the elbow and lower them while inhaling to the starting position. Hands are always close to the torso, do not spread your elbows.
Repeat 15 lifts and do 3 sets of these.
Raising your arms forward
The exercise works the anterior deltoid muscles.
You should stand straight, place your feet at a distance of 30 cm. Fix the expander with your feet, and take its ends in your hands.
Lower your shoulders and lift your arms until they are parallel to the floor.
Such repetitions should be performed 15–20, for a total of 4 sets.
Raising arms with an expander
Stand in the middle of the expander, straighten your back. Hold the handles of the expander in your hands and select the length so that your hands are at hip level.
Exhale and at the same time raise your arms above shoulder level. Return to the starting position while inhaling.
Work out 4 sets of 15 repetitions.
Standing press with expander
The shoulders and triceps are involved.
First, you need to stand on the machine so that the tension begins when your arms are lowered.
Holding the handles of the expander, your arms should be raised above your head. At the top point, the hands should close together. Lower your arms while inhaling.
Do 3 sets of 10 repetitions.
Crossover with expander
First you need to find a stable and motionless stand, you need to pass an expander through it. Turn your back to her and grab the handles of the expander.
Take a big step forward and raise your arms parallel to the floor, at shoulder level. Next, you should bend your arms slightly at the elbow and, as you exhale, bring your hands together in front of you, performing an arched movement.
At the end point, the clasped hands should form an oval and then return to their original position.
You should perform 3 sets of 15 times.
Training the muscles of the shoulder girdle and deltoid muscles
The main function of the muscles of the shoulder girdle is to provide the most varied and complex movements of the arms. However, its configuration, appearance and strength are determined mainly by the superficial deltoid and trapezius muscles. The structure and functions of the trapezius muscle are described by considering the back muscles.
The complexity of the structure of the deltoid muscle allows you to perform complex and varied movements with your hand: it pulls the shoulder forward and somewhat rotates it inward, takes it upward to a horizontal level, pulls the arm back and slightly rotates it outward. Therefore, a comprehensive study of this muscle is required. It is recommended to include at least one exercise for each of its parts in your classes.
Typical objectives for training the muscles of the shoulder girdle are:
The exercises presented below help strengthen the muscles of the shoulder girdle and develop their strength.
Some of the exercises have a universal focus, simultaneously affecting neighboring muscles. A number of exercises differ only in body position, but this does not mean that the effect of the exercises is the same. For example, when performing exercises in a sitting and lying position, you exclude many muscles from work and the effect of the exercises occurs more selectively. Fig 1. Deltoid muscle A - front view, B - rear view
For the general development of strength and mass of the deltoid muscles, they usually use a barbell press from the chest and from behind the head with a weight of 70-80% of the maximum in a standing and sitting position, 6- 8 reps per set. The standing press can also be performed using the legs in the initial phase of the movement.
A complex effect on the muscles of the shoulder girdle is exerted by circular movements of the arms with dumbbells in a standing, sitting position, as well as lying on your back or stomach on a horizontal bench.
When working on the relief of the deltoid muscles, the best results are obtained by the same selective impact exercises, but performed on block machines or devices with lighter weights, but with a higher number of repetitions.
In addition, it is necessary to take into account that the work, as a rule, also involves the trapezius muscles, the hypertrophy of which creates the impression of narrow and sloping shoulders. To eliminate this drawback, when performing upward rows of a barbell or kettlebell, it is necessary to end the movement at the level of the sternum, and when raising straight arms with dumbbells to the sides, do not lift the weight above eye level.
Exercises to develop the muscles of the shoulder girdle and deltoid muscles
Exercise 1
Starting position: standing, feet shoulder-width apart, arms down. Perform lateral abduction to shoulder level with straight arms with dumbbells held with an overhand grip (Fig. 2).
Exercise 2
Starting position: standing, feet shoulder-width apart, arms down. Perform alternating arm raises with dumbbells held with an overhand grip forward - to the side, to shoulder level (Fig. 3).
Breathing coordination is the same as when performing the previous exercise.
Exercise 3
Starting position: standing leaning forward, feet wider than shoulders. Perform straight arm raises with dumbbells to shoulder level (Fig. 4).
Exercise 4
Starting position: sitting on a bench, leaning forward. Perform straight arm raises with dumbbells to shoulder level (Fig. 5). Breathing coordination is the same as when performing the previous exercise.
Exercise 5
Starting position: standing, feet shoulder-width apart, arms with dumbbells raised to the shoulders. Perform alternating dumbbell presses, with your back arched (Fig. 6). Coordination of breathing must be consistent with hand movements.
Exercise 6
Starting position: sitting on a bench or stand, arms with dumbbells raised to the shoulders. Perform alternating dumbbell presses, with your back arched (Fig. 7). Coordination of breathing must be consistent with hand movements.
Exercise 7
Starting position: standing, barbell on chest. Perform barbell chest presses with a medium grip. The exercise should be performed dynamically; when working with heavy weights and when tired, you can help perform the leg press at the beginning of the movement (Fig. 8).
Exercise 8
Starting position: sitting on a bench, barbell on chest. Perform barbell chest presses with a medium to wide grip (Fig. 9).
Exercise 9
Starting position: standing, feet shoulder-width apart, barbell on shoulders. Perform overhead barbell presses with a medium to wide grip (Fig. 10).
Exercise 10
Starting position: sitting on a bench with a barbell on your shoulders. Perform overhead barbell presses with a medium to wide grip (Fig. 11).
Exercise 11
Starting position: standing with a barbell in your hands. Perform barbell rows with a narrow grip up to chin level (Fig. 12).
Exercise 12
Starting position: lying with your back on a horizontal bench. Raise straight arms with the barbell from the hips to a vertical position, while gripping the bar with your hands should be shoulder-width apart (Fig. 13).
Exercise 13
Starting position: lying face down on a horizontal bench, arms down. Perform straight arm raises with dumbbells (Fig. 14).
Exercise 14
Starting position: lying face down on the edge of a horizontal bench, arms forward, legs secured. Perform straight arm raises with dumbbells or a barbell to shoulder level. Breathing: arms forward - inhale, down - exhale (Fig. 15).
Hand exercises
Effective exercises for the arms so that the skin does not sag: many women, when working out in the gym, mistakenly do not work out the muscles on the limbs, believing that they will acquire masculine outlines. It is very difficult to achieve the effect of pumped-up male shoulders; for this you need to do a lot of strength training with weights. What exercises for beautiful hands are recommended for women:
- There are a number of workouts that, even at home, will improve the appearance of your skin.
- She will become toned by strengthening the biceps on her limbs.
Upper limb muscle training
The biceps brachii muscle (biceps) is located on its front surface.
With good development, it is usually easily palpable under the skin and stands out prominently on the shoulder (Fig. 16). The biceps acts simultaneously on the forearm and shoulder, causing them to move at the shoulder and elbow joints. The biceps muscle begins on the scapula with two heads and is attached to the radius bone of the forearm. Both heads, when contracted, bend the shoulder in the shoulder joint, with the long head abducting it, and the short one leading to the body. At the elbow joint, the biceps brachii muscle contracts, flexes the forearm and rotates it outward. The simultaneous contraction of the long and short heads of this muscle causes flexion of the shoulder at the shoulder joint and the forearm at the elbow joint. Fig. 16. Arc muscle A - action diagram, B - general view
When in a supporting position, the tension of the long head of this muscle fixes the shoulder joint, and the shoulder is fixed in a stationary position relative to the body. This makes it possible, by creating the necessary conditions for support, to bend the arm at the shoulder joint and, holding it in this position, perform any movement in the elbow joint. It follows from this that the biceps muscle will experience the least tension when simply flexing the elbow joint, and the greatest tension when bending the arm, previously bent at the shoulder, at the elbow joint. These conditions must be taken into account when preparing sets of physical exercises aimed at developing strength and increasing muscle mass of the biceps brachii muscle. Therefore, the proposed physical exercises for this muscle are very effective; the athlete can, if desired or necessary, use them in any sequence. When choosing a mode of work and rest for the biceps muscle, you should know that with long-term rest it quickly decreases in size and loses strength. Her endurance, for example, allows her to perform a constant set of exercises every training day of the weekly training cycle.
Exercises for training biceps
Exercise 1
Starting position: standing, feet shoulder-width apart, arms with the barbell down, while the barbell should be held with a narrow or medium grip from below (palms up), and your elbows resting on your stomach. Perform arm curls with a barbell at the elbow joints (Fig. 17). The exercise can also be performed with the help of the trunk muscles in the initial phase of the movement, with fatigue in the last 2-3 repetitions of each approach.
Exercise 2
Starting position: standing at a distance of half a step from the wall, holding the barbell in straight hands with a reverse grip, lean your back against the wall, while your legs are supported and should not slide your feet along the floor. Perform flexion and extension of your arms at the elbow joints (Fig. 18).
Exercise 3
Starting position: lying on an inclined plane, straight legs in support, the barbell at hip level is held with a reverse grip. Perform flexion and extension of your arms at the elbow joints (Fig. 19).
Exercise 4
Starting position: standing, feet shoulder-width apart, arms down. Perform alternate bending of the elbow joints of the arms with dumbbells with supination of the forearms (turning them upward with the inside) (Fig. 20). In this case, you should try to lift the dumbbells above shoulder level. The rhythm of breathing must be consistent with the rhythm of hand movements.
Exercise 5
Starting position: sitting on a bench with an inclined back, arms down and the backs of the palms facing forward. Perform alternate bending of the elbow joints of the arms with dumbbells with supination of the forearms in the second phase of the movement trajectory (from the level of the abdomen) (Fig. 21). When performing the exercise, the breathing rhythm should be consistent with the rhythm of hand movements.
Exercise 6
Starting position: sitting on a bench with an inclined back or lying on an inclined board, arms with dumbbells are lowered down and turned with the back side forward. Perform simultaneous bending of the elbow joints of the arms with supination of the forearms along the trajectory of movement (Fig. 22).
Exercise 7
Starting position: lying with your chest and stomach on an inclined bench, the edge of which rests against the armpits, arms bent at the shoulder joints and holding the barbell with a reverse grip, shoulders on a soft stand, forearms hanging. Perform flexion and extension of your arms at the elbow joints (Fig. 23).
Exercise 8
Starting position: standing, lean the shoulder of your working arm on an inclined board. Bend your arm with a dumbbell at the elbow joint. When bending your arm, lift the dumbbell above shoulder level. After completing this exercise with one hand, repeat it with the other hand (Fig. 24). The rhythm of breathing must be consistent with the rhythm of hand movements.
Exercise 9
Starting position: sitting on the edge of a bench, arms down and supinated (turned inside out). Perform alternating bends at the elbow joints from the sides - up your arms with dumbbells, while your back should be arched (Fig. 25). When performing the exercise, the breathing rhythm should be consistent with the rhythm of hand movements.
Exercise 10
Starting position: sitting on a bench, arms with dumbbells down and supinated. Simultaneously bend your arms with dumbbells at the elbow joints from the sides - up, while keeping your back straight (Fig. 26).
Exercise 11
Starting position: standing, feet shoulder-width apart, hands holding the barbell with a narrow or medium overhand grip (palms down), lowered. Bend your arms at the elbow joints (Fig. 27).
The triceps brachii muscle (triceps) is located on the back of the shoulder and is an antagonist of the biceps brachii (Fig. 28).
This muscle has two short heads and one long one. The short inner head in relation to the humerus is on the inner side, and the short outer head lies on the outer side. The short heads are classified as single-joint muscles, and the long heads are classified as two-joint muscles. The long head starts from the scapula, the inner and outer short heads - from the back surface of the humerus, and from the inner and outer septa. With one common tendon, all the heads of this muscle are attached to the ulna. The long and internal short heads are involved in extension and adduction of the shoulder, and all the heads together, contracting, extend the shoulder in the shoulder joint, and the forearm in the elbow joint. Fig. 28. Triceps muscle A - general view, B - scheme of action
Although this muscle is more massive than the biceps muscle, under normal conditions in an untrained person it is not stronger than it, and it is less durable. This should be taken into account when planning physical activity, especially in the initial period of training. In the future, after long-term and systematic comprehensive training with special physical exercises, it turns out that the triceps muscle has large reserves, it quickly increases in mass, gains strength and can surpass the biceps in endurance.
Exercises for developing the triceps muscles of the shoulder can be divided into the following groups:
Triceps exercises
Exercise 1
Starting position: lying on a horizontal bench. Perform the barbell press with a narrow grip from the chest (Fig. 29).
Exercise 2
Starting position: lying with your back on a horizontal bench with a barbell held with a narrow grip at the forehead in bent arms. Extend your arms at the elbow joints to a vertical position (Fig. 30).
Exercise 3
Starting position: lying with your back on a horizontal bench with a barbell in your hands behind your head, narrow grip. Extend your arms at the elbow joints (Fig. 31). This exercise can be performed with cheating, that is, using the force of inertia to facilitate movement.
Exercise 4
Starting position: standing, arms with a barbell held with a narrow grip, raised vertically upward. Perform flexion and extension of your arms at the elbow joints. When extending, the shoulder should take a vertical position, and the elbows should be pulled back behind the head as much as possible (Fig. 32). This exercise can also be performed with shock absorbers or a block attached to the back.
Exercise 5
Starting position: standing, hands with a dumbbell behind your head. Extend your arms from behind your head upward, while trying to ensure that the movement is performed only in the elbow joints (Fig. 33). The breathing rhythm is the same as during the previous exercises.
Exercise 6
Starting position: sitting on a bench with a dumbbell held behind your head in your hand. Perform an arm extension with a dumbbell from behind your head. First perform the exercise with one hand, then with the other (Fig. 34).
Exercise 7
Starting position: standing in an inclined position, one hand resting on the thigh, the shoulder of the other hand is parallel to the body, the forearm is bent at the elbow joint, and the hand holds a dumbbell. Without changing your posture, extend the arm holding the load (Fig. 35).
Exercise 8
Starting position: lying on your back on a horizontal bench with dumbbells in bent arms behind your head. Perform simultaneous extension of the arms with dumbbells from behind the head (Fig. 36).
Exercise 9
Starting position: lying on your back on a horizontal bench with dumbbells in bent arms behind your head. Perform variable extensions from behind the head with dumbbells (Fig. 37).
Exercise 10
Starting position: leaning on the uneven bars. Perform flexion and extension of your arms, while pressing your elbows to your body (Fig. 38).
Great Exercises for Slimming Arms: Video Complexes!
Over time, the standards for a woman’s figure change, but at all times there have been uniform requirements for a beautiful woman’s hand.
It should be quite thin, but round, with elastic and healthy skin, with thin graceful fingers. In the shoulder area, it should also be rounded, but not full, because otherwise it will be impossible to wear a seductive outfit without sleeves or with a neckline that reveals the shoulders. Thick arms and pumpkin-like fingers will have to be hidden under long, voluminous sleeves.
This is why many women are concerned about the problem of losing weight in their arms . Diets that are effective for general weight loss do not work effectively in this case, because the arms, as a rule, take longer to lose weight than the rest of the body. And if successful, we get thin hands, but flabby and sagging skin, which also looks unaesthetic.
Therefore, the main method for acquiring beautiful arms is effective exercises for losing weight on your arms . Additionally, you can also use wraps and massage, and sports such as fitness and swimming are also very effective.
First, you need to determine which part of the arm (shoulder, forearm, part of the arm below the elbow, hand, fingers) is the most problematic, because fat deposits may not be on the entire arm, but on individual sections of it.
READ ALSO: Hollywood Diet
Then we select appropriate exercises for losing weight in your arms that train specific muscles. Most often, the triceps, the muscles responsible for extending the arms, require special attention. Insufficiently active work can lead to the appearance of excess fat and sagging skin. Then specially selected exercises for losing weight in the arms should be aimed at training the triceps.
If the reason for the unaesthetic appearance of the arm is the underdevelopment of the pectoral muscle, the consequence of this will be not only sagging breasts, but also fat folds in the armpit. You need effective exercises to lose weight in your arms in this area and train your pectoral muscles. To reduce the volume of the hand and fingers, another group of exercises, etc. is intended.
You can do these exercises under the guidance of a trainer or on your own by watching video exercises for losing weight on your arms. This can be either ordinary exercises without equipment, or exercises with weights - dumbbells or a ball. Ordinary push-ups are very effective, also pay attention to the different variations of this exercise for losing weight in the arms video .
In any case, you need to be prepared for the fact that exercises for losing weight in your arms will not give quick results.
The first visible changes can be seen after regular exercise (every day for half an hour) in a few months, but already the first fashion show through the city streets in a revealing outfit demonstrating the beauty of your hands will be a reward for all your efforts.
Training the anterior forearm muscles
The anterior muscle group of the forearm includes eight muscles, which mainly begin from the inner epicondyle of the shoulder and the anterior surface of the forearm (Fig. 39). The muscles of this group are located in two layers: the superficial layer contains five muscles, and the lower, deep layer contains three. Each of these muscles is attached in a different place, and has its own clearly defined function, causing subtle movements of the fingers and hand. In addition, their general function includes flexion of the hand, fingers and rotation of the forearm along with the hand inward. All muscles of the anterior part of the forearm have a relatively small total volume and develop relatively little force during their contraction. Despite this, the nature of their location in relation to each other, to the joints of the hand and forearm makes it possible to advantageously use the mechanical capabilities of the lever, which is actually the skeleton of the upper limb for them.
The conditions for the development of strength in the anterior group of muscles of the forearm are determined by the functional characteristics of the joints of this part of the skeleton, and are ensured by performing physical exercises in the shoulder and radioulnar joints.
Exercises for the development of the anterior muscle group of the forearm can be divided into exercises for pronators (muscles that rotate the forearm and hand inward) and all other muscles.
Fig. 39. Anterior muscle group of the forearm A - general view, B - action diagram; 1 - brachialis, 2 - lower end of the biceps brachii, 3 - pronator teres, 4 - brachioradialis, 5 - flexor carpi radialis, 6 - palmaris longus. 7 - flexor digitorum superficialis, 8 - flexor carpi ulnaris.
Exercises to develop the anterior muscle group of the forearm
Exercise 1
Starting position: standing with a barbell in your hands, medium grip from below. Bend your arms at the elbow joints while simultaneously bending your wrists (Fig. 40).
Exercise 2
Starting position: standing with a barbell in your hands behind your back. Perform wrist bending (Fig. 41, 42).
Exercise 3
Starting position: sitting on a bench with a barbell in your hands, resting your forearms on your thighs or a special stand, grip from below. Perform wrist curls (Fig. 43).
Exercise 4
Starting position: sitting on a bench, resting your forearms on your hips or a stand. Consistently perform adduction and abduction of your hands with dumbbells, holding them vertically (Fig. 44).
Exercise 5
Starting position: sitting on a bench, resting the inner or outer surface of your forearms on your hips or a stand. Consistently perform abduction and adduction of the hands with dumbbells, holding them horizontally with an overhand or underhand grip (Fig. 45).
Exercise 6
Starting position: standing with dumbbells in your hands. Rotate your hands with dumbbells inward or outward (Fig. 46).
Exercise 7
Starting position: standing with dumbbells in your hands, bent at the elbows and resting your elbows on your stomach. Perform simultaneous inward or outward rotation of your hands with dumbbells (Fig. 47).
Exercise 8
Starting position: standing or sitting, with the straight arm abducted at the shoulder joint and lying on a horizontal plane at chest level, the hand hanging holding the dumbbell by the free end of the bar, and a disc attached to the other end of the bar of this dumbbell. Perform flexion and extension of the hand (Fig. 48). When the shoulder and hand rotate outward, the anterior group of forearm muscles develops, and when the forearm and hand rotate inward, the posterior group of forearm muscles develops.
Training the posterior forearm muscles
The posterior muscle group of the forearm (Fig. 49) contains ten muscles, of which five are located in the superficial and five in the deep layer. They begin mainly from the outer epicondyle of the humerus and the posterior surface of the radius.
Exercises for developing the posterior muscle group of the forearm can be divided into exercises that develop the supinator (the muscle that rotates the forearm and hand outward), and exercises that develop all other muscles of the posterior forearm.
Fig. 49. Posterior group of muscles of the forearm A - diagram of action, B - general view; 1 - ulnar muscle, 2 - extensor carpi radialis longus, 3 - extensor carpi ulnaris, 4 - brachioradialis muscle, 5 - extensor digitorum muscle, 6 - extensor carpi radialis brevis, 7 - extensor pollicis ulnaris, 8 - abductor pollicis longus muscle, 9 - extensor of the index finger, 10 - short extensor of the thumb.
Exercises to develop the posterior muscle group of the forearm
Exercise 1
Starting position: sitting on a bench, resting your forearms on your thighs or a special stand. Alternately perform flexion and extension at the wrists of your hands with the barbell, while holding it with an overhand grip (Fig. 50).
Exercise 2
Starting position: sitting on a bench, resting your forearms on your thighs. Alternately perform flexion and extension at the wrists of your hands with dumbbells, holding them with an overhand grip (Fig. 51).
Exercise 3
Starting position: standing with a barbell in your hands and holding it with a medium overhand grip. Bend your arms at the elbow joints while simultaneously extending your wrists (Fig. 52).
Exercise 4
Starting position: standing, with dumbbells in hands. Extend your arms at the wrist joints (Fig. 53).
Exercise 5
Starting position: sitting on a bench, resting your forearm on the edge of an inclined board. Extend the wrist joint of the hand with a dumbbell, holding it with an overhand grip (Fig. 54).
Exercise 6
Starting position: standing. Perform twisting of the sleeve with a weight hanging on the cable by alternating hand movements “from yourself” with an overhand grip (Fig. 55).
Push-ups for beautiful hands
Push-ups are a good way to combat hand problems. The exercise gives missing tone to the muscles of the arms and the entire shoulder girdle . As a result, the skin takes on the required shape. You can strengthen the inner surface of the muscles, their upper and lower parts with the help of exercises. The rules for various types of push-ups are as follows:
- It is necessary to descend slowly.
- The lower a woman goes, the better her arms are pumped.
The classic push-up is performed as follows:
- You need to get down on the floor, rest your legs and arms on the floor.
- You need to slowly rise and fall, while trying not to spread your legs.
- If the exercise seems too difficult, you can place them on the floor in a bent position.
- The workout must be repeated at least 15 times.
French press:
- You need to sit on a chair, take a dumbbell and hold it with both hands.
- The dumbbell is placed behind the head, elbows pressed to the head.
- The exercise should be done alternately with each hand.
- The complex must be repeated at least 25 times.
Bench press:
- You need to lie on a bench, leave your feet on the floor.
- Bend your arms with a dumbbell and raise them.
- As you exhale, you need to straighten your arms, and as you inhale, return them to their place.
- You must do at least 10 repetitions.
Development of hand muscle groups
There are no muscles on the dorsum of the hand. The muscles of the palmar surface consist of three groups: the muscles of the eminence of the thumb, the middle group of muscles and the muscles of the eminence of the little finger (Fig. 56).
Numerous muscles of the forearm and hand, associated with its bones, allow the production of subtle, highly coordinated movements of the fingers and various movements of the hand. The fingers can be used to perform flexion, extension, abduction away from the middle finger, adduction toward the middle finger, and circular motion.
To train these muscles, squeeze a tennis ball or wrist expander with your fingers.
Fig. 56. Muscles of the hand A - interosseous, B - eminence of the thumb.
source
Therapeutic exercises for upper limb injuries
Trauma to the upper extremities involves damage to muscle tissue, ligaments, bones, and leads the entire body to impaired functionality. Injuries to the upper extremities include dislocations, fractures, sprains, and bruises.
After any of these injuries, the patient needs some time to restore the functionality of the damaged part of the body.
As with any injury, you should not self-medicate, but it is better to immediately seek help from a traumatologist. The doctor will make the correct diagnosis, prescribe appropriate treatment and recommend a recovery process.
The recovery process after an injury to the upper extremities must begin as early as possible in the first days after the injury. To quickly recover from injury, comprehensive treatment is necessary. The most effective methods for restoring an injured part of the body are using special therapeutic exercises (therapeutic exercises), qualified massage and physiotherapy.
It is important to remember that it is necessary to perform therapeutic exercises after an injury slowly, without jerking, and not to cause pain, since pain causes reflex muscle tension, which will slow down the recovery process.
The main tasks of exercise therapy (therapeutic exercises) for upper limb injuries:
- normalization of metabolic processes in the body,
- improve the psycho-emotional state of the patient,
- improve blood supply to the injured limb,
- prevent muscle wasting.
The set of therapeutic exercises (therapeutic exercises) proposed below for injuries of the upper extremities is aimed at strengthening the muscles and completely restoring the amplitude of movement of the upper extremities. The set of exercises includes: walking, walking with weights to improve balance and coordination; exercises with a gymnastic element are also included for recovery.
At the recovery stage after an injury, exercise therapy (therapeutic exercises) should be performed daily, 2-3 approaches per day. It is necessary to systematize the implementation of therapeutic exercises (therapeutic exercises) with a further increase in load, which will achieve better results and lead to a speedy recovery of the injured limb.
Contraindications to classes
Exercises for the arms that are aimed at tightening the muscles will undoubtedly be beneficial. But before you start training, you need to familiarize yourself with the limitations that such activities have:
- Diabetes mellitus and thyroid diseases.
- Various diseases of the spine.
- Previous heart attack.
- Presence of arrhythmia or hypertension.
If a girl suffers from one of the above diseases, there is no need to be upset. You can restore a beautiful and toned covering on your hands using alternative methods.
Exercise therapy complex for upper limb injuries
1. We start the exercises with normal walking - counting. 2. Fingers clenched into a fist, arms to the sides. Normal walking, with our arms bent and extended at the elbow joints - perform for 10 seconds. 3. Hands are located on the belt. Walking on your heels and simultaneously raising and lowering your shoulders - the amount of time to perform, as in exercise No. 2. 4. Place your hands behind your back, shoulder blades retracted. Walking on the outside of the foot – 10 seconds. 5. Hands on the belt. Walking on the inside of the foot – up to 10 seconds. 6. Arms spread to the sides. Rotation in the elbow joints – 8 seconds each. in each direction. 7. Place your fingers on your shoulders. Rotation in the shoulder joints - execution time is similar to exercise No. 6. 8. Arms straight in front of you, extended forward. We begin to perform cross movements with our hands “scissors” 8-10 times. 9. Fingers clenched into a fist. Boxer movements - 10-12 times. 10. Hands in the “lock”, lowered down. Movements in the shoulder joint: circular movements to the right, then to the left 4 times. 11. Hands crossed behind the head. Walking in a half-squat – 10 seconds. 12. Hands placed on knees. Walking in a full squat – 10 seconds. 13. 10 seconds of normal walking. 14. Arms bent at the elbows, hands into fists. We perform the exercise in jerks: bent back, then straight to the sides, then bent, continue straight up, bent again and lowered down - 6-8 times. 15. The hands are clenched into a fist. Walk with long steps, while changing hands (up, down) – 8-10 times. 16. For the next exercise, place your hands in front of your chest in a “lock” and perform 8-10 times. We take a step with our left foot, turning our torso to the left, then step with our right foot, turning our torso to the right. 17. Hands in the “lock” and raise up above your head. Bend your right arm behind your head. Press your left hand to your body, then change hands – 6-8 times. 18. Place your fingers on your shoulders. Cross exercise. Pull up your right knee, touch with your left elbow, then pull up your left knee, touch with your right elbow - do this 8-10 times. 19. Hands raised up above your head. Place your right foot forward on your toe, make three springy bends towards the leg and change legs – 8-10 times. 20. Now the hands are lowered down. We start the exercise by raising the arms up through the sides - clap, swing the right leg to the side, change the leg - perform 4-6 times.
For the next set of exercises for the upper limbs we will need a gymnastic stick
1. Spread your legs shoulder-width apart, arms wider, hold the stick in front. We start the exercise by pulling the stick to the chest, lifting it up, placing it behind the shoulder blades and lowering it – 6-8 times. 2. Hold the stick by the ends. Raise vertically up to the left, then to the right - 4-6 times on each side. 3. The position is similar to exercise No. 2. Raising the stick, we hold it behind the head, left hand at the top, now repeat on the right - 6-8 times. 4. Stick in front on palms. Bend your arms at the elbows, bringing your elbows together 6-8 times. 5. Stick in front, shoulder width apart. Rotate the stick towards yourself, then away from you – 4-6 times. 6. The body is slightly tilted, we hold the stick by the ends. Swing smooth movements of the arms to the left and right - 10-12 times. 7. We hold the stick from behind. Raise it up, bend your arms, touch your shoulder blades and lower. 8-10 times. 8. Position as in exercise No. 7. Rise on your toes, move the stick away from your back, lower it, then tilt your torso forward, lift it up and finish - 6-8 times. 9. Hold the stick at shoulder width. We turn the stick to the left, touching it with our elbows, and similarly in the other direction - 8-10 times. 10. Stick up. Rotate the stick in a circle to the left, then to the right - 4-6 times. 11. Stick at chest level, hold by the ends, left elbow bent. Straightening your left arm, simultaneously bend your right arm and vice versa – 4-6 times. 12. We take the stick in the right hand, the left one on the belt. Turn the palm up and down, change the hand - 10-12 times. 13. For this exercise we will need a partner. We turn to each other, hold the stick by the ends and do the “cutting wood” exercise.
source
- Privacy Policy
- Copyright holders
© 2021 Attention! The information published on the site is for informational purposes only and does not constitute a recommendation for use. Be sure to consult with your doctor!
Exercises with a gymnastic stick for the arms
A gymnastic stick (body bar) is a sports instrument that is used for training in the gym and at home, as well as for therapeutic training to develop posture and strengthen muscles.
Such exercises can be performed by everyone without exception, since the gymnastic stick is considered one of the lightest sports equipment.
Rear delt stretch
You need to stand up straight and spread your legs slightly. Place your hands behind your back and hold the gymnastic stick.
The arms are slowly raised up and then returned to their original position. Do not make quick movements, as this can lead to injury.
You should do 15 repetitions. A total of 3–4 approaches are performed.
Shoulder girdle stretch
Stand up straight and place your feet wide. Take the stick in your hands with a wide grip so that your palms are facing down.
The projectile needs to be lifted up and placed a little further behind the head. At this time, the back should be extremely straight and the stomach should be pulled in. Return your hands slowly down.
Do 15 repetitions and 4 sets.
Hand raises
Holding a vertical stick with your hands, lying on your stomach, close your legs together.
First, you should raise your head up and bend strongly. Then, moving your hands along the stick, raise your body to the limit. The pelvis and legs cannot be lifted off the floor.
Hold the position for 6 - 8 seconds and slowly, lowering down, return to the starting position.
Conduct the training 15 – 20 times.
Gymnastic stick press
Stand straight and spread your legs a short distance apart. Take the stick with a reverse grip and, bending your elbows, lift the projectile to your shoulders. After this, slowly lower the gymnastic stick.
Perform 4 sets of 15 reps.
Triceps stick press
Position yourself on the floor and hold the bodybar with a straight grip, bend your knees. Raise it above your chest.
Smoothly lowering your arms, lower the projectile so that your hands stop directly above your forehead. The exercise completely repeats the French press.
Do this for 4 sets of 12 times.
Forearm exercise
Take the bodybar with a reverse grip, lift it so that the arm is bent perpendicular to the body. The projectile is held only by the hands. The next moment, unclenching your fingers, tilt the stick down and then return it to the starting position.
Do 10–12 repetitions and 3 approaches.
Lifting a gymnastic stick
Lie on the floor, holding a gymnastic stick in your hands. Perform a bench press: lift the stick straight up above your chest until your arms straighten, and then. slowly lower your hands to the floor.
Work out 4 sets of 15 lifts